고객센터

도움이 필요하세요?

설정, 활성화, 환불, 핫스팟, 데이터 로밍에 대한 답변을 찾아보세요.

자주 묻는 질문

문제 해결

기기 호환성

설치 가이드

eSIM 사용 방법

구매 및 환불

자주 묻는 질문

자주 묻는 질문 게시물 (테스트)

자주 묻는 질문 콘텐츠

문제 해결

How to Find eSIM QR Code If It’s Lost or Deleted?

If you’ve misplaced your eSIM QR code, don’t worry! There are several easy ways to recover it. You can find your eSIM QR code by checking your email, looking through a WhatsApp message, or logging into your roAmigo account on the app. Keep reading to discover how to find eSIM QR code quickly and effortlessly!


Where Can You Find the eSIM QR Code?

If you need to install your eSIM or reinstall it, but have deleted the message with the installation code, don’t worry! There are three easy ways to recover it:

  • Checking your deleted emails folder and the spam folder.
  • Review your WhatsApp messages, as the QR code may have been sent to the number you add in the purchase information.
  • Download the app to see your eSIMs and installation codes, which are available there.

Troubleshooting tips

If you haven’t found your roAmigo eSIM on your email, don’t worry! You can get your eSIM from the App just following these steps:
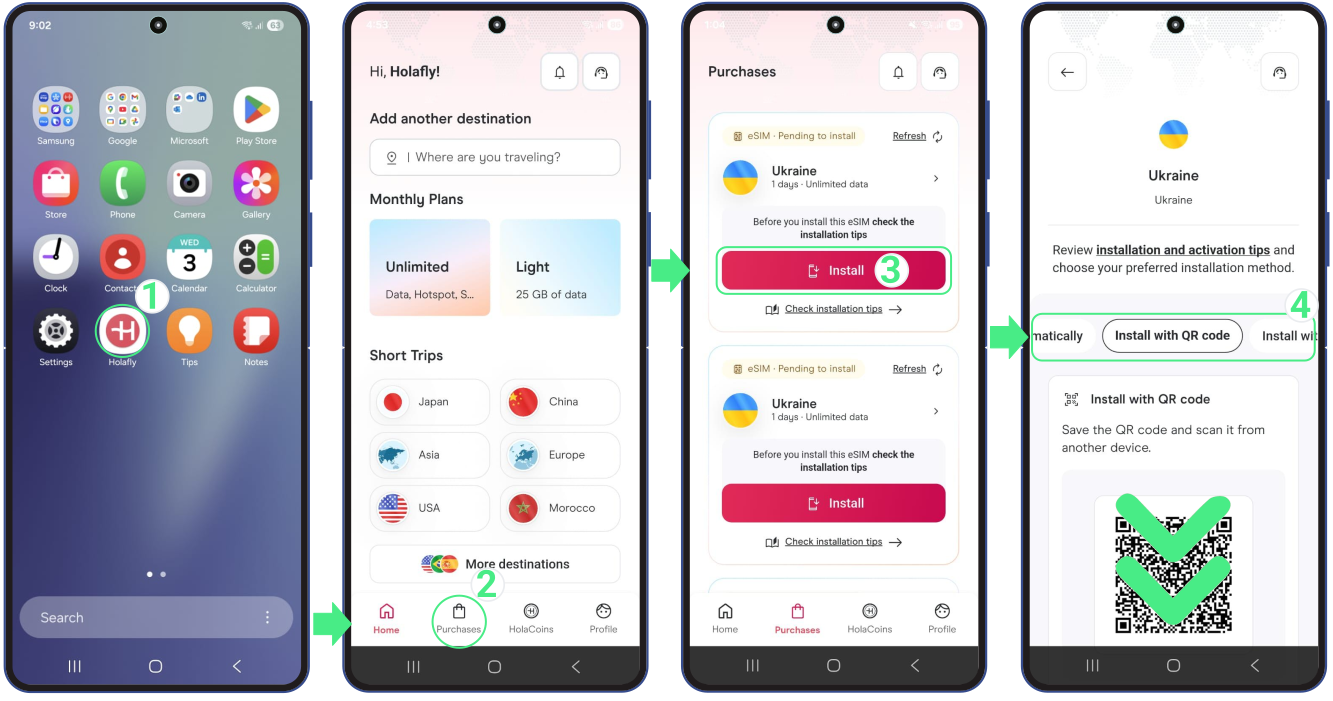

  • Open the roAmigo Website and sign in using the same email you used when purchasing → Tap on Purchase → Select the option Install of the eSIM you need to view the installation codes → In that section, you’ll see the Install automatically button for immediate installation on your device, plus the QR code and Manual codes, so you can choose the method that works best for you.

How to get the eSIM from the app

To Keep in Mind 

  • If you’re using the eSIM for the first time, install it at home or a location with strong Wi-Fi before your trip, and avoid unstable networks like those at airports or public places.
  • Whenever you need to reinstall the eSIM, use the manual codes to install it on your iOS or Android device.
  • If you have an iPhone with iOS 17 or later, you can quickly install the eSIM directly from the roAmigo website with a single tap.

Why is My Hotspot Not Working On My Android?

We understand how important it is to share internet access while traveling. If you are wondering why your hotspot is not working on your Android device, and you’re looking for solutions, you’re in the right place! This handy guide will help you troubleshoot when your hotspot is not working on Android, so you can get back online seamlessly.

Reasons Why Your Hotspot Is Not Working

There are several reasons why the mobile hotspot may not be working, and you might be having trouble sharing data on your Android. Here are some of the most common ones:


  • The “Mobile Hotspot” or “Wi-Fi Zone” option is disabled.
  • Your plan doesn’t include Hotspot.
  • You’ve reached your daily limit for data sharing.
  • Airplane mode is enabled.
  • There’s a pending Android software update.
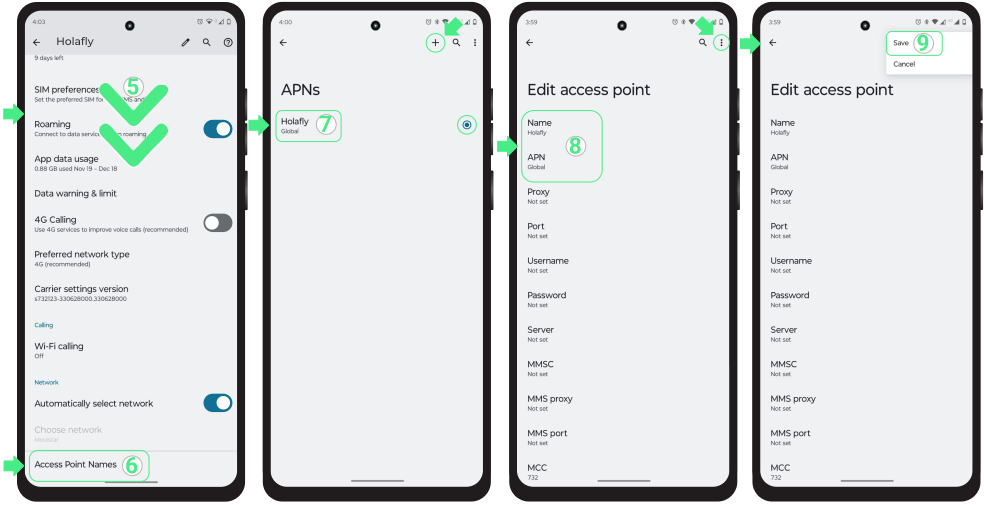
  • The APN for your eSIM might be misconfigured.
  • The mobile data signal is weak.
  • You have a different band setup than 2.4 GHz.
  • You are sharing the internet with multiple devices.
  • You could be experiencing unstable connections or interference.

Troubleshooting Tips When Your Hotspot is Not Working 

If your eSIM data plan allows hotspot usage and mobile data is working, but your hotspot is not working, follow these steps and try sharing data after each one:

On the device providing the Hotspot:

  • Disable and then re-enable mobile data.
  • Ensure that the “Mobile Hotspot” or “Wi-Fi Zone” option is enabled.
  • Make sure your Android software is updated to the latest version.
  • Check that you have a strong signal.
  • Ensure that the Power saving mode is turned off.
  • Set the hotspot band to 2.4 GHz.
  • Provide the correct Wi-Fi password for your device to share internet access.
  • Don’t leave the “Mobile Hotspot” or “Wi-Fi Zone” screen until you connect the other device to the Wi-Fi network.
  • Restart your Android device.
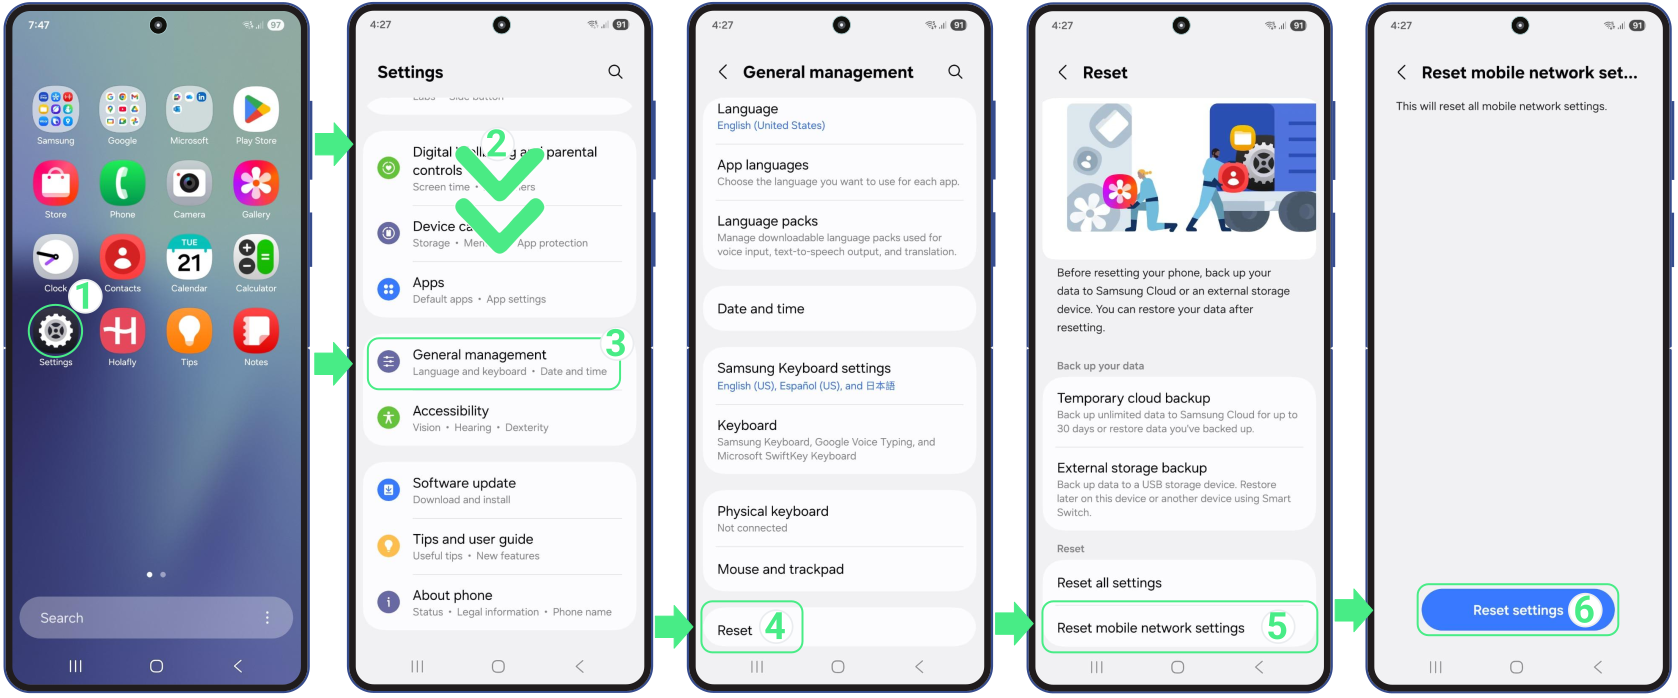
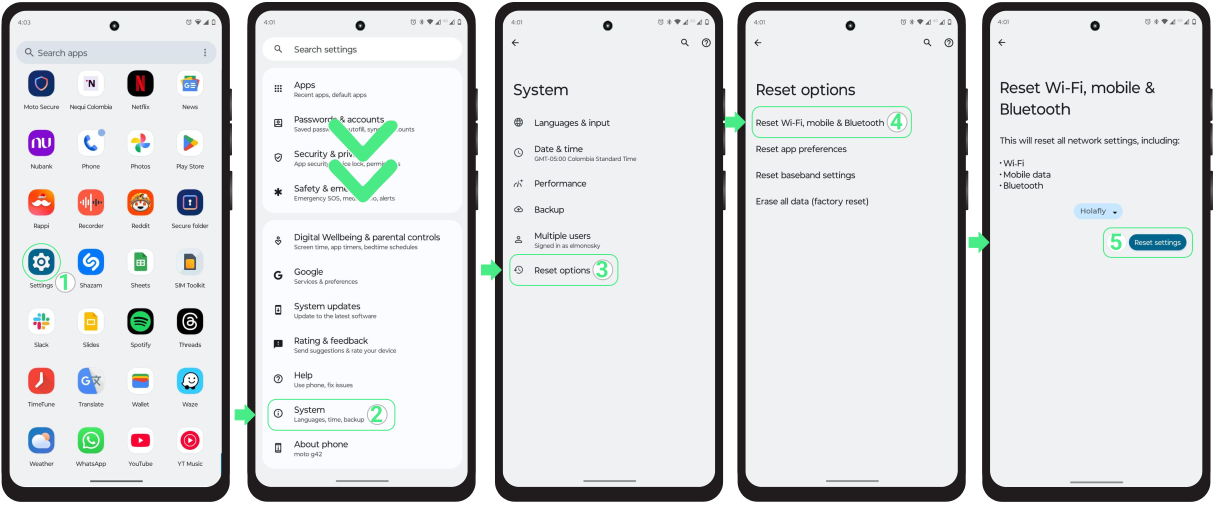
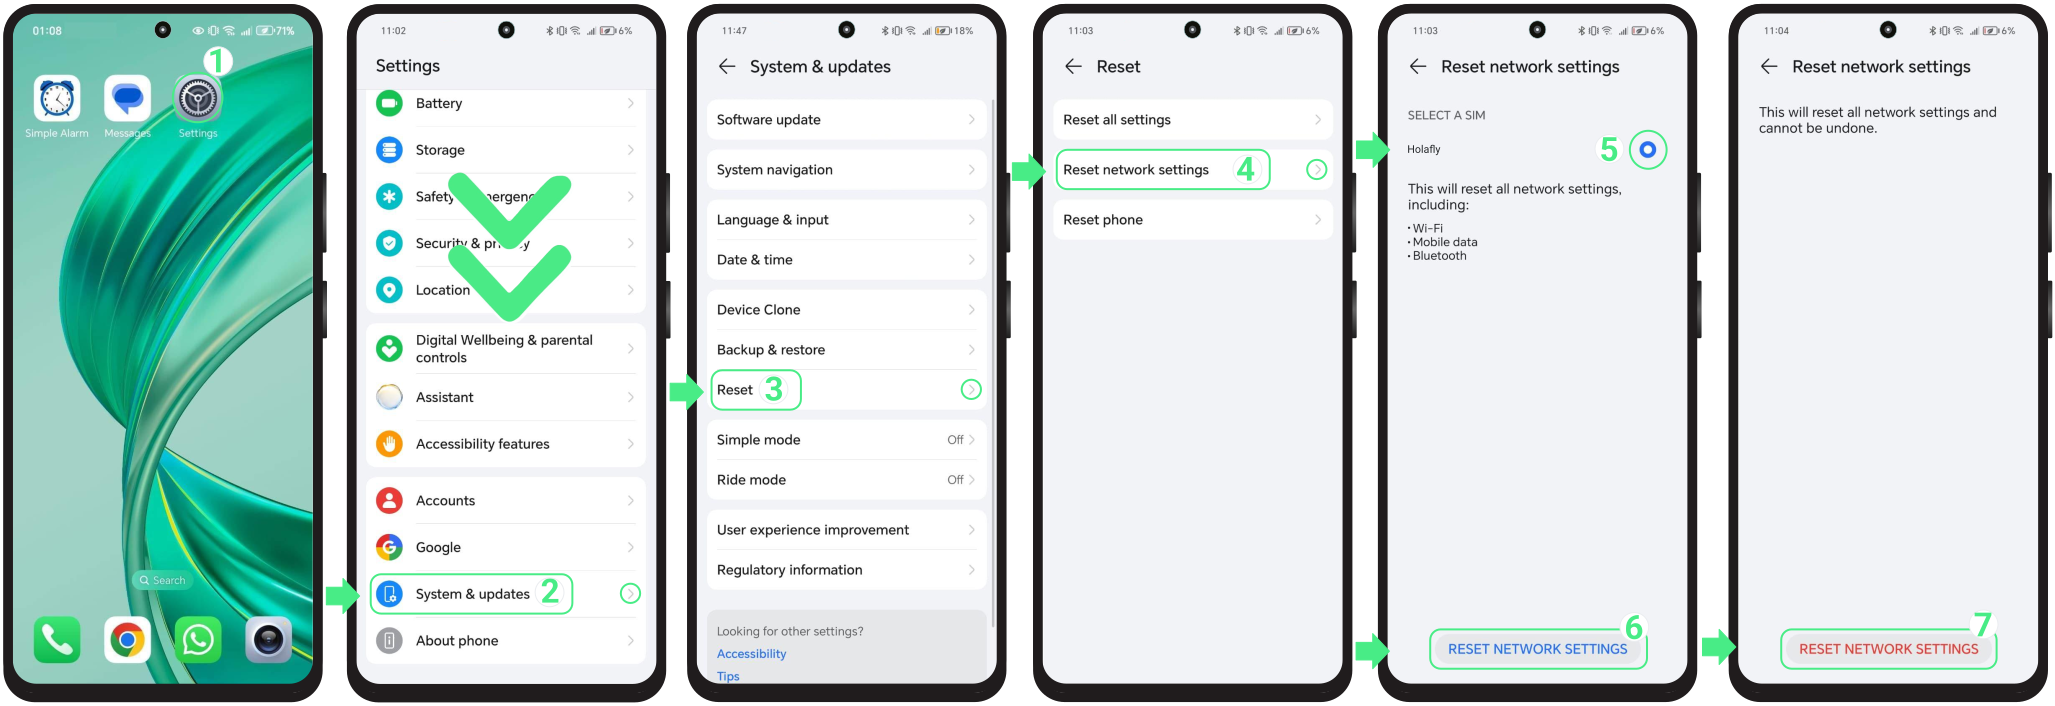
  • Reset your Android network settings.

On the device that needs to connect to the Internet:

  • Turn off Wi-Fi, then turn it back on.
  • Ensure you’re using the Wi-Fi network that matches the name of the device sharing the internet.
  • Check the Wi-Fi password if you receive a password error when trying to connect.
  • Restart the devices you are trying to connect to the Mobile Hotspot.
  • Delete the Wi-Fi profile on the connecting device and re-add it.

Steps to apply the possible solutions listed above

To check if your roAmigo eSIM allows using a hotspot:

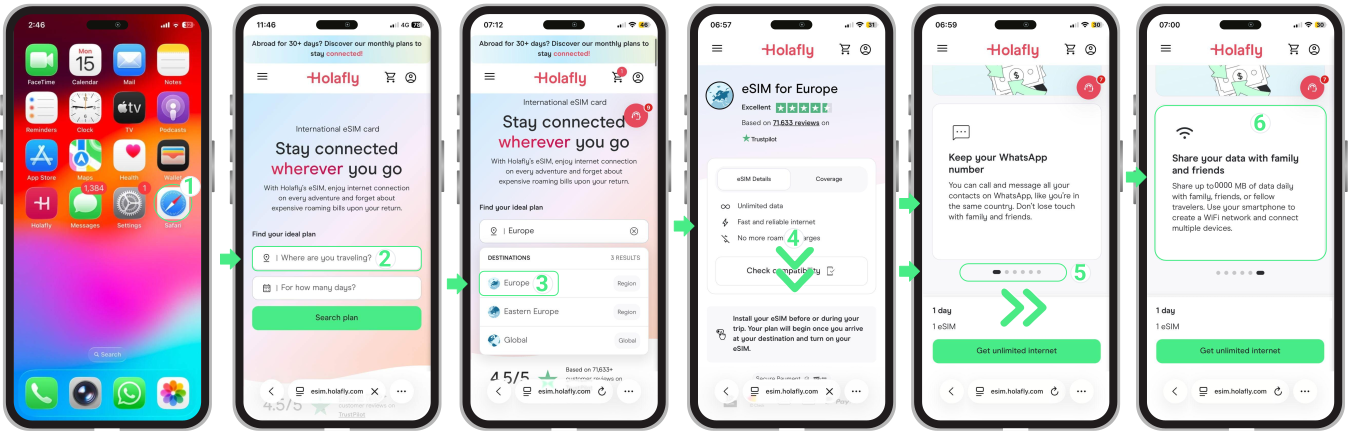
  • Type your destination into the search bar labeled “Where are you traveling?” → Then, tap the Search Plan button → Once you’re on the eSIM destination page, scroll down until you see “Advantages of using roAmigo eSIM in (your destination)” → Scroll a bit further until you see the advantage cards → Swipe left through the cards until you find the one that says “Share your data with family and friends” → There, you’ll see how much data (in MB) you can share per day.

To check If your holafly eSIM allows using hotspot:

To check that the mobile hotspot feature is ON:


  • Open Settings → Tap on Connections → Select Mobile Hotspot and Tethering → Check that the Mobile Hotspot or Wi-Fi Zone button is turned ON.

To see the Wi-Fi password and Network name, you’ve assigned to your device for data sharing, tap on Mobile Hotspot.


Try sharing data after enabling the Mobile Hotspot or Wi-Fi Zone option.
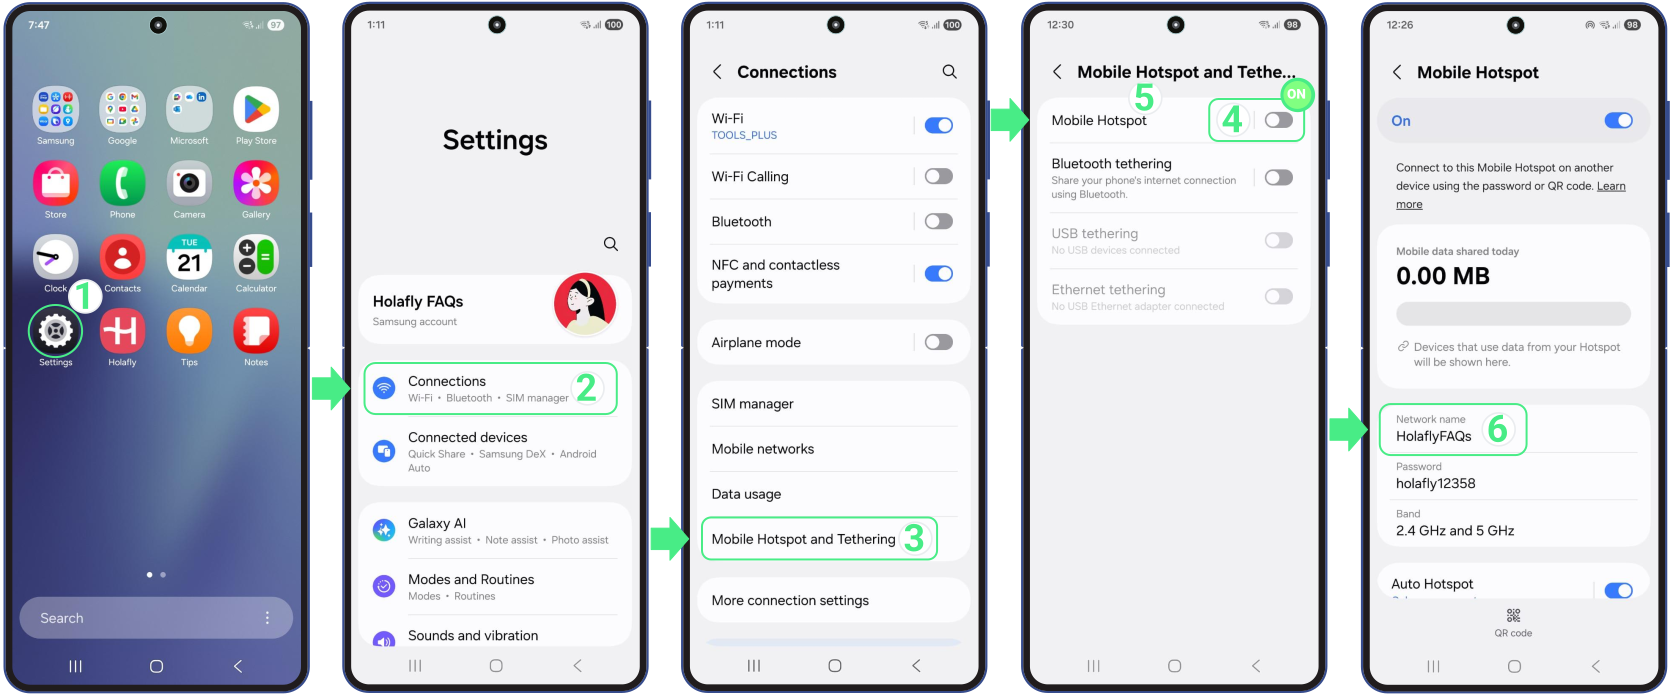

To check that the mobile hotspot feature is ON:

Why set up the hotspot band?

Configuring the right band can significantly improve the speed and stability of your mobile hotspot, especially if you’re wondering, “Why isn’t my hotspot working?” In many cases, switching to the 2.4 GHz band is the better option, as it’s compatible with older devices and offers greater range, allowing the signal to pass through walls and other obstacles more effectively.

To set up the hotspot band:

  • Open Settings → Tap on Connections → Select Mobile Hotspot and Tethering → Turn Mobile Hotspot (or Wi-Fi Zone) ON → Tap on Mobile Hotspot → Check your Network name and Password → (Optional) Tap Configure Mobile Hotspot → Edit name/password or Band → Tap Save → Try sharing data again.

To disable power saving mode on your Android:

  • Go to Settings → Tap on Battery → Scroll down → Power saving and toggle the switch OFF.To disable power saving mode on your Android:

To reset network settings on your Android:

If the suggested steps still don’t help and the hotspot is not working on your Android, try resetting your network settings to clear any corrupted data that could be affecting your eSIM. 
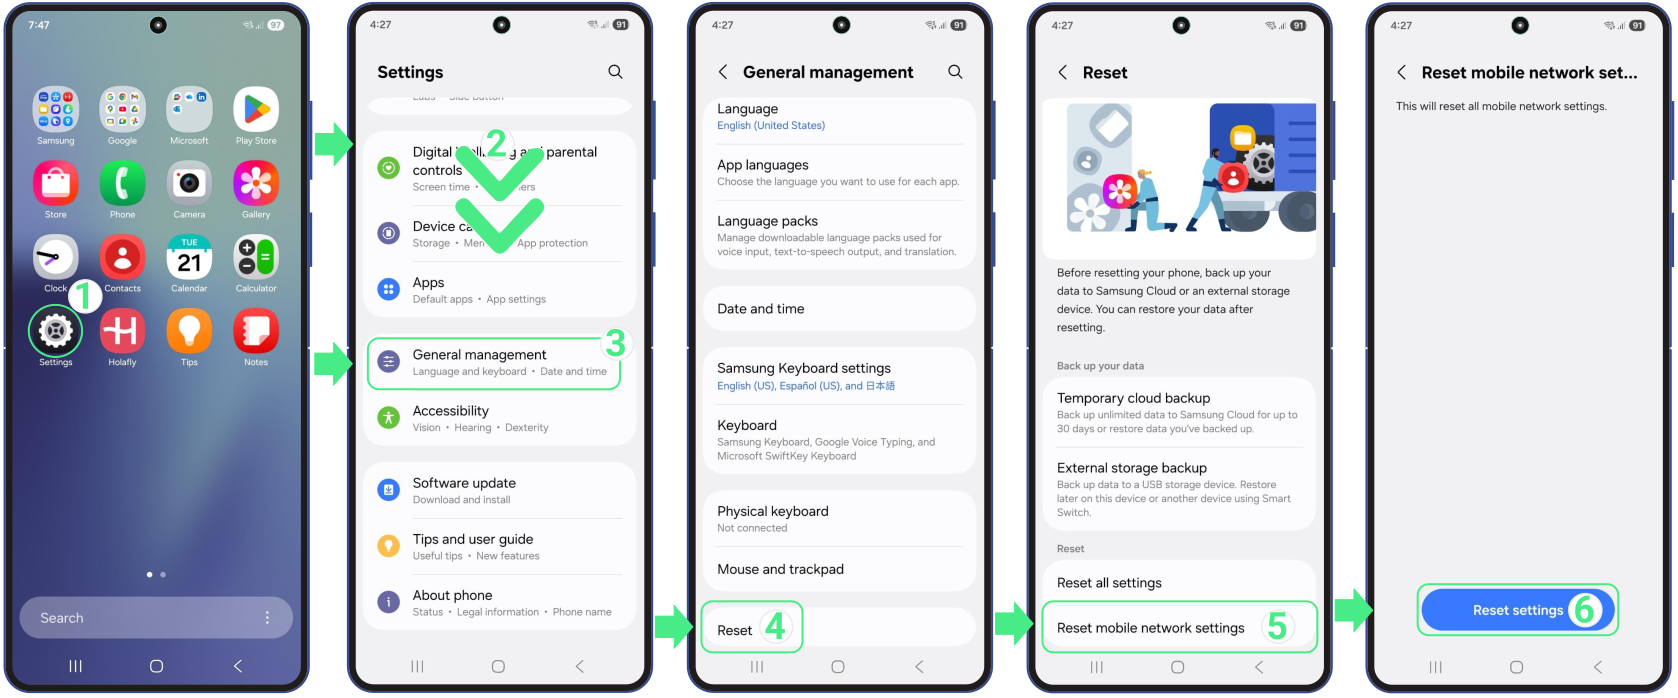
  • Go to Settings → Scroll down → Select General management → Then on Reset → Choose Reset mobile network settings (If you’re prompted to enter a PIN, enter the code you use to unlock the screen and tap Next) → Confirm your selection with the Reset settings option.

To reset network settings on your Android:

To check if your Android is running the latest version of Android:

  • Go to Settings → Scroll down → Click on Software Update → Tap Download and Install → If you haven’t updated to the latest version of Android and your hotspot is not working, please click on Install Now. Sometimes, updates can fix bugs that prevent data sharing.

To check if your Android is running the latest version of Android:

  • Try sharing data again after updating your Android software.

How to download the roAmigo invoice?

How to download the roAmigo invoice?

If you’re wondering how to see your roAmigo invoice, the process is easy and quick. Simply fill out the form with your details, and you’ll receive your roAmigo invoice right away at the email you provided. Just a heads-up, the invoice is a formal payment request, while the receipt confirms your payment. If you need to download your roAmigo invoice or check the receipt, we’ll guide you through the process easily.

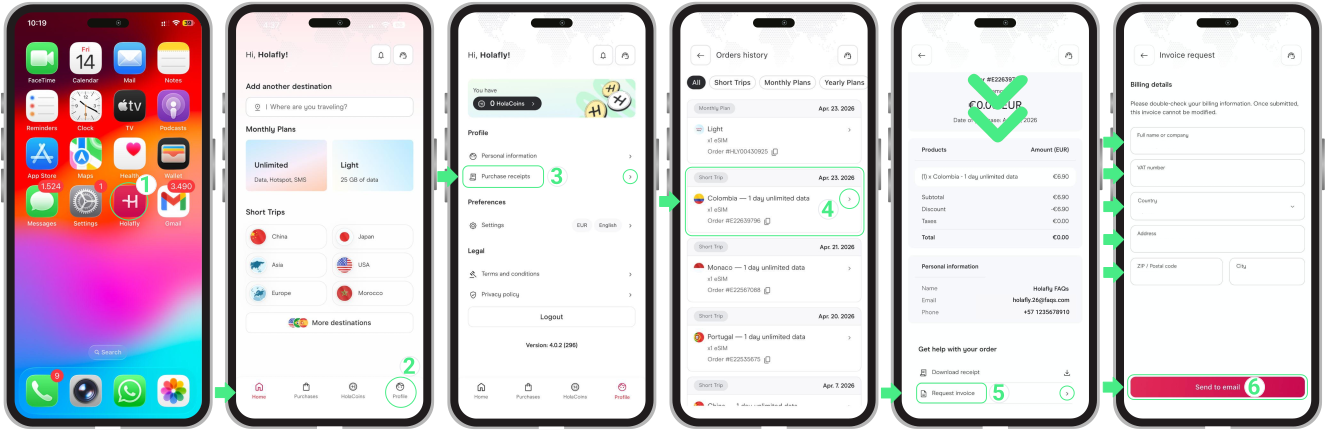
To download your roAmigo invoice:

  • Go to the roAmigo Website → Tap on Profile → Tap on Purchase receipts → Select the order for which you need the invoice → Scroll down to the Get help with your order section and choose Request Invoice → Review your information before submitting the request (you can modify it if needed) → Finally, tap Send to email.

To Download Your Holafly Invoice:

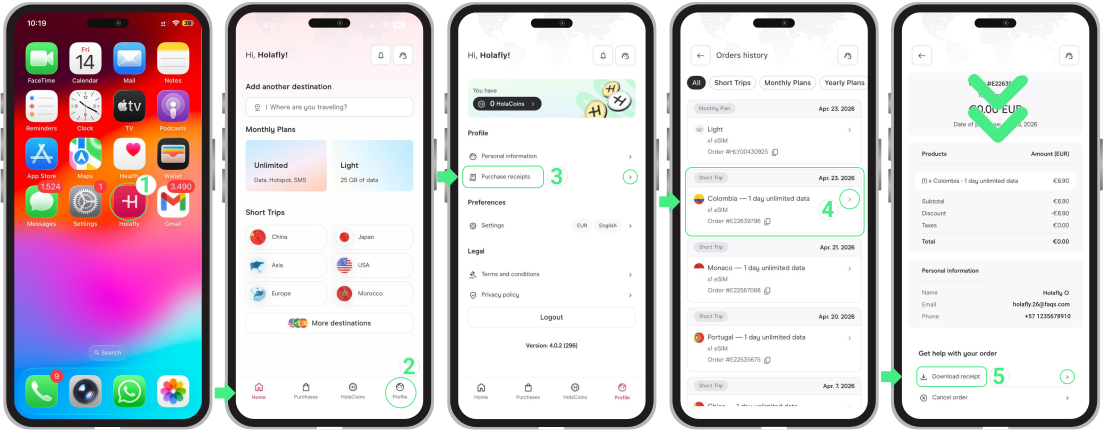
To access your roAmigo purchase receipts:

  • Go to the roAmigo Website → Tap on Profile → Tap on Purchase receipts → Select the order for which you need the receipt → Scroll down to the Get help with your order section and choose Download receipt → Choose a location to save the file. 

To Access Your Holafly Purchase Receipts:

To keep in mind

  • If you need to make any changes to your roAmigo invoice, please contact us with the necessary details at roamigo@roamigoesim.com
  • If you’re no longer a roAmigo customer but need an invoice or receipt, you can still access your account using the same purchase email.
  • Make sure to fill in your personal information accurately to avoid delays in receiving your invoice.
  • Your invoice will be sent to the provided email in PDF format.

What to Do If iMessage Is Not Working With an International eSIM?

Using iMessage on your iPhone while traveling helps you avoid SMS roaming fees. If iMessage isn’t working after switching to an international eSIM, you might be asking, “Why is my iMessage not working?” This article will guide you on how to activate iMessage with an international data-only eSIM, so you can keep chatting seamlessly.


Common Reasons Why Is iMessage Not Working

If you have only data eSIM and your iMessage is not working after activating an eSIM, several common issues could be at play. Let’s look at these factors to help you troubleshoot and restore your iMessage functionality.


  • Your eSIM may be set up incorrectly.
  • You haven’t activated your Apple ID email in iMessage.
  • You’re not connected to mobile data or Wi-Fi.
  • iMessage is not enabled on your device.
  • You haven’t correctly activated iMessage for use only with data or Wi-Fi.
  • Your primary number is selected for sending and receiving messages.
  • The international network you’re on has restrictions.
  • Your time zone may be misconfigured for the city or country you’re in.
  • Your iPhone is not updated to the latest version of iOS.

Steps to Troubleshoot and Resolve iMessage Issues

If your iMessage isn’t working while you’re abroad, understanding the causes can help you troubleshoot. Whether it’s an eSIM setup issue or trouble staying connected, let’s explore how to resolve iMessage not working on your iPhone and ensure it’s activated for seamless communication.


1. Check if Your iMessage is Correctly Activated 

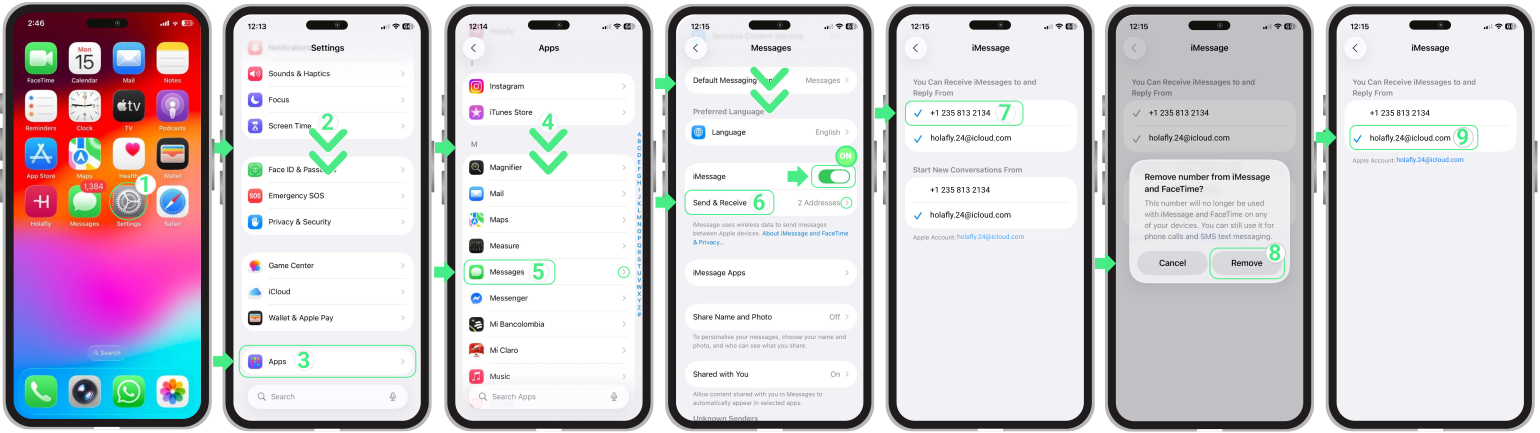
To use iMessage with an International eSIM or only data eSIM, it’s always important to verify that your iMessage is correctly activated, if you are not sure if your iMessage is properly activated, follow these steps:


  • Go to Settings → Scroll down → Tap on Apps → Scroll down → Select Messages → Ensure that iMessage is turned on →Tap Send & Receive → Deselect your phone number → Tap Remove to confirm and unlink your number from iMessage and FaceTime → Now, your iMessage is set up with your email address, allowing you to send and receive messages using mobile data. Make sure the selected email is the one linked to your Apple ID.

To use iMessage with an International eSIM or only data eSIM, it’s always important to verify that your iMessage is correctly activated, if you are not sure if your iMessage is properly activated, follow these steps:
Go to Settings > Scroll down > Tap on Apps> Scroll down > Select Messages > Make sure iMessage is turned on > Then tap on Send & Receive > Deselect your phone number > Click on Remove to confirm to remove the number from iMessage and FaceTime> Now your iMessage is set up with your email address, allowing you to send and receive iMessages using just a data connection.

2. Send and receive messages through your Apple account email

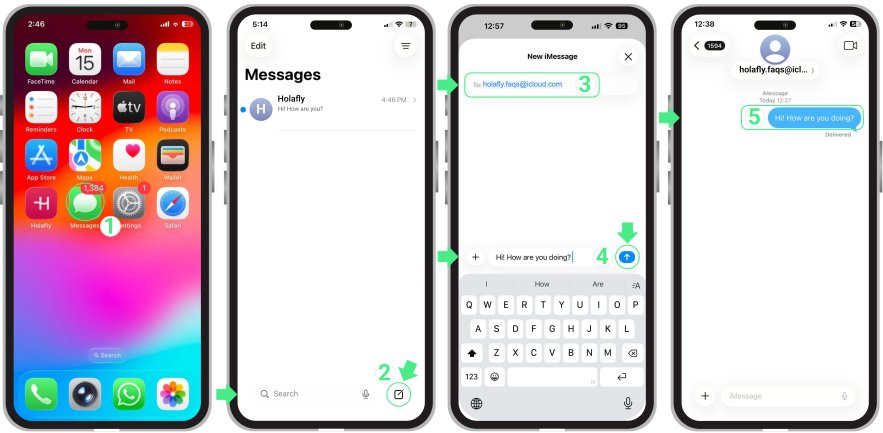
If you can’t send or receive iMessages because you’re traveling abroad, don’t worry! You can still stay in touch without extra carrier fees. Instead of using your phone number, send messages over Wi-Fi or mobile data by texting your friends at the email linked to their Apple ID. They can reply the same way, using the email registered with your iPhone. Follow these simple steps: 


  • Open the Messages app → Tap the icon to create a new message in the top right corner → In the ‘To‘ field, enter the recipient’s Apple email → Type your message in the bottom bar → Tap the upward arrow to send it. And that’s it! Your message should be sent as an iMessage, appearing in a blue bubble.

Send and receive messages through your Apple account email

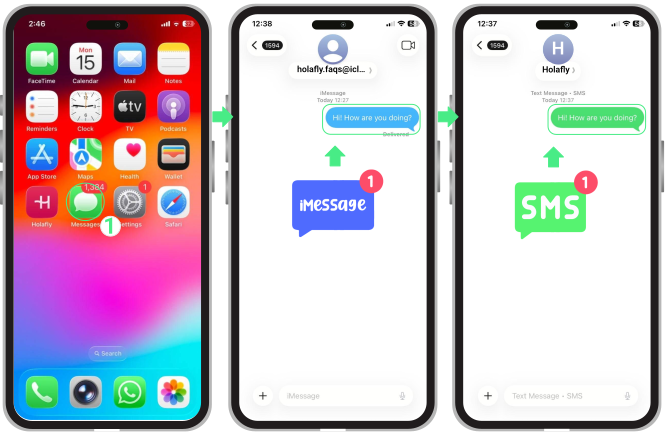
3. Identify that your messages were sent as iMessage:

iMessage works over an internet connection, so you can avoid SMS charges and carrier fees while traveling. By ensuring your messages are sent as iMessages, you’ll enjoy smooth communication. Here’s how to check if your messages are sent as iMessage or SMS on your activated eSIM:


  • Open the Messages app → Send a message, and if it appears in a blue bubble, it was sent as an iMessage. If it’s in a green bubble, it was sent as an SMS, which may incur charges from your carrier.

Identify that your messages were sent as iMessage or regular SMS

4. Set the time zone on your iPhone:

Setting the correct time zone is vital for iMessage to ensure messages are sent and received at the right times. A misconfigured time zone can cause delays or missed messages, especially when traveling internationally. Here’s how to set it on your iPhone:


  • Go to Settings → General → Date & Time → Time Zone → Tap the search bar → Type the country or city you’re in → Select the correct location.

Set up the correct zone time on your iPhone:

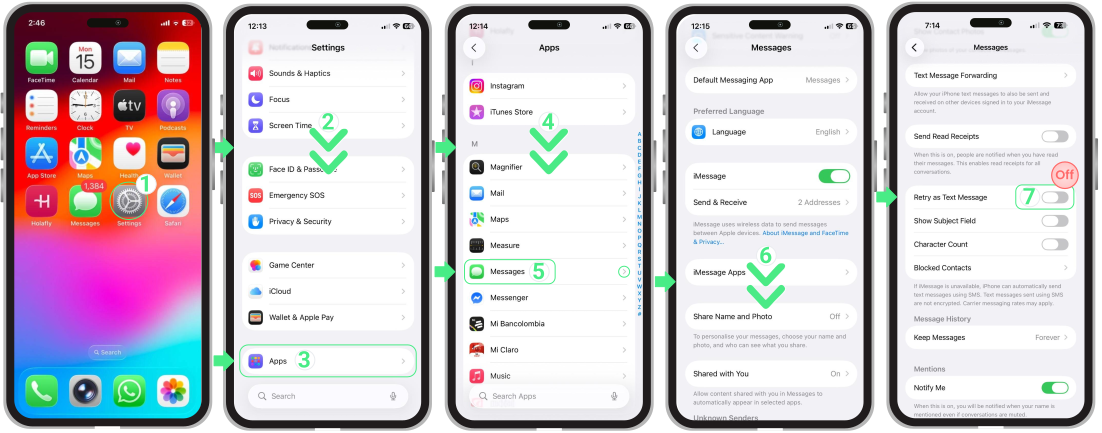
5. Disable sending messages as SMS:

Disabling SMS for iMessage when using an international data-only eSIM is crucial to avoid unexpected charges and ensure all messages go through the Internet. This lets you enjoy iMessage features while traveling. Here’s how to set it up on your iPhone:


  • Go to Settings → Scroll down → Tap on Apps → Scroll down → Select Messages → Scroll down →  Tap on Retry as Text Message → Toggle the button off.

5. Disable sending messages as SMS:

To Keep in Mind:

  • roAmigo’s eSIM doesn’t support text messages.
  • If you send a message in a green bubble while using data-only eSIM abroad, your primary SIM is active, which may incur additional charges. Disable it to avoid fees. 
  • When using iMessage with the international eSIM, you can only message other iPhone or iOS users. 
  • To switch back to iMessage with your primary SIM, follow the same activation steps and verify your number again.

How to fix mobile data not working on Android

If your mobile data isn’t working on Android, turn Airplane Mode ON, wait 10 to 15 seconds, and turn it back OFF. This can help refresh your network connection. If you’re traveling internationally, make sure Data Roaming is turned on. Below, you’ll find key settings to review and step-by-step solutions to help you get back online. 

Common reasons mobile data isn’t working on Android

  • Your phone may simply need a few minutes to connect to the new network after you activate your eSIM.
  • A lock from your original phone company might prevent you from using mobile data on other networks, even if your device supports eSIMs.
  • Having two SIM lines active at the same time can affect your mobile data connection when your phone tries to choose a data line.
  • An incorrect setting, an outdated Android version, or an incomplete eSIM activation may prevent your phone from connecting to the internet. 
  • A data usage limit enabled on your phone can stop mobile data from working, even if your eSIM plan is active.
  • A weak signal in remote areas (like deserts, mountains, or open waters) or a crowded network in places like concerts, stadiums, and festivals can temporarily slow down your connection.

Quick fixes to restore service on Android

These basic checks often bring mobile data back on your Android device without requiring bigger changes.


  • Check your eSIM settings. Make sure your eSIM is turned on and selected for mobile data. If you are traveling, also turn on Data Roaming for that line.
  • Turn Airplane Mode on for 15 seconds, then turn it off. This prompts your phone to reconnect to the nearest network.
  • Turn off any other SIM lines. Keep only the eSIM you want to use for mobile data turned on. 
  • Restart your phone. Turning it off and back on can help refresh your connection. 

Troubleshooting tips

If mobile data still isn’t working after the basic checks, don’t delete your eSIM, as you might not be able to reinstall it, and try these settings to get your Android back online.


Note: Verify your eSIM is installed and activated correctly before troubleshooting your mobile data. If you’re unsure how to set up your eSIM on your Samsung, Google Pixel,Huawei, Xiaomi, Honor, Vivo, Motorola,Nokia,Sony, or OnePlus, check the activation steps for your specific  model. 

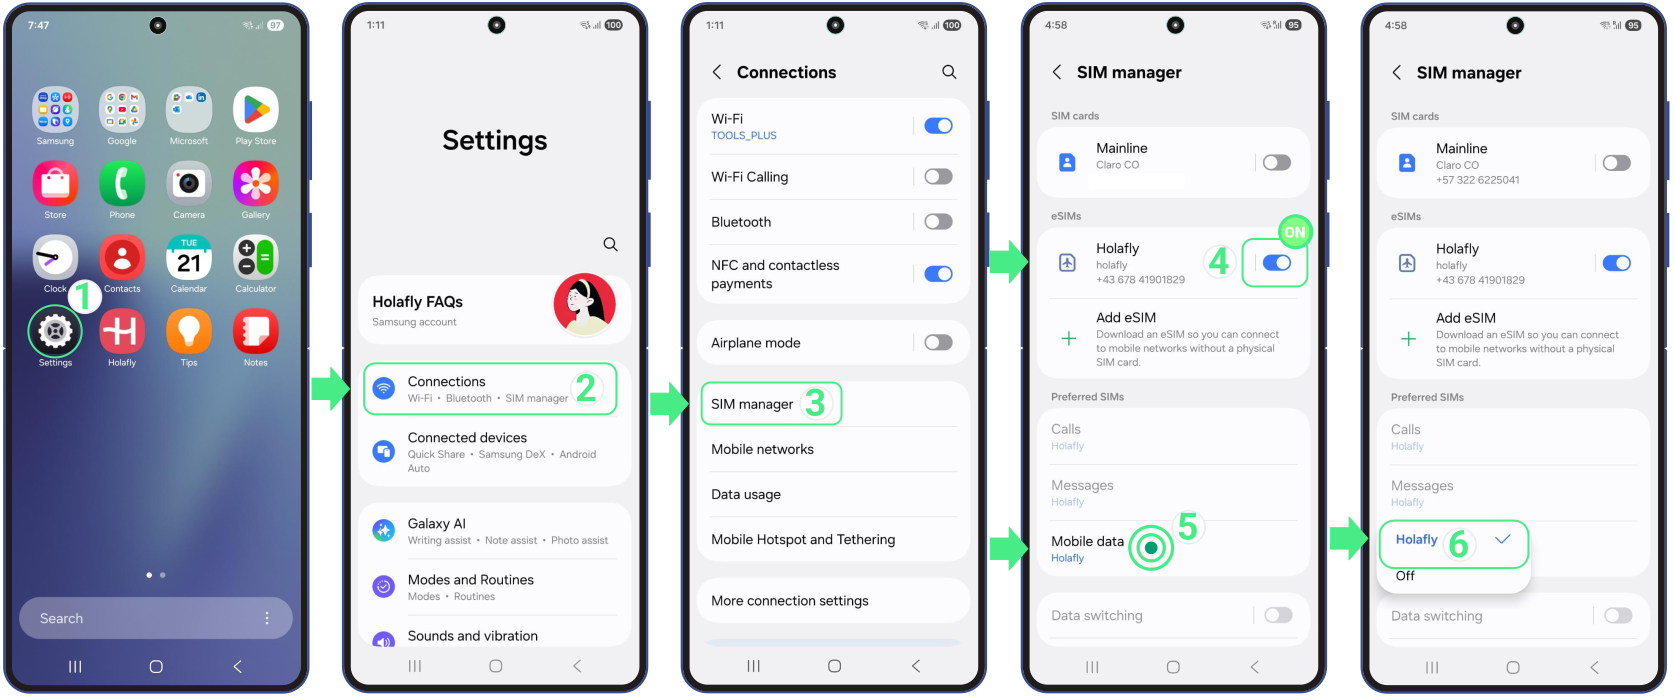
1. Set your eSIM for mobile data

To get online, make sure your eSIM is selected for mobile data. If your primary SIM is still selected, your phone may use that line instead. 


Follow these steps to set it up correctly:


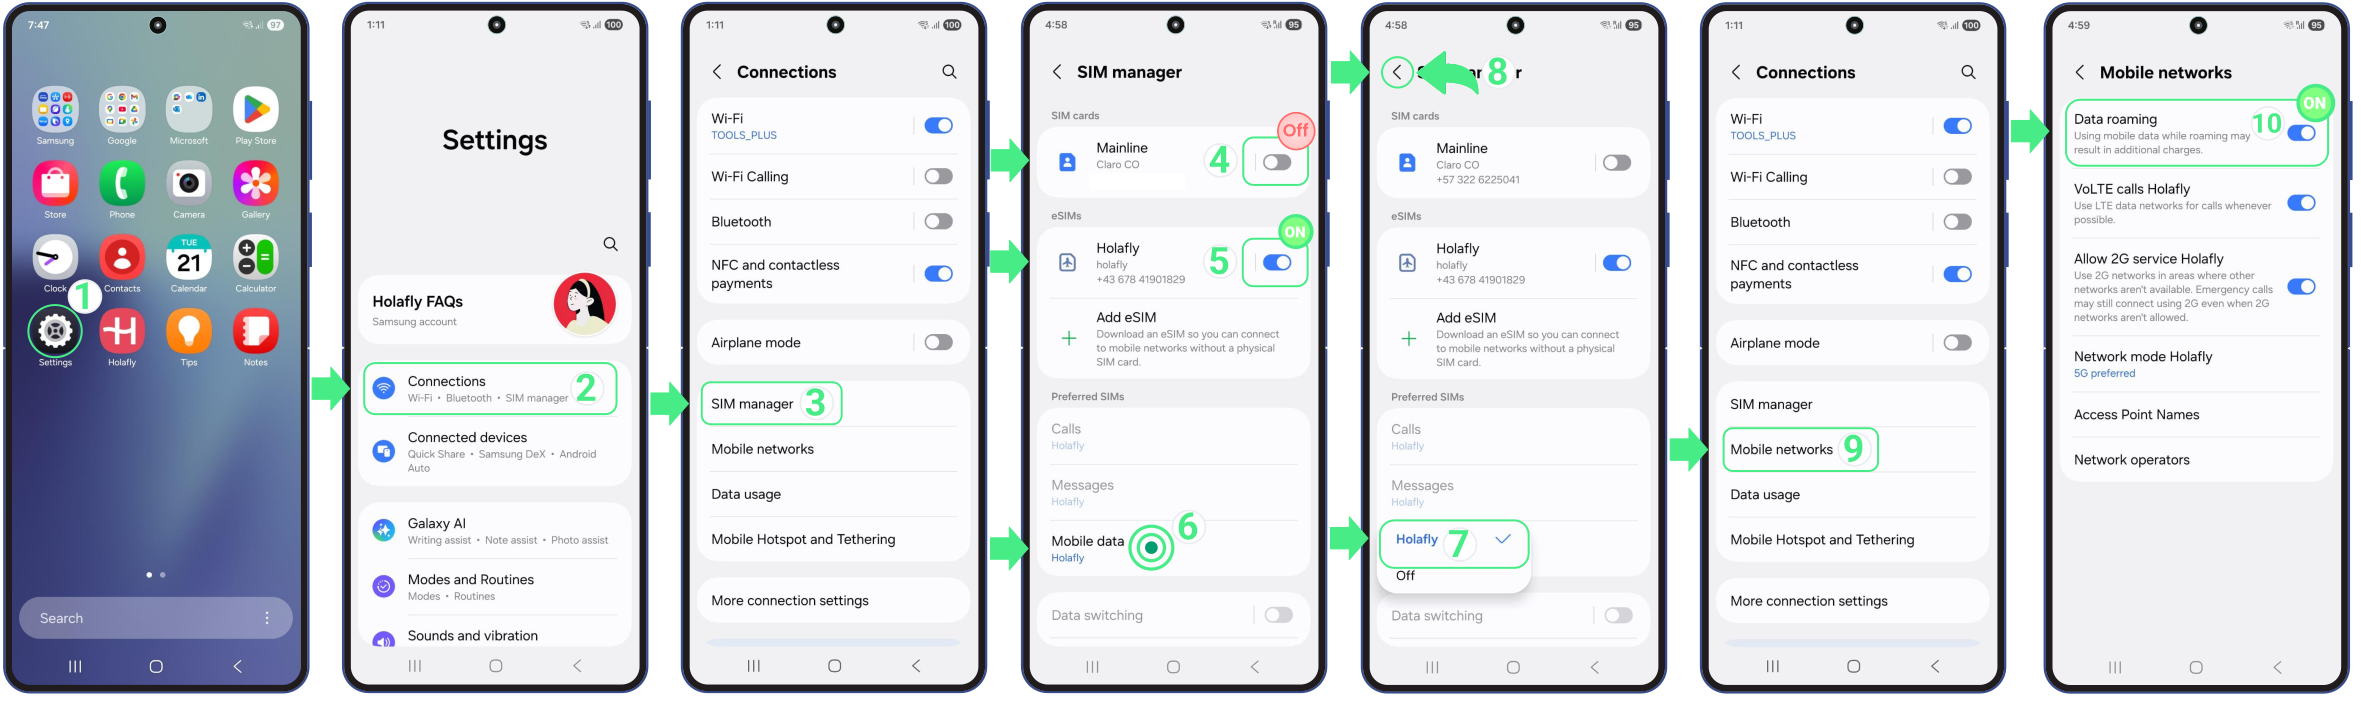
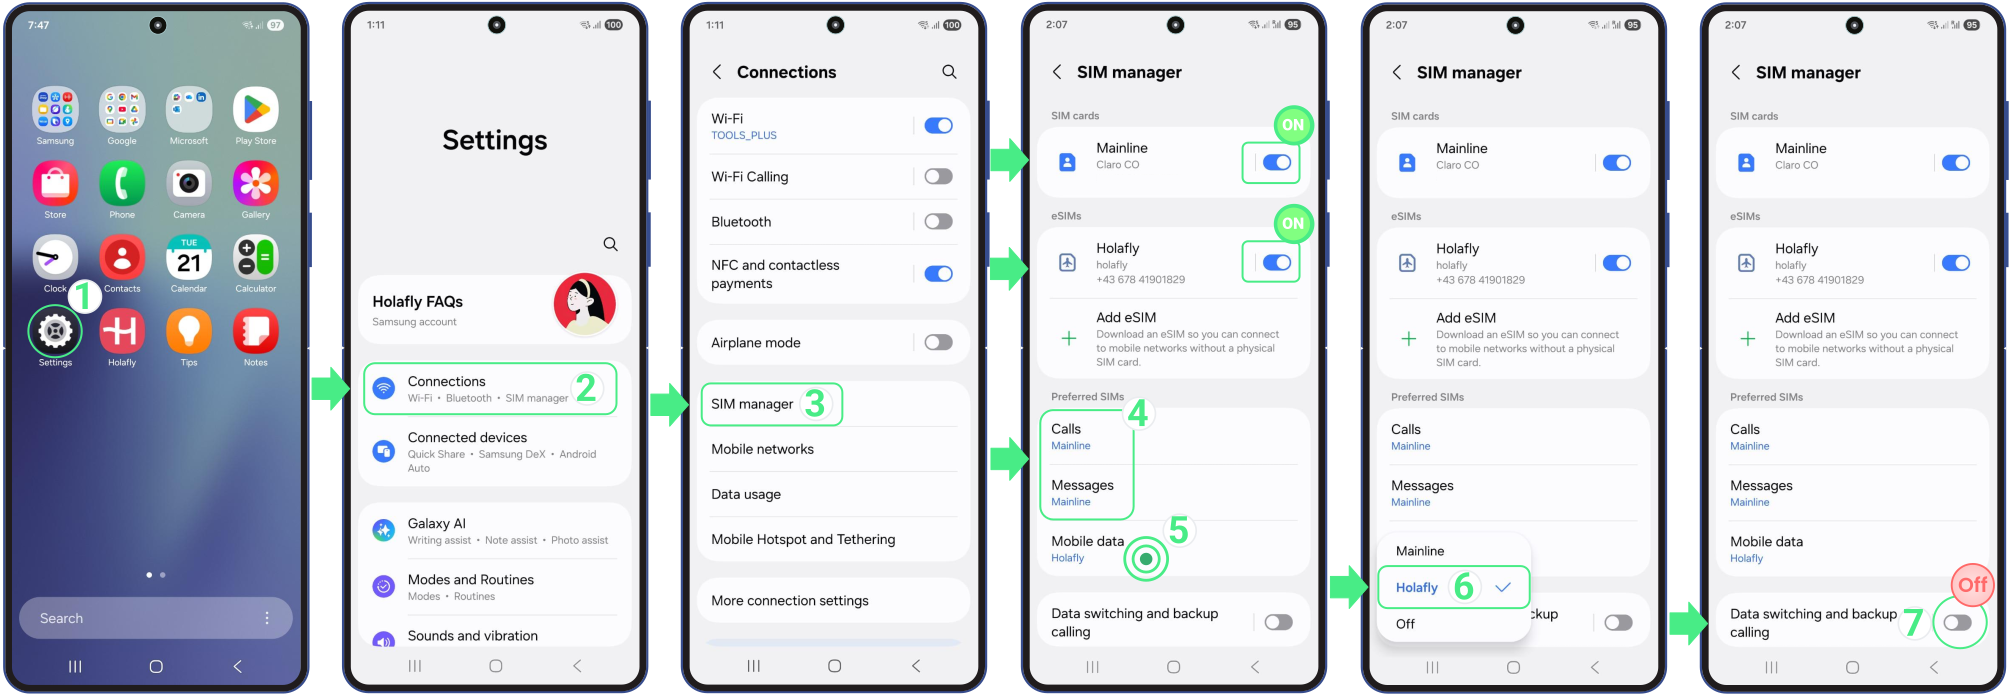
  • Go to Settings → Tap Connections → Select SIM manager → Turn on your new eSIM →Tap on Mobile data and select your data-only eSIM.

Important: If you are traveling and using an international eSIM, we recommend turning off your personal SIM line to avoid unexpected roaming charges from your home carrier.


1. Set your eSIM for mobile data

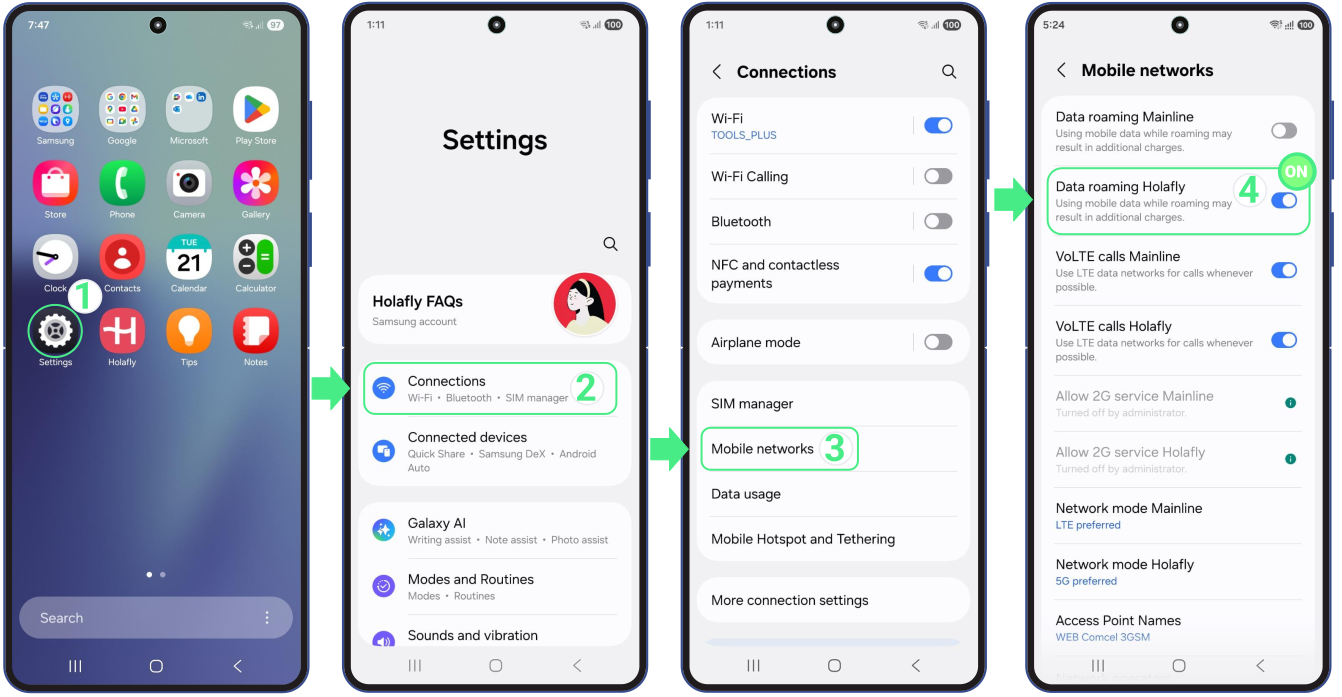
2. Enable data roaming on Android

This setting is needed only for your travel eSIM, not for your personal line. Because your international eSIM connects to networks outside your home country, you need to turn on Data Roaming to get mobile data while traveling. 


Once your eSIM is turned on and selected for mobile data, follow these steps:


  • Go to Settings → Tap Connections → Tap Mobile networks → Turn Data roaming ON (Make sure you are enabling it specifically for the Travel eSIM).

2. Enable data roaming for eSIM on Android

Note: Menu names may vary slightly depending on your phone brand. If you don’t see “Connections”, look for Mobile Network, Mobile Data or Network and Internet in your Settings to find the Roaming switch.

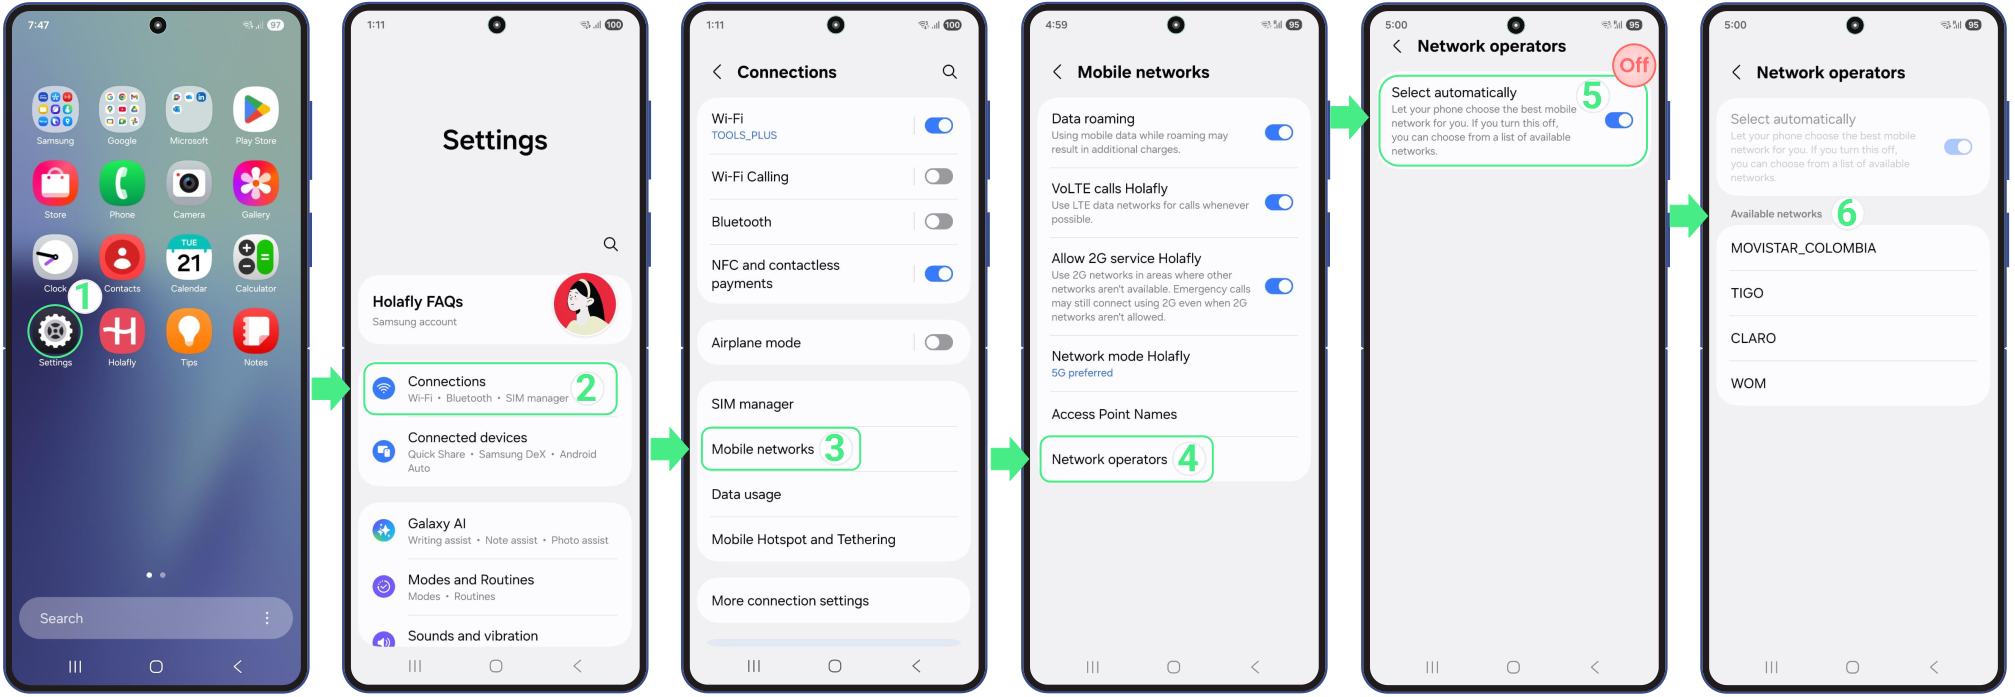
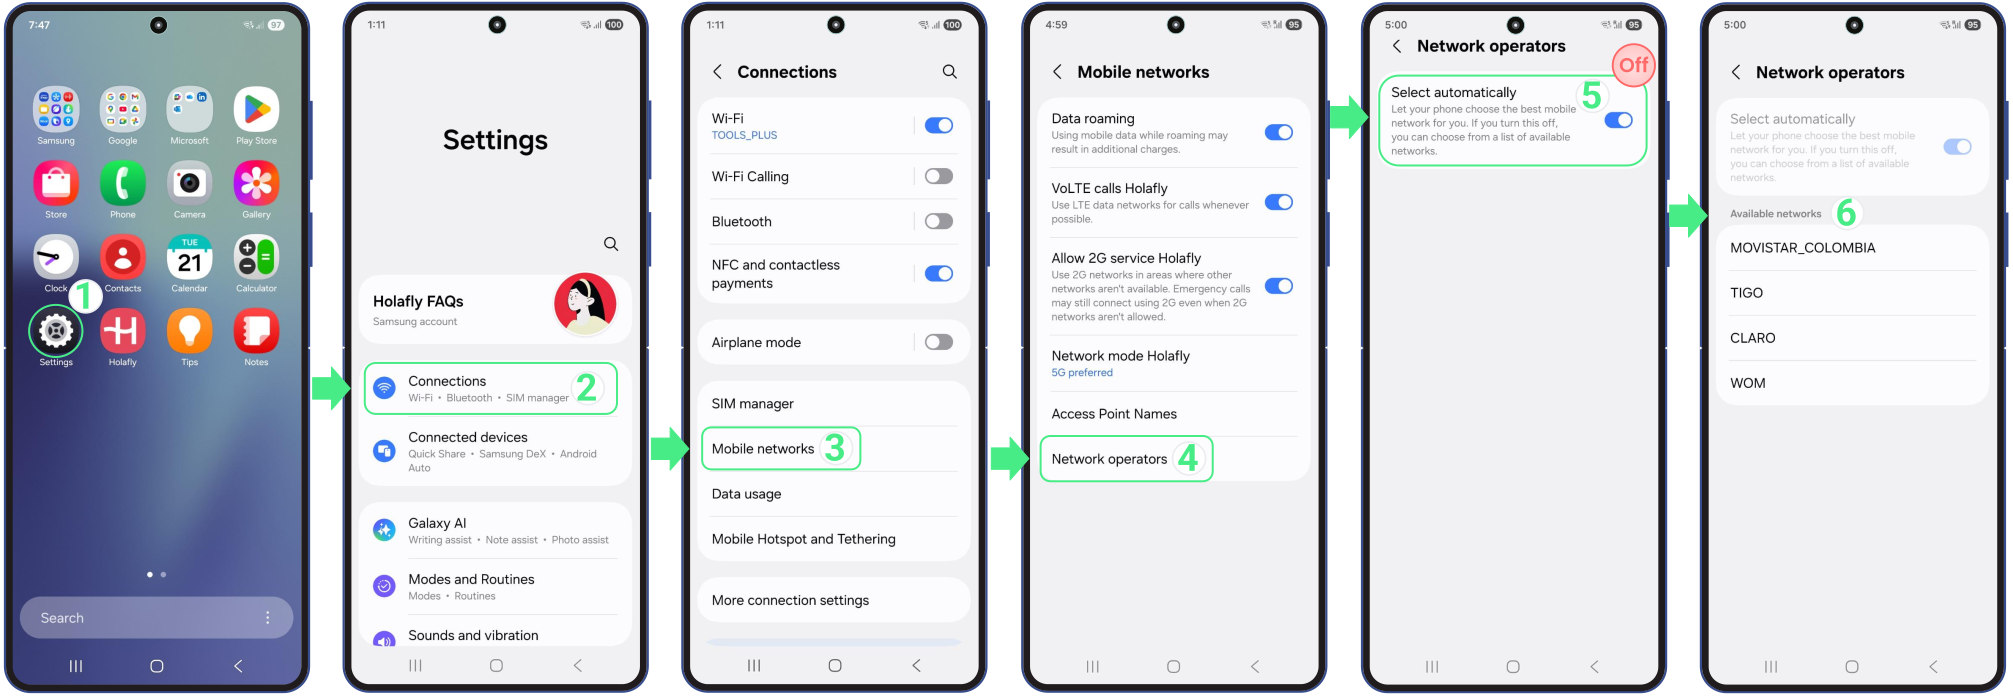
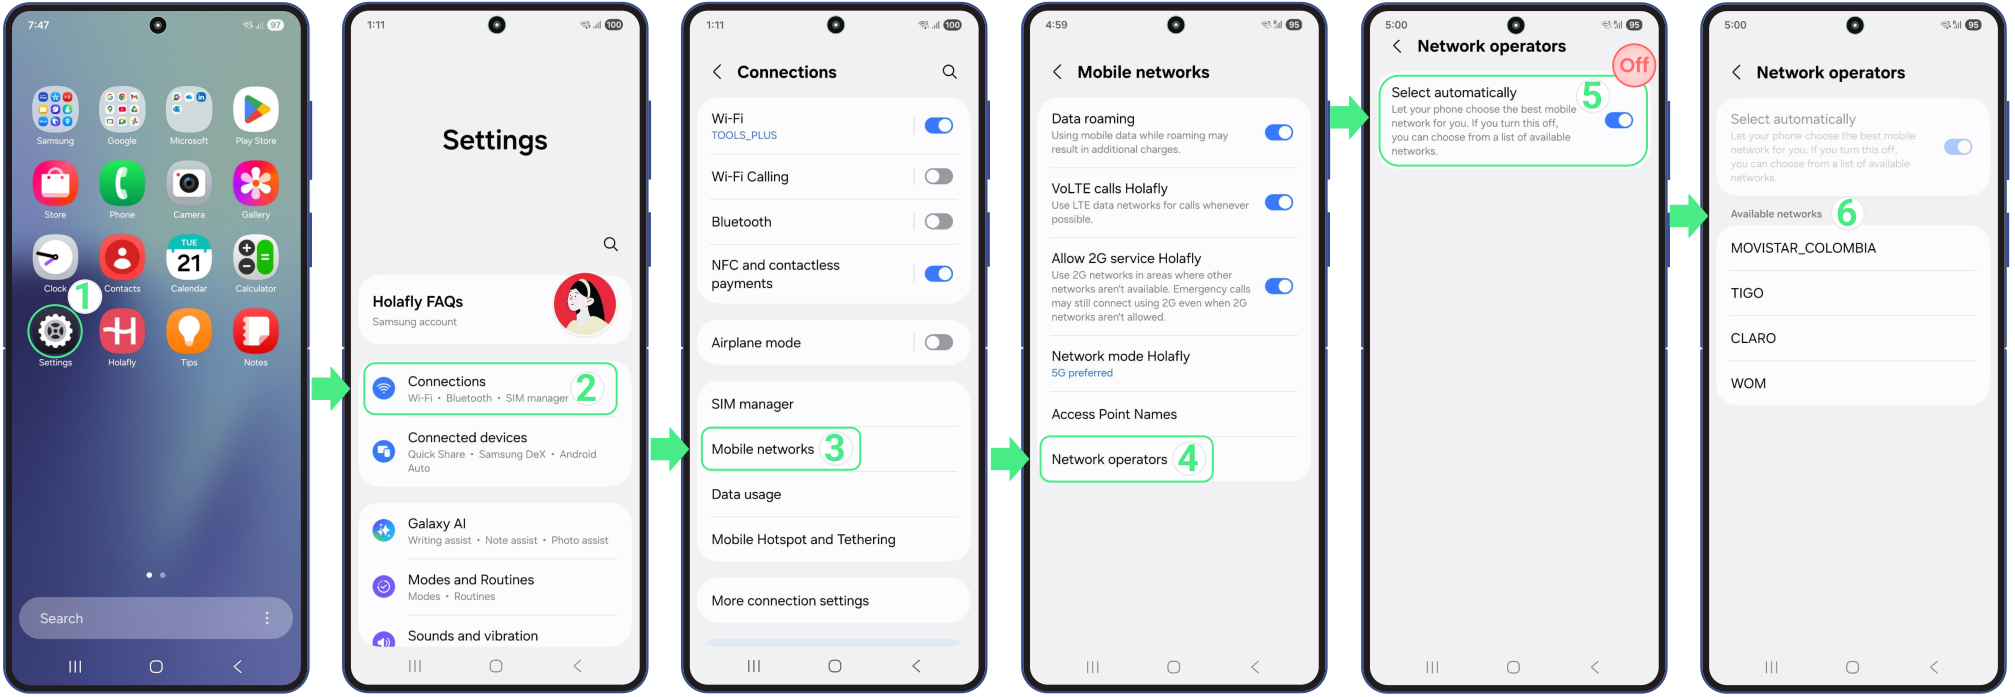
3. Manually select a network operator

If your mobile data isn’t working on your Android, you can also manually choose a local network for your eSIM instead of letting your phone select one automatically. 


  • Go to Settings → Tap on Connections → Select Mobile networks → Choose Network operators → Disable the Select automatically option and wait a moment while the available networks load on your screen → Then try one by one all the operators listed (each time you select one, wait 30 seconds while it connects to the network) → Choose the operator with the best signal for you → Test your network.

2. Manually select a network operator

Note: If you want to know which specific operator to connect to, go to our website, search for the country you are in, and check the Coverage and Network sections to see all compatible networks for your mobile plan.

4. Reset network settings

Use this option to clear connection errors that may be blocking your internet. It only resets your network settings, such as Wi-Fi and Bluetooth and won’t delete your photos, contacts, apps, or eSIM. 


  • Go to Settings → Scroll down → Select General Management → Then on Reset → Choose Reset mobile network settings (if you’re prompted to enter a PIN, enter the code you use to unlock your screen and then tap Next) → Confirm your selection with the Reset settings Button.

4. Reset network settings

Is Your iPhone Hotspot Not Working? Here’s How to Fix It

We understand how important it is to share internet access while traveling. If your iPhone hotspot is not working, and you’re looking for solutions, you’re in the right place! This handy guide will help you troubleshoot when your hotspot is not working, so you can get back online seamlessly.

Reasons Why Your Hotspot Is Not Working

There are several reasons why your hotspot might not be working on your iPhone. Here are some of the most common ones:

  • The option ¨Allow Others to Join¨ on your iPhone is turned off.
  • Your plan doesn’t include Hotspot.
  • You’ve reached your daily limit for data sharing.
  • Airplane mode is enabled.
  • There’s a pending iOS software update.
  • The APN for your eSIM might be misconfigured.
  • The mobile data signal is weak.
  • You are sharing the internet with multiple devices at the same time.
  • Some devices may not be compatible with the frequency band used by your iPhone.
  • You could be experiencing unstable connections or interference.

Troubleshooting Tips When Your Hotspot is Not Working 

If your eSIM data plan allows hotspot and mobile data is working, but your hotspot is not working, follow these steps and try sharing data after each one: 

On the device providing Hotspot:

  • Turn off and then turn on your mobile data.
  • Make sure “Allow Others to Join” is enabled.
  • Ensure you have the latest version of iOS.
  • Check that you have a strong signal.
  • Provide the correct Wi-Fi password for your device to share internet.
  • Enable “Maximize Compatibility” if you have an iPhone 12 or later.
  • Don’t leave the “Personal Hotspot“ screen until the other device is connected to the Wi-Fi network.
  • Restart your iPhone.
  • Reset your iPhone’s network settings.

On the device that needs to connect to the internet:

  • Turn off Wi-Fi, then turn it back on.
  • Ensure you’re using the Wi-Fi network that matches the name of the device sharing the internet access.
  • Check the Wi-Fi password if you receive a password error when trying to connect.
  • Restart the devices you are trying to connect to the Hotspot.
  • Delete the Wi-Fi profile on the connecting device and re-add it.

Steps to apply the possible solutions listed above

To check if your roAmigo eSIM allows using Hotspot

  • Visit the roAmigo website → Type your destination into the search bar labeled “Where are you traveling?” → Then, tap the Search Plan button → Once you’re on the eSIM destination page, scroll down until you see “Advantages of using roAmigo eSIM in (your destination)” → Scroll a bit further until you see the advantage cards → Swipe left through the cards until you find the one that says “Share your data with family and friends” → There, you’ll see how much data (in MB) you can share per day.To check if your Holafly eSIM allows using Hotspot

To check that the Hotspot feature is ON:

  • Go to Settings → Tap on Personal Hotspot → Check that the “Allow Others to Join” toggle is Turn ON.How to Turn ON Hotspot on iPhone?
  • On this same screen, you can see the Wi-Fi password you’ve assigned to your device for data sharing, and you can also enable the “Maximize Compatibility” option if needed. Try sharing data after completing the steps above.

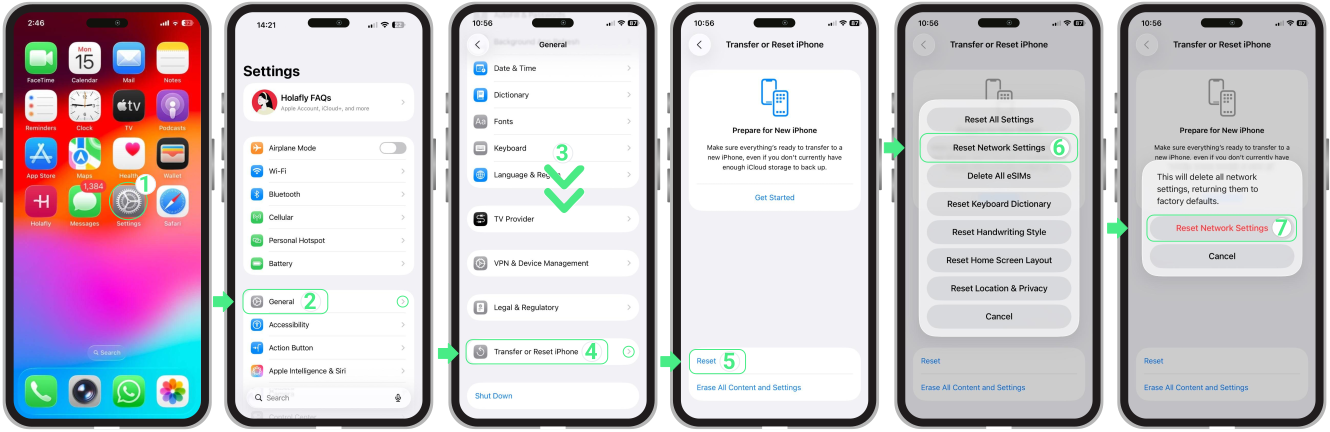
To reset network settings on your iPhone: 

If the suggested steps still don’t help and the hotspot is not working on your iPhone, try resetting your network settings to clear any corrupted data that could be affecting your eSIM. Just remember, this will erase all your Wi-Fi passwords and mobile preferences, so be sure to back everything up first!


  • Go to Settings → General → Scroll down → Transfer or Reset iPhone → Reset → Reset Network Settings and confirm your selection with the Reset Network Settings option.

  • Try sharing data again after resetting your iPhone’s network settings.

To reset network settings on your iPhone:

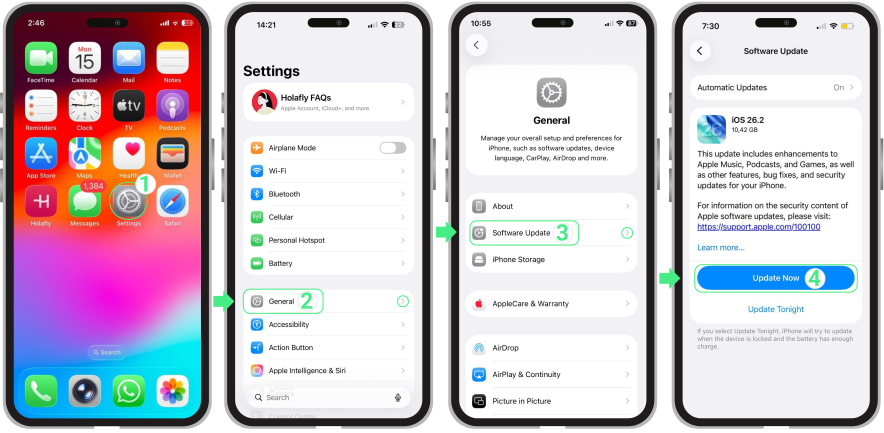
To check if your iPhone is running the latest version of iOS:

  • Go to Settings → Tap on General → Select Software Update → If you haven’t updated to the latest version of iOS, please click on Update Now. Sometimes, updates can fix bugs that prevent data sharing.

To check if your iPhone is running the latest version of iOS:
  • Try sharing data again after updating your iPhone’s software.

How to fix an eSIM error during installation on Android

To resolve an eSIM installation error on Android, first make sure your phone is compatible and carrier-unlocked, then connect to a strong Wi-Fi network with Airplane Mode and VPNs turned off. Most installation failures happen when one of these conditions isn’t met, causing the setup to stop before it can finish.


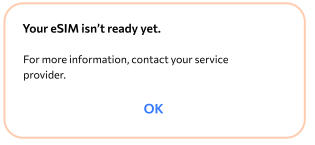
If the process is interrupted, you may see messages like “Your eSIM isn’t ready yet” or “Couldn’t connect with SIM, try again later.” This usually means the eSIM profile is already on your device and just needs to be completed for activation. Below, you’ll find the most common Android eSIM installation messages and the steps to address each one.

Common reasons eSIM installation can fail on Android

Several technical and configuration factors can prevent an eSIM from installing correctly on Android. These are the most common ones.


  • eSIM availability varies by region and manufacturer, so some Android devices don’t display the option to add an eSIM.
  • The device is locked to a carrier, which blocks third-party eSIM profiles even if the model supports eSIM.
  • The eSIM QR code has already been scanned or partially installed, causing the system to reject a new attempt.
  • A weak Wi-Fi connection, VPN, or background restriction interrupts the eSIM download process.
  • The eSIM profile is already installed but turned off, triggering errors when scanning the QR code again.
  • The QR code is scanned from the camera app instead of through Android network settings.
  • The Android system software is outdated and prevents the installation flow from completing.

Android eSIM installation error messages

During eSIM setup on Android, different error messages can appear depending on where the installation process stops. Below are the most common ones and what they usually indicate.

1. Your eSIM isn’t ready yet


This message usually appears when the eSIM profile is already installed on the device, but hasn’t completed the activation process. It can also show up if Airplane Mode is enabled, the phone isn’t connected to a stable Wi-Fi network, or the eSIM installation was interrupted. To resolve this installation error, review the following points:


  • Avoid scanning the QR code again if the eSIM profile is already present, as most eSIMs can only be installed once.
  • Turn OFF Airplane Mode if it’s enabled.
  • Connect to a strong and stable Wi-Fi network.
  • Check whether the eSIM is already installed on your phone and only needs to be activated.

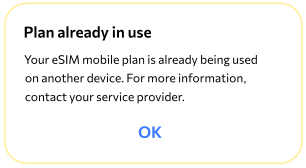
2. Plan already in use 


This message means the eSIM profile has already been activated on the device and cannot be installed again. It usually appears if the QR code was used before, even if the mobile data isn’t working yet. Check whether the eSIM is already installed and turned on in your network settings, and avoid scanning the QR code again, as most eSIMs can only be installed once.

How to check if your eSIM is already installed on Android

Both “Your eSIM isn’t ready yet” and “Plan already in use” can appear when the eSIM profile is already stored on your device. In these cases, installing it again isn’t necessary.


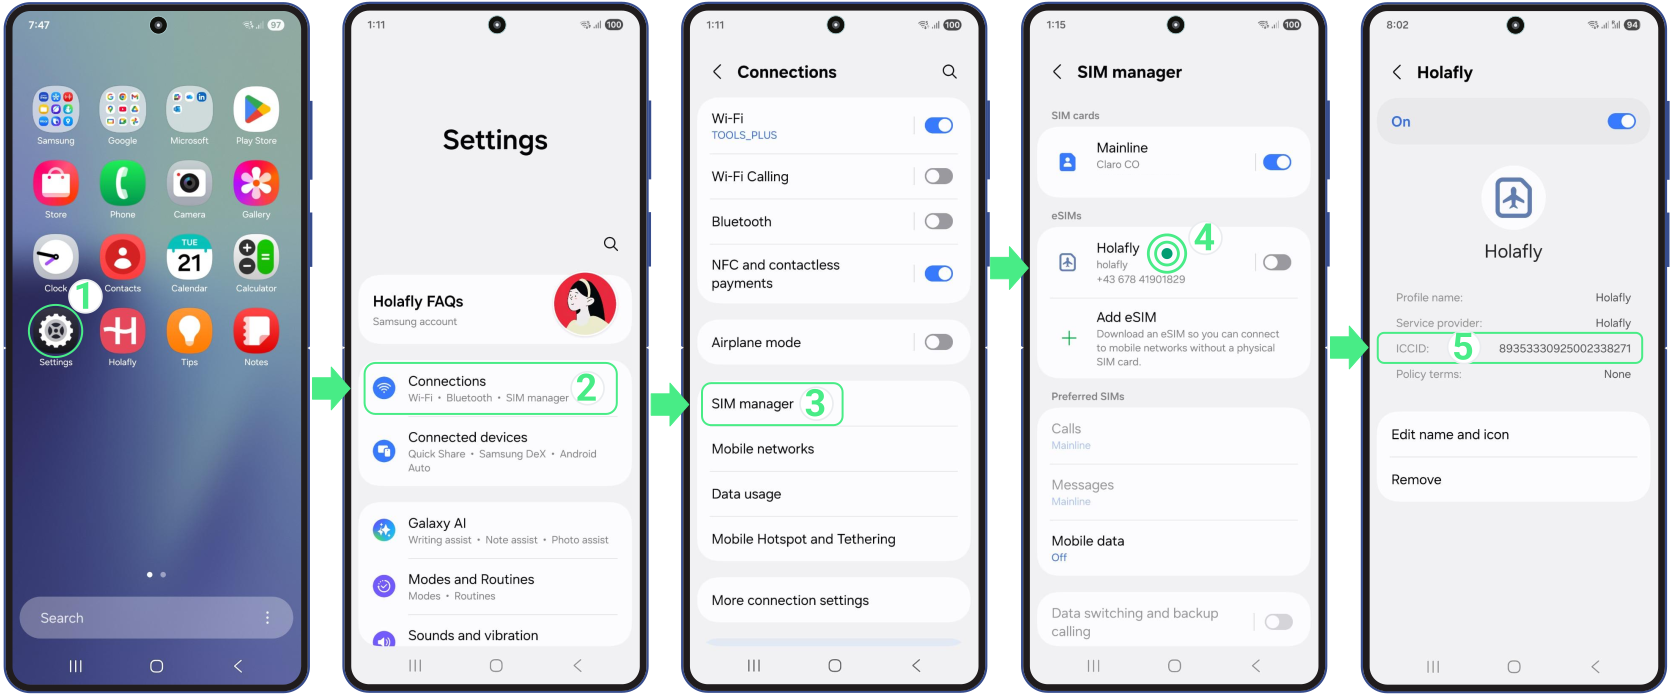
Note: If you see two mobile signal icons, the eSIM may already be installed and just needs activation. Checking the ICCID helps confirm it.


To check the ICCID on Android: 


  1. Open Settings → Select Connections → Tap SIM manager → Choose the last eSIM installed → Turn it ON → Open the ICCID section → Check the ICCID number.

How to check if your eSIM is already installed on Android

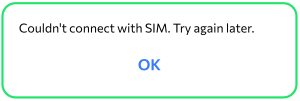
3. Couldn’t connect with SIM, try again later


This error appears when the eSIM download is interrupted before it can finish. It doesn’t mean there’s a conflict with the eSIM itself, but rather that the device lost connection during the setup process, often due to unstable Wi-Fi or system restrictions.


To continue, make sure the installation is done over a strong and stable Wi-Fi connection, with VPNs or data-saving features turned off. Keep the installation screen open until it completes, and restart the device before trying again if the connection was interrupted.

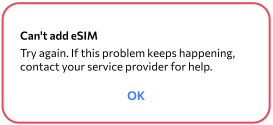
4. Can’t add eSIM


This error can appear at different stages of the eSIM installation process on Android, even though the message shown is the same. Here are the two possible reasons: 


1. If the device blocks the eSIM profile, the cause is usually a carrier lock, regional incompatibility, or reaching the maximum number of stored eSIMs. In this case, Android won’t allow a new digital SIM to be added.

2. If the message appears during setup, it can also be caused by a connection issue that interrupts the download, such as unstable Wi-Fi or system restrictions.


What to review:


  • Keep the installation screen open until the process finishes.
  • Confirm the device is unlocked and supports eSIM in your region.
  • Remove unused eSIM profiles if the device has reached its limit.
  • Use a stable Wi-Fi connection and disable VPNs or data-saving features.

How to check if your Android phone is carrier-locked

  • Open Settings → Select Connections → Tap Mobile networks → Choose Network operators → Turn Select automatically OFF → Wait about 30 seconds for the available carriers to load. If you see only one carrier, your phone is locked. If multiple carriers appear, your Android device is unlocked and can use an eSIM.

How to check if your Android phone is carrier-locked

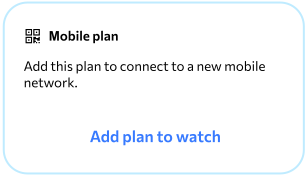
5. Add plan to watch


This message is a clear sign that your Android device doesn’t support eSIM. It usually appears when the QR code is scanned from the camera app because the Add eSIM option isn’t available in your device settings. Since Android can’t add the eSIM directly, it redirects to a generic “Add plan” option, which is commonly used for wearables like smartwatches.


Before trying again, confirm that your phone supports eSIM and start the installation from the network settings, not from the camera.

Troubleshooting tips

If you’ve reviewed the error messages above and the installation still doesn’t move forward, these additional checks often help complete the setup successfully.

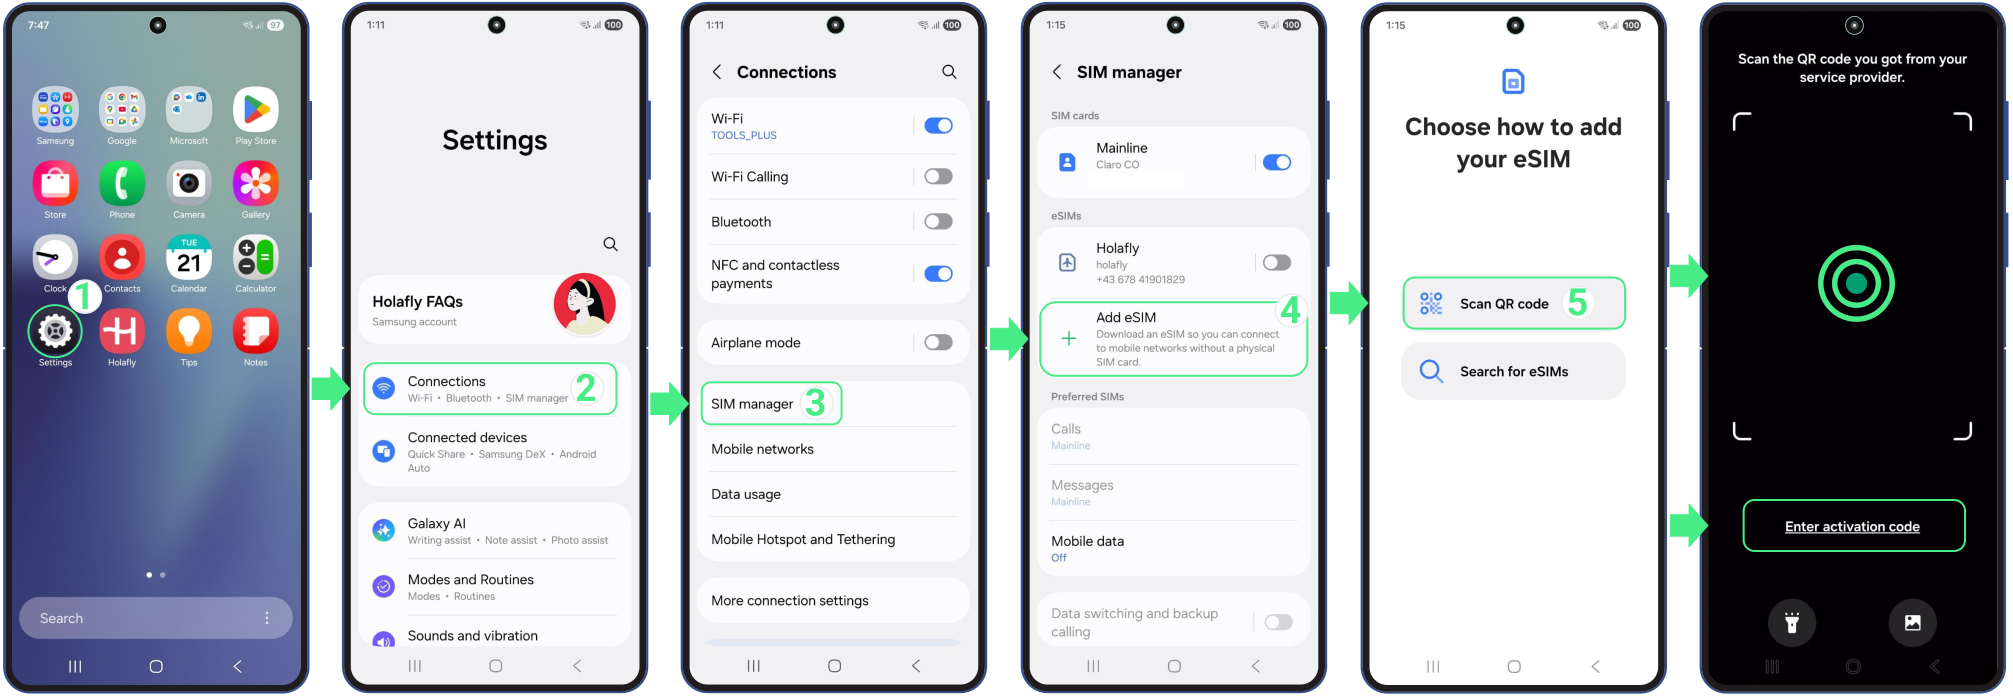
Install the eSIM manually on Android

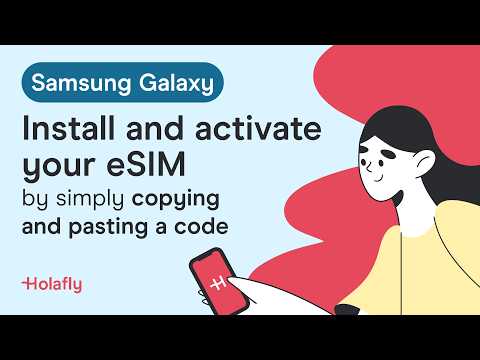
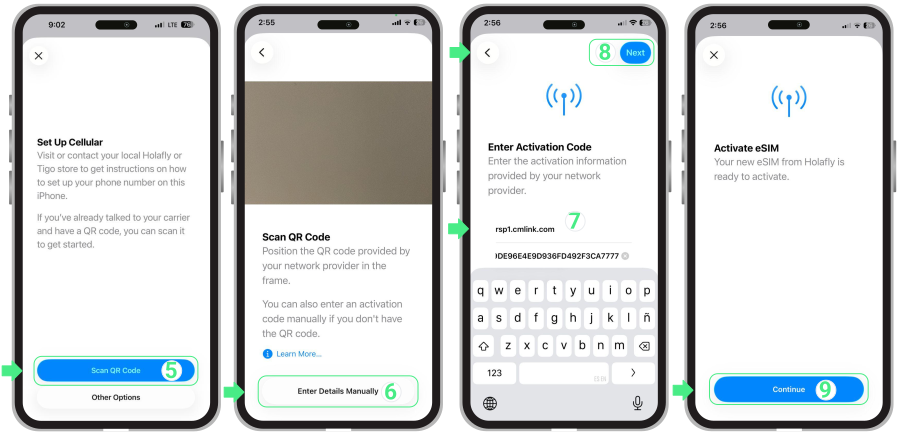
Install the eSIM by entering the activation codes from your purchase confirmation email while connected to a strong and stable Wi-Fi network. The video below walks you through each step so you can complete the setup smoothly.

Reset your network settings

This clears saved network data that may interfere with the installation process. After the reset, reconnect to Wi-Fi and try again.


  • Go to Settings → Scroll down and select General management → Then on Reset → ChooseReset mobile network settings (If you’re prompted to enter a PIN, enter the code you use to unlock the screen and tap Next) → Confirm your selection with the Reset settings option.

If you still have any doubts, here’s a video that will guide you through resetting your Android!

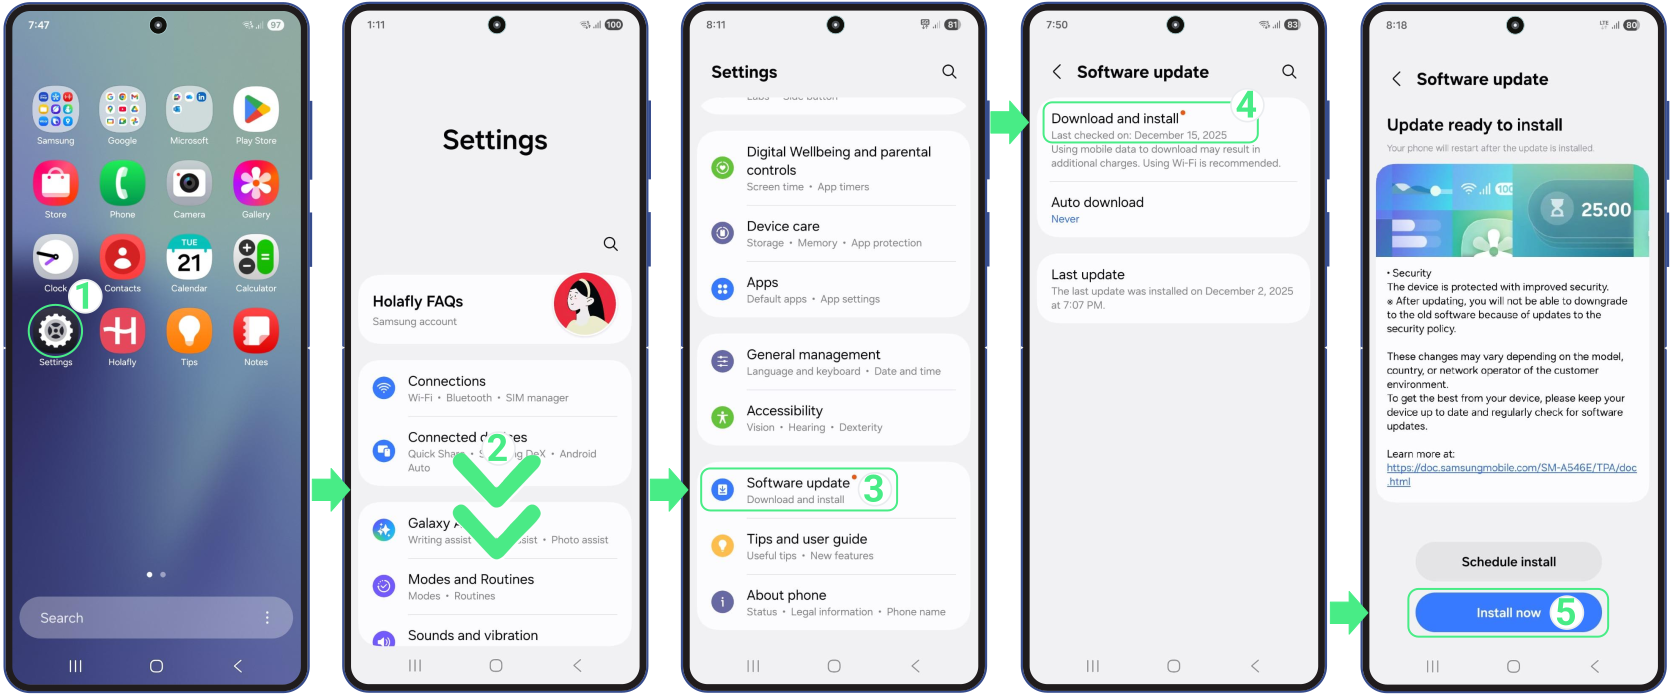
Update your Android software

Make sure your device is running the latest software version, as updates help keep the eSIM setup process running smoothly.


  • Open Settings → Scroll to Software Update → Tap Download and Install → Select Install Now.


Update your Android software

To keep in mind

  • eSIM setup paths vary by Android manufacturer, so it’s important to follow the specific installation steps for your device. Brands like Samsung, Google Pixel, Huawei, Xiaomi, Honor,Vivo, Motorola, Nokia, Sony,and OnePlus may show different menus or options during the process.
  • If your Android device doesn’t support eSIM, the digital profile is still valid. As long as the QR code hasn’t been scanned or activated, the eSIM can be installed on another compatible phone or saved for future use.
  • Device compatibility alone isn’t enough; your phone must also be unlocked. A carrier-locked device can block third-party eSIM profiles and cause an eSIM error, so requesting an unlock from your carrier may be necessary before installation.
  • If you see iOS-specific messages such as “Unable to Complete Cellular Plan Change,” follow the iPhone eSIM troubleshooting guide instead, as those errors use a different setup flow.

What to Do If FaceTime is Not Working With an International eSIM?

Using FaceTime on your iPhone is a great way to stay connected while traveling and avoid roaming fees. If FaceTime isn’t working on your iPhone after switching to an eSIM, you might be asking, “Why is my FaceTime not working?” This article will help you activate FaceTime with an international data-only eSIM, ensuring seamless communication.

Common Reasons Why Is FaceTime Not Working

If you have only data eSIM and your FaceTime is not working after activating an eSIM, several common issues could be at play. Let’s look at these factors to help you troubleshoot and restore your FaceTime functionality.


  • Your eSIM may be set up incorrectly.
  • You’re not connected to mobile data or Wi-Fi.
  • FaceTime is not enabled on your device.
  • You haven’t correctly activated the FaceTime for use only with data or Wi-Fi.
  • Your primary number is selected for making and receiving calls on FaceTime.
  • The international network you’re on has restrictions.
  • Your time zone may be misconfigured for the city or country you’re in.
  • Your signal is weak.
  • Your iPhone is not updated to the latest version of iOS.
facetime is not working

Steps to Troubleshoot and Resolve FaceTime Issues

If FaceTime isn’t working on your iPhone while you’re abroad, don’t worry! Let’s explore why FaceTime might not be working and how to fix it, from eSIM setup issues to trouble staying connected. We’ll help you get FaceTime up and running again so you can enjoy seamless communication while traveling.

1. Check if Your FaceTime is Correctly Activated 

To use FaceTime with an International eSIM or only data eSIM, it’s always important to verify that your FaceTime is correctly activated, if you are not sure how to activate FaceTime, follow these steps:


  • Go to Settings → Scroll down → Tap on Apps → Scroll down → Select FaceTime → Ensure that FaceTime is turned on → Deselect your phone number → Tap Remove to confirm and unlink your number from iMessage and FaceTime → Now, FaceTime is set up with your email address, allowing you to make and receive FaceTime video calls using mobile data.

1. Check if Your FaceTime is Correctly Activated

  • Ensure that the selected email is the one you used to register your Apple ID.
  • If FaceTime doesn’t work after the previous steps, try disabling and re-enabling the FaceTime option.

2. Set the time zone on your iPhone:

Setting the correct time zone is essential for FaceTime to ensure calls are sent and received at the right times. A misconfigured time zone can cause issues, especially when traveling internationally. Here’s how to set it on your iPhone:
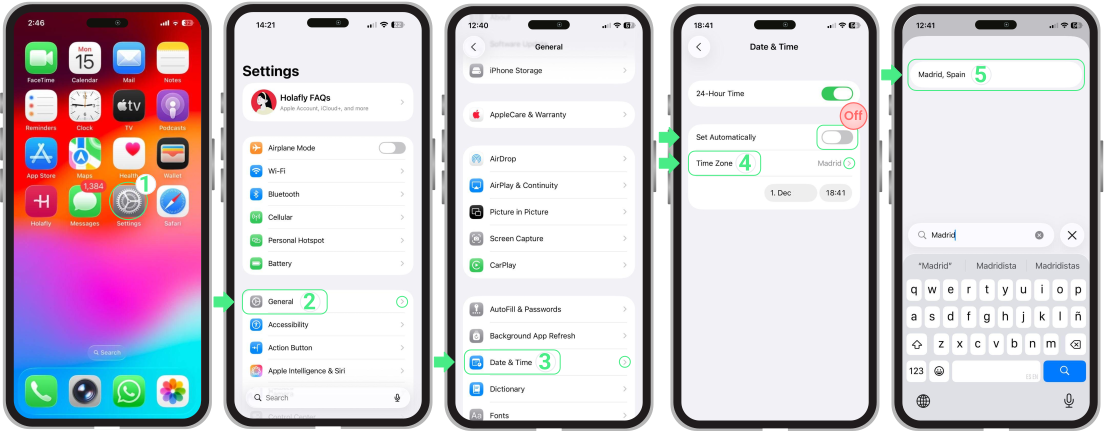
  • Go to Settings → Tap on General → Select Date & Time → Choose Time Zone → Tap the search bar → Type the country or city you’re in → Select the correct location.

3. Reset network Settings on your iPhone:

Resetting the network settings is essential if FaceTime is not working despite having the correct settings, as it eliminates interference from previous configurations and helps the device connect more effectively. Just keep in mind, this will erase your Wi-Fi passwords and cellular preferences, so back those up first! Here’s how to reset your network settings. Here’s how to do it:


  • Go to Settings → General → Scroll down → Transfer or Reset iPhone → Reset →  Reset Network Settings and confirm your selection with the Reset Network Settings option.


If you still have any doubts, here’s a video that will guide you through resetting your iPhone!


To Keep in Mind:

  • FaceTime is only for iOS users.
  • It works with Wi-Fi or mobile data.
  • Availability varies by country, region, and carrier.
  • To switch back to FaceTime with your primary SIM, just follow the activation steps and verify your number again.
  • The roAmigo eSIM offers data for FaceTime use without your primary SIM. It’s best to turn off your main SIM for optimal performance.

How to Get Fast Russia Internet Access with Your eSIM

The key to a reliable connection lies in adhering to current local regulations. This requires a brief Russia internet authentication for all devices connecting via international data, including eSIMs, physical SIMs, and standard roaming. This verification is a standard security measure required before mobile data access is enabled. To ensure your data works the moment you land, first ensure your eSIM is installed (ideally, one day before your trip), and then follow the 5-step protocol detailed below. Following these steps ensures your service remains uninterrupted throughout your stay. We’ll walk you through the entire process!

Before You Start: Key Points for Russia Internet Verification

In Russia, international data connections are verified through a government-approved local operator, typically MTS. To ensure you are prepared to complete the verification, here is crucial information about the authentication before you begin the 5-step process and get internet in Russia smoothly:


  • The process requires completing a brief verification step, which you access by tapping the link sent to you by the local operator (MTS) in the incoming SMS.
  • While you will receive a single SMS from MTS for verification, this does not mean your eSIM supports calling or texting. This is a data-only eSIM.
  • This step validates you are a human user and confirms your presence in the country; you will simply need to follow the prompts on the screen (such as solving a CAPTCHA).
  • The verification is tied exclusively to the recommended operator (MTS). If your device switches networks, you may lose data access and be required to re-verify.

Quick Tips While You Activate Your Internet in Russia

These optional tips will help you manage your digital needs while you complete the eSIM activation protocol:


  • Use airport/hotel Wi-Fi for initial needs.
  • Download maps (e.g., Yandex or 2GIS), public transport routes, and translation language packs now. Local apps are more reliable than Google Maps in Russia.
  • Save key documents (tickets, reservations) locally to your phone; cloud access may be unstable without mobile data.
  • Carry physical payment options (cash or credit cards) as backup.
  • For long stays, create an account on VKontakte (VK), Russia’s main social network. This can be useful for local communication, as Western apps like Snapchat, iMessage, and Messenger can face restrictions.

The 5-Step eSIM Activation Protocol in Russia

To comply with the new regulation and gain reliable internet access in Russia, follow these 5 mandatory steps upon arrival:


1. Go to your device Settings, turn on your international eSIM, and enable Mobile Data Roaming for that line.

2. Navigate to Cellular/Network Selection (or Mobile Networks), disable Automatic Selection, and select MTS as your network carrier.

3. Open the SMS from the local operator, tap the link, and solve the CAPTCHA (security check) to confirm you’re not a robot. This will enable your data access.

4. Once you see the confirmation page, restart your phone to refresh the network settings.

5. Confirm you are connected! You should now have full internet access on the MTS network.

How to manually select the MTS network (Step 2)

Registering with the correct network is a non-negotiable step to receive the mandatory verification message (SMS). Since the process varies slightly by operating system, find the precise instructions for your device below.

Manually selecting MTS on iOS:

  • Go to Settings → Tap on Mobile service (or Mobile Data) → Select your eSIM travel line → Tap on Network Selection → Disable the Automatic toggle → Wait on this screen for the available operators to appear → Select the MTS operator → Wait 30 seconds for the registration process to complete. This registers your device on the MTS network so you can receive the verification SMS→Proceed to Step 3 (SMS verification) to finalize access.

Manually selecting MTS on iOS:

Manually selecting MTS on Android:

  • Go to Settings → Tap on Connections → Select Mobile Networks → Choose Network operators → Disable the automatic selection toggle → Wait on this screen for the list of available operators to appear → Select MTS and wait 30 seconds → This establishes the connection necessary to receive the verification SMS → Now move on to Step 3 (SMS verification) to finalize your data access.

Manually selecting MTS on Android:

Troubleshooting Tips

If you have completed the 5 activation steps but cannot connect on your iOS or Android device, run through this quick checklist: 


  • Restart your device to force a fresh link with the local networks.
  • Double-check that your carrier is manually set to MTS in your network settings.
  • Ensure your Holafly eSIM is selected as the primary source for Mobile Data.
  • Temporarily disable any active VPN. Many VPN services are restricted inside Russia and can interfere with the initial connection.
  • Turn off your primary personal SIM entirely, as it can sometimes override the international line.

How to fix iPhone eSIM Network not available error

In the event of this error appears, toggling Airplane Mode or verifying that Data Roaming is enabled on your travel eSIM is often enough to restore service. When you see an iPhone eSIM network not available status, it typically means the line hasn’t fully registered with a local network, or a key setting is off. Below you’ll find what to review to get back online, whether at home or abroad.

Common reasons why iPhone eSIM shows “Network Not Available”

  • Incorrect data selection. The travel eSIM is not selected as the primary line for Cellular Data in your settings.
  • Delayed network refresh or being outside the plan’s covered area.
  • Carrier-locked devices that do not support third-party eSIMs.
  • Line conflicts caused by an active physical SIM or a secondary line.
  • Misconfigured settings, outdated iOS, or an incomplete eSIM setup.
  • Network congestion or a weak signal. Coverage is excellent in urban areas, but your connection may be weaker or unstable in remote areas (deserts, mountains, jungles, or open waters) or crowded places, such as concerts, stadiums, and festivals, where networks can become congested.

Quick fixes to restore your service

  • Confirm your eSIM is turned ON and selected for Cellular Data. If you are traveling, also ensure Data Roaming is enabled for your eSIM under Settings → Cellular.
  • Toggle Airplane Mode ON for 15 seconds, then OFF to refresh network registration.
  • Turn OFF other lines under Settings → Cellular to prevent them from interfering with your data-only eSIM and causing a No Service status.
  • Restart your iPhone to clear temporary software malfunctions that may be affecting mobile data or eSIM performance. 

Troubleshooting tips

If the quick fixes didn’t work, don’t delete your eSIM because you may not be able to reinstall it, and follow these steps instead.

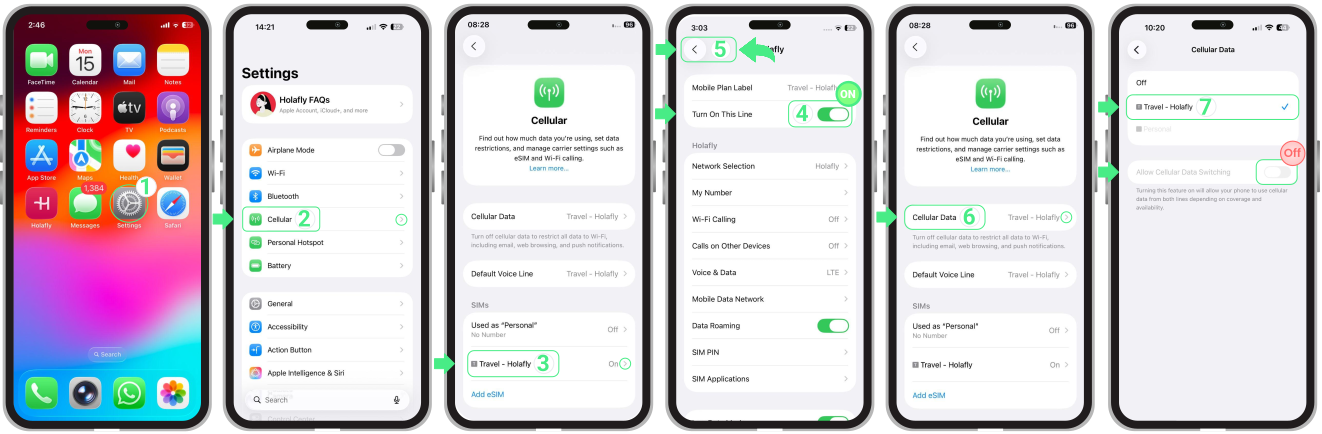
1. Set your travel eSIM for Cellular Data

To get online abroad, you must set the travel eSIM as your active data line. If your primary SIM remains selected, the eSIM signal may stay inactive.


  • Go to Settings → Cellular (or Mobile Service) → Tap your Travel eSIM → Enable Turn On This Line → Then, go back and tap Cellular data and select your Travel eSIM → Turn OFF “Allow Cellular Data Switching” to prevent the iPhone from using your primary line.

Note: We recommend turning off your primary local SIM to avoid unexpected roaming charges from your home carrier.

1. Set your travel eSIM for Cellular Data

2. Enable data roaming on your iPhone

For international plans, Data Roaming must be active to connect to local networks and prevent signal drops outside your home country. This is the most effective step for travel eSIMs showing SOS or No Service: 
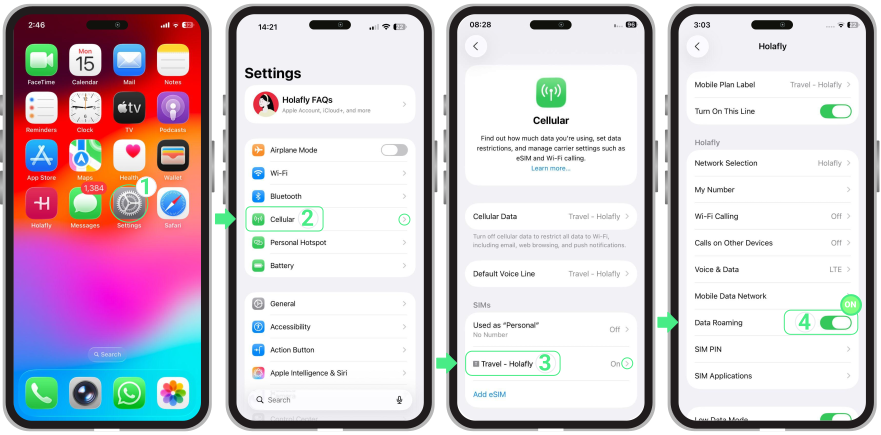

  • Go to Settings → Tap on Cellular or Mobile Service → Tap on your Travel eSIM → Turn Data Roaming ON.

2. Enable data roaming on your iPhone

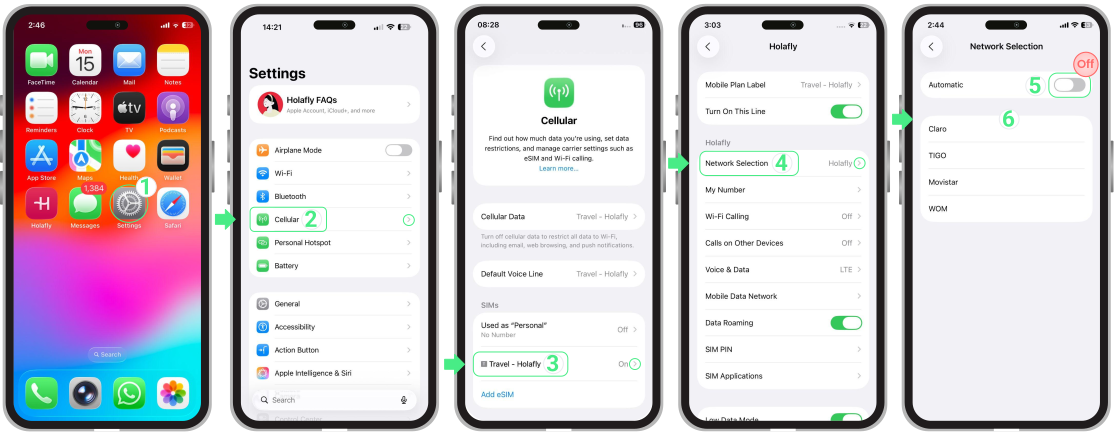
3. Manually select a network operator on your iPhone

If your device remains on SOS or shows No service after eSIM activation, manually selecting can help your device connect to a compatible carrier:
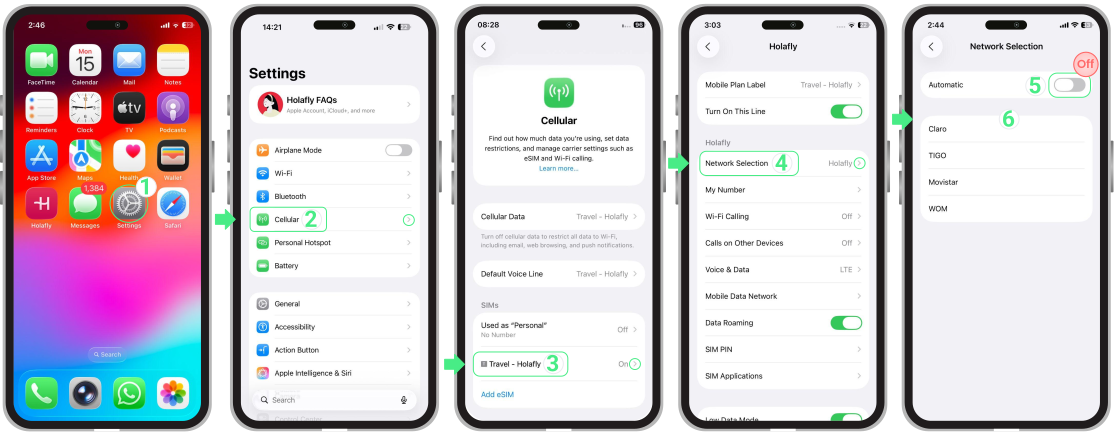

  • Go to Settings → Tap on Cellular (Mobile Service) → Tap your eSIM line → Network Selection → Turn OFF Automatic → Wait a few minutes for the available networks to appear on the screen → Then try one by one all the operators listed (each time you select one, wait 30 seconds while it connects to the network) → Select the operator with the strongest signal → Try browsing again.

Manually select a network operator on an iPhone:
If your device is stuck in SOS, No Service, or you continue to experience the iPhone eSIM network not available status, manually selecting a network can help the device register with a compatible carrier. You can do this directly from your cellular settings:

Go to Settings → Tap on Cellular or Mobile Service → Tap your eSIM line → Network Selection → Turn OFF Automatic → Wait for available networks to load → Select each network one by one, waiting about 30 seconds between attempts → Keep the network that provides the most stable signal.

Note: If you want to know which specific operator to connect to, go to our website, search for the country you are in, and check the Coverage and Network sections to see all compatible networks for your mobile plan.

4. Reset network settings

If the steps above didn’t bring your connection back, resetting network settings is a good option to clear any misconfiguration errors. 


Important:This action won’t delete your eSIM, but it will remove saved Wi-Fi networks and cellular preferences.


Here’s how to do it:
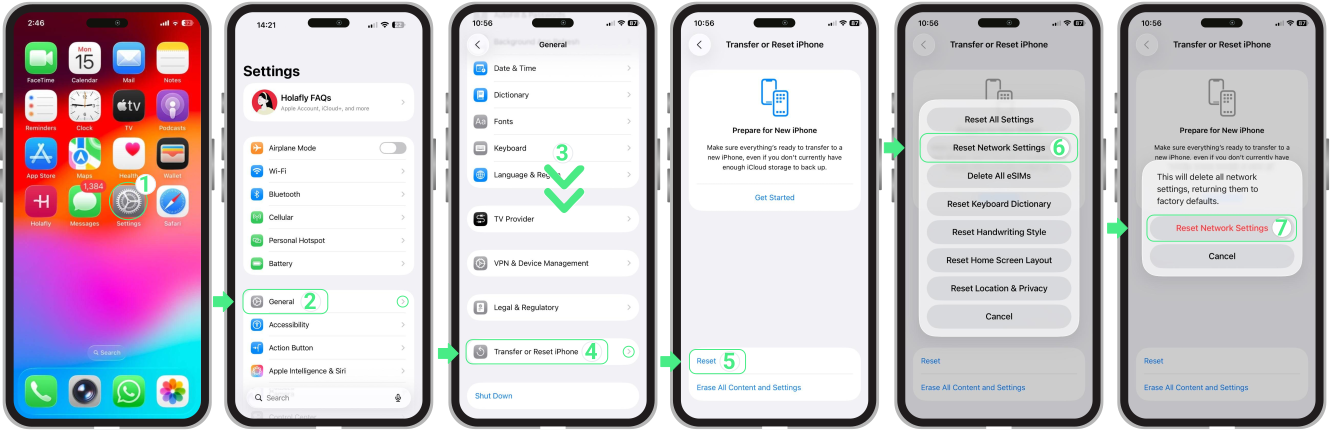

  • Go to Settings → Tap on General → Select Transfer or Reset iPhone → Tap on Reset → Select Reset Network Settings → Enter your device passcode when prompted → Tap Reset Network Settings again to confirm.

To Reset Network Settings on iPhone:
Go to Settings → Tap on General → Select Transfer or Reset iPhone → Tap on Reset → Then, select Reset Network Settings → Confirm when prompted. This won’t delete your eSIM, but it will remove saved Wi-Fi networks and cellular preferences, which can help fix no service after eSIM activation.

게시물 문제 해결 (테스트 2)

콘텐츠

게시물 문제 해결 (테스트)

콘텐츠 문제 해결

기기 호환성

Is the Motorola eSIM Compatible?

Motorola has made significant progress in integrating eSIM technology into many of its recent models. In this guide, we’ll show you three simple ways to check Motorola eSIM compatibility on your phone.

How Do I Know If My Motorola Phone is eSIM Compatible?

Checking if your Motorola eSIM phone is eSIM compatible is easy. You can do it directly on your device through the settings, by dialing *#06#, or by reviewing the list of eSIM compatible Motorola phones available online.
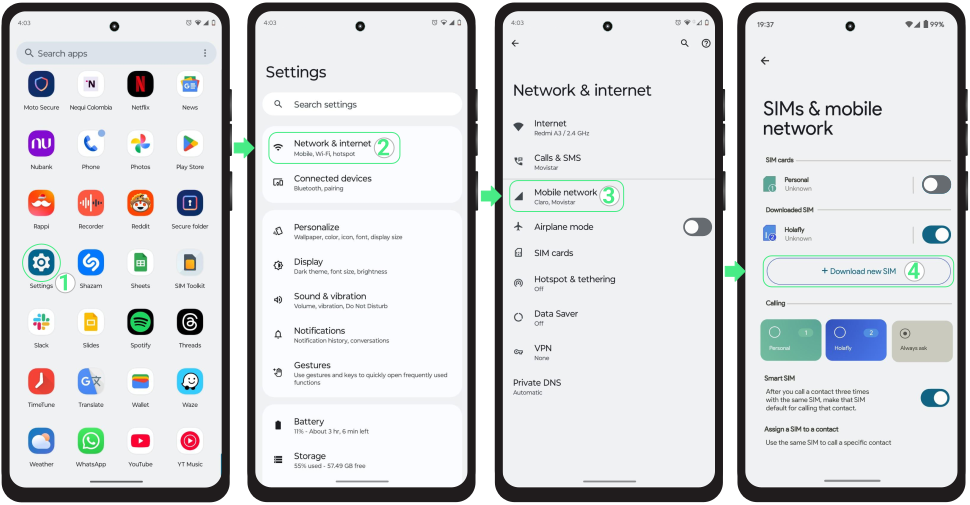
To Check Motorola eSIM Compatibility from the Settings


  • Go to Settings → Network & Internet → Tap on Mobile Network or SIMs → If you see the Download new SIM option, it means your Motorola is eSIM compatible.

To Check Motorola eSIM Compatibility from the Settings

To Check Motorola eSIM Compatibility by Dialing *#06#:


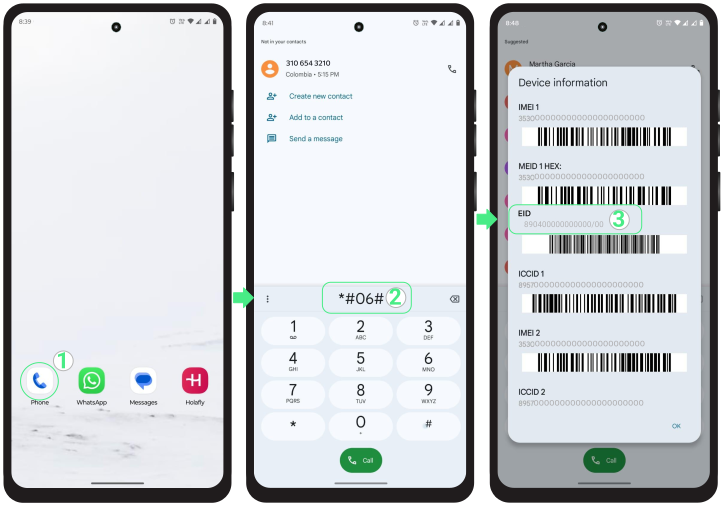
  • Go to the Phone app → Tap on the keypad → Dial *#06# → If you see the EID code, your Motorola phone is compatible with eSIM.

Check Motorola eSIM Compatibility by Dialing *#06#:

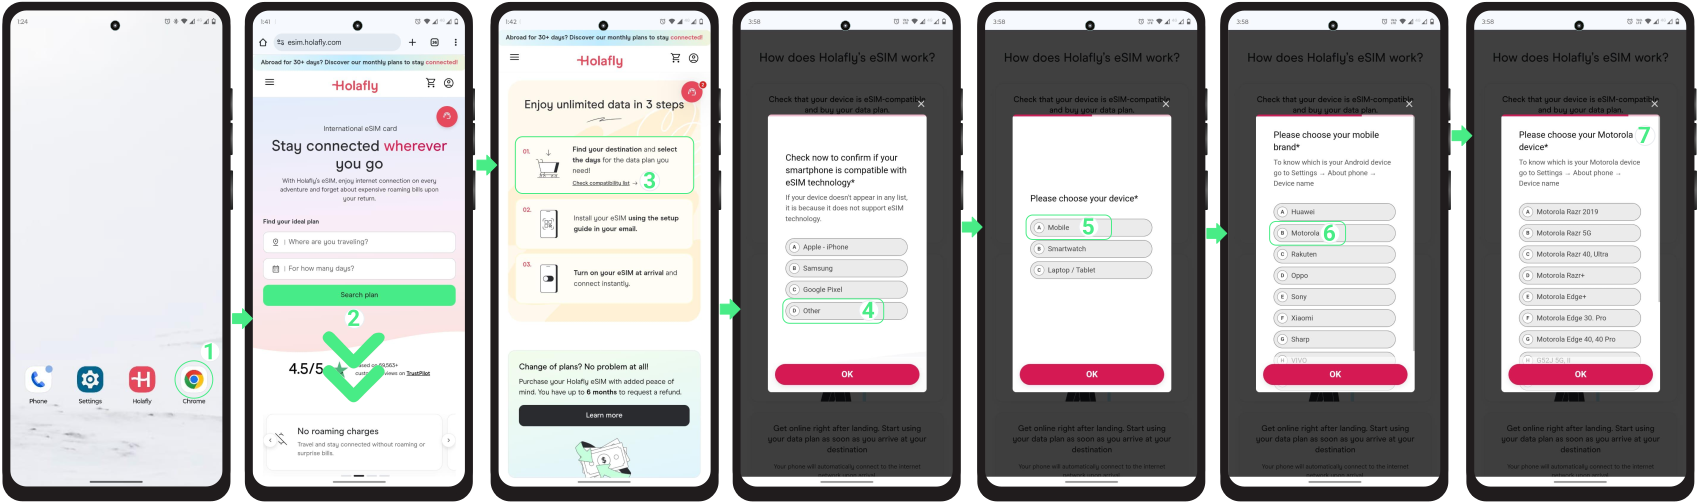
To Check Motorola eSIM Compatibility via the Holafly Website:


  • Go to Holafly.com → Scroll down to the section “Enjoy unlimited data in 3 steps” → Click the “Check Compatibility” link → Select other → Select Mobile → Choose your device brand, in this case, Motorola → A list of currently compatible Motorola models with eSIM will appear.

To Check Motorola eSIM Compatibility via the Holafly Website:

To Keep in Mind

  • Some carriers block the use of lines with other providers. Check with your carrier to see if your Motorola phone with eSIM is unlocked.
  • The eSIM compatibility on Motorola devices can vary depending on the model and the country of manufacture.

Troubleshooting Tips

If your Motorola is compatible with the eSIM, and you’ve already purchased it, just follow the installation process before your trip. It’s best to set it up at home while connected to a stable Wi-Fi network to avoid installation issues.

What to do if your Motorola isn’t eSIM compatible, and you have purchased already?

  • You can use your eSIM on another compatible device.
  • Keep the eSIM for your next trip.
  • You can also give it to a friend or family member who has a compatible device.

Redmi Note 13 Pro eSIM support: is it compatible?

No, Redmi Note 13 Pro eSIM support is not available on the standard 4G model. In this series, eSIM is available only on the Redmi Note 13 Pro 5G and Redmi Note 13 Pro+ 5G, and only in certain global variants. Since these models look almost identical, it’s important to confirm which version you own before assuming eSIM availability.


The most reliable way to check is directly from your phone settings: if the option to add an eSIM appears, your device supports it. Keep reading to see how to verify your Redmi Note 13 Pro model in just a few seconds.

How to confirm eSIM compatibility on Redmi Note 13 Pro

Because eSIM support varies by model and region, the answer is on your device. In under a minute, you can verify whether your Redmi Note 13 Pro supports eSIM using these two universal methods.

Check eSIM compatibility from your phone settings

  • Go to Settings → Tap on Mobile Networks → Select Manage eSIM → If you see the option use eSIM, your Xiaomi is compatible with eSIM. If it doesn’t appear, your device does not support this technology.

Check xiaomi eSIM compatibility from your phone settings:
Go to Settings → Tap on Mobile Networks → Select Manage eSIM → If you see the option use eSIM, your Xiaomi is compatible with eSIM. If it doesn’t appear, your device does not support this technology.

Check eSIM compatibility by dialing *#06#

  • Go to the Phone app → Tap on the keypad → Dial *#06# → If you see the EID code, your Xiaomi is compatible with eSIM.

To Keep in Mind

  • Check the exact model you own, since not all Redmi Note 13 versions support eSIM, even if they share similar names.
  • Verify where the device was sold, as phones from mainland China, Hong Kong, or Macao usually don’t include eSIM support.
  • Confirm that your phone is unlocked, since carrier locks affect which eSIMs you can use, not whether the device is technically eSIM compatible.
  • Remember that only one eSIM can be active at a time, even though compatible models like the Redmi Note 13 Pro 5G can store several eSIM profiles.
  • Use one physical SIM and one eSIM together on supported models, which is especially helpful when traveling.

Troubleshooting tips

When eSIM isn’t available on your Redmi Note 13 Pro

  • Save the eSIM for a future trip, as long as it hasn’t been activated. 
  • Use the eSIM on another compatible device if you have one available.
  • Share the eSIM with a friend or family member who has a phone that supports eSIM.
  • Confirm the destination before saving the eSIM, since it must match the country it was purchased for.

Is the Google Pixel 7 eSIM Compatible?

Yes, eSIM is available on all Pixel 7 models, including the Pixel 7, Pixel 7 Pro, and Pixel 7a. You can confirm compatibility directly from your phone settings: if the option to add an eSIM appears under Mobile Data, your device supports it. Compatibility can vary by region, and Pixel devices sold in Hong Kong and Macao do not support eSIM. Keep reading to learn how to check compatibility step by step before installing an eSIM.

How to check if your Google Pixel 7 supports eSIM

There are two quick ways to verify eSIM compatibility on a Google Pixel. Both methods take under a minute and don’t require installation.

Check eSIM compatibility from your Pixel settings

  • Go to Settings → Tap on Network & Internet → Choose SIMs → If the option ‘Add SIM’ is available, your device supports eSIMs.

Check eSIM compatibility from your Pixel settings

Check eSIM compatibility by dialing *#06#

  • Open the Phone app → Go to the keypad → Dial *#06# → If you see the EID code, your Pixel 7 is compatible with eSIM.

Check eSIM compatibility by dialing *#06#

How to set up an eSIM on Google Pixel 7

Once compatibility is confirmed, you can install your eSIM in two simple ways: by scanning a QR code or by manually entering the activation details provided by your carrier. 


Before installing, make sure you’re connected to a stable Wi-Fi network and that your device has at least 20% battery to ensure a smooth installation.

To keep in mind

  • Even if your Pixel supports eSIM, it may be locked to a specific carrier, which can prevent you from using eSIMs from other providers.
  • Compatible Google Pixel devices can store multiple eSIM profiles, which is useful if you travel frequently or plan future trips.
  • Only one eSIM can be active at a time for mobile data and calls.
  • Pixel 7 models support Dual SIM, allowing you to use one physical SIM and one eSIM simultaneously, for example, keeping your regular line active while using an eSIM for data when traveling.

Troubleshooting tips

What to do if your Pixel is not eSIM compatible

  • If you save the eSIM, make sure it’s for the same destination it was purchased for, as using it in a different country may prevent it from working correctly.
  • Use the eSIM on another compatible device if you have one available.
  • Save the eSIM for a future trip if you don’t need it right away.

Is the iPhone X eSIM Compatible?

No, the iPhone X doesn’t support eSIM, but models like the iPhone XS, iPhone XS Max, iPhone XR, and newer models like the iPhone 11, iPhone 12, iPhone 13, and iPhone 15, onward, do support eSIM technology. This article will explain how to confirm if your iPhone supports eSIM and provide options if you’ve already purchased one.


How to Confirm If Your iPhone is Compatible with an eSIM?

You can easily check if your iPhone is eSIM compatible directly from your device. There are two ways to check: through the settings or by dialing *#06#.
To Check eSIM Compatibility Through Settings:

  • Go to Settings → Cellular or Mobile Data → If the “Add eSIM” option is available, your device supports eSIMs.

To Check eSIM Compatibility Through Settings:

To Check eSIM Compatibility by dialing *#06#:

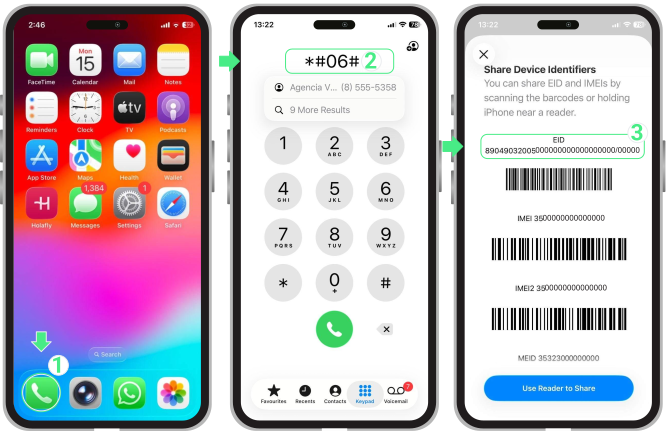
  • Open the Phone app → Go to the keypad → Dial *#06# → If you see the EID code, your iPhone is compatible with eSIM.

To Check eSIM Compatibility in your iPhone X by dialing *#06#:

Troubleshooting Tips

What should you do if you’ve already purchased an eSIM?

  • You can use your eSIM on another compatible and unlocked device.
  • Keep the eSIM for your next trip.
  • Give the eSIM to a friend or family member who has a compatible device.

Is the iPhone 8 eSIM Compatible?

No, the iPhone 8 does not support eSIM technology. Apple introduced eSIM compatibility starting with the iPhone XS and newer models, including the latest releases like the iPhone 16 Pro and iPhone 16 Pro Max. In this article, we’ll show you how to confirm your iPhone’s compatibility and what to do if you’ve already purchased a roAmigo eSIM.

How to Confirm If iPhone 8 Supports eSIM Compatibility

Confirming whether your iPhone 8 supports eSIM is simple. You can check directly in your device’s settings or by dialing the *#06# code.
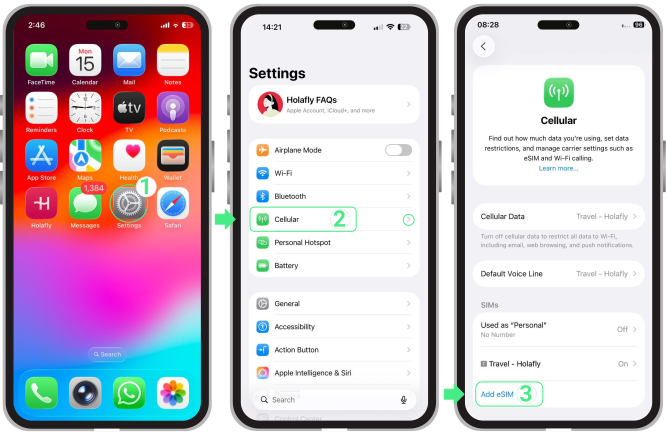
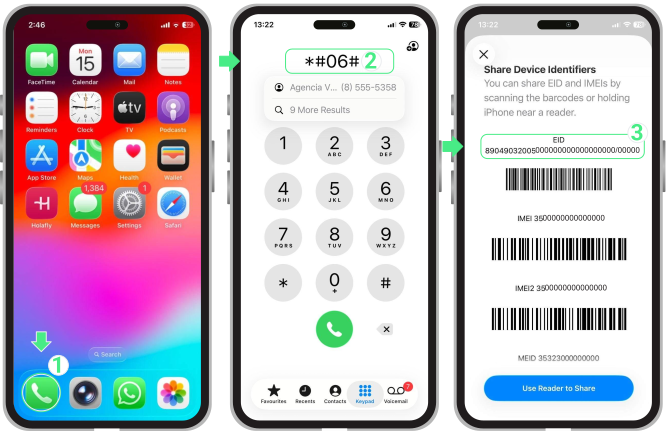
To Check eSIM Compatibility Through Settings:

  • Go to Settings → Tap on Cellular or Mobile Data → If the “Add eSIM” option is available, your device supports eSIMs.

To Check If iPhone 8 Supports eSIM Compatibility:

To Check eSIM Compatibility by dialing *#06#:

  • Open the Phone App → Go to the keypad → Dial *#06# → If you see the EID code, your iPhone is compatible with eSIM.

Troubleshooting Tips

What should you do if you’ve already purchased an eSIM?

  • You can use your eSIM on another compatible and unlocked device.
  • Keep the eSIM for your next trip.
  • You can also give it to a friend or family member who has a compatible device

Is My iPhone eSIM Compatible?

As a traveler, staying connected abroad can be tricky, especially with evolving technologies. Many carriers now prefer eSIM for its convenience, raising the common question: Is my iPhone eSIM compatible? In this guide, we’ll walk you through how to easily check if your iPhone supports eSIM, so you can stay connected effortlessly during your travels.

How Do I Know If My Phone is eSIM Compatible?

Checking iPhone eSIM compatibility is easy. You can do it directly on your device, through the settings, or by dialing the code *#06#. You can also review our updated list of compatible models before purchasing your eSIM.
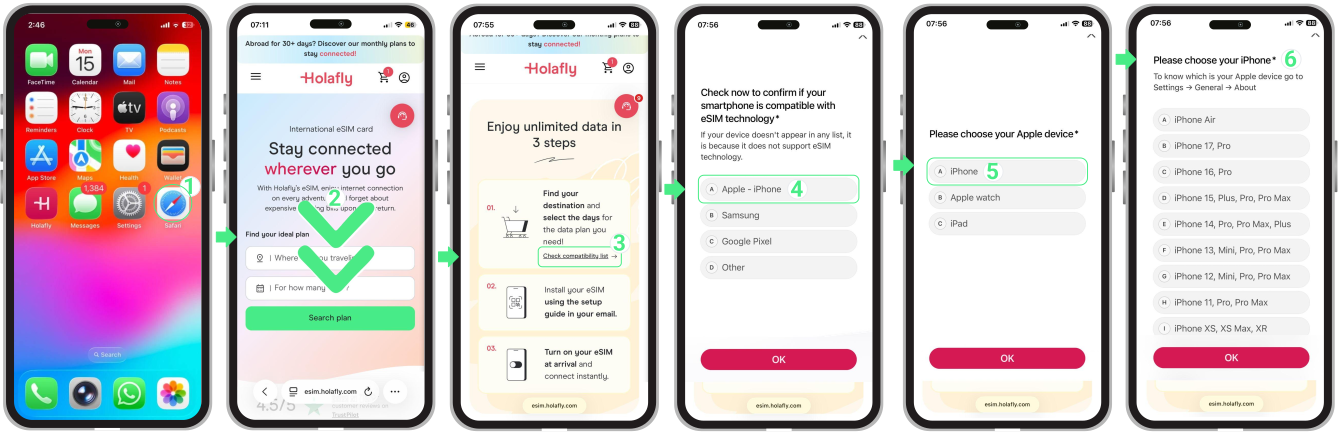
To Check iPhone eSIM Compatibility from the Settings:


  • Go to Settings → Select Cellular → If you see the option to Add eSIM or Add Mobile Plan, it means your iPhone is compatible with eSIM. If it doesn’t appear, your device does not support this technology.

To Check iPhone eSIM Compatibility from the Settings:

To Check eSIM Compatibility on Your iPhone by Dialing *#06#


  • Open the Phone app → Go to the keypad → Dial *#06# → If you see the EID code, your iPhone is compatible with eSIM.

To Check eSIM Compatibility on Your iPhone by Dialing *#06#

To Check Apple iPhone Compatibility with eSIM via the Holafly Website:


  • Go to Holafly.com → Scroll down to the section “Enjoy unlimited data in 3 steps” → Click the “Check compatibility list” link → Select your device brand, in this case, Apple – iPhone → Select iPhone → A list of currently compatible iPhone models with eSIM will appear.

To Check Apple iPhone Compatibility with eSIM via the Holafly Website:

To Keep in Mind

  • Some carriers block the use of lines with other providers. Check with your carrier to see if your iPhone is unlocked.
  • eSIM compatibility may vary by country. In mainland China, eSIM is not offered for iPhones, while in Hong Kong and Macau, some models are compatible. Verify this information before using it.

Troubleshooting tips

If your iPhone is compatible with eSIM, and you’ve already purchased it, you just need to install it. It’s recommended to do so at home, before traveling, and make sure you’re connected to a strong and stable Wi-Fi network to avoid installation issues.

What to do if you already Have an eSIM and your iPhone isn’t compatible?

  • You can use your eSIM on another compatible device.
  • Keep the eSIM for your next trip.
  • You can also give it to a friend or family member with a compatible device.

Is The Motorola Edge eSIM Compatible?

No, the Motorola Edge is not eSIM compatible. Models from the Motorola Edge 30 series, like the Edge 30 Ultra, Fusion, and Neo, also lack eSIM support. However, newer versions, such as the Motorola Edge 2022 and Motorola Edge 2023, do include eSIM functionality. This article will help you confirm if your Motorola Edge supports eSIM and what to do if it doesn’t.

How to Confirm if Your Motorola Edge Supports eSIM?

To check if your Motorola is eSIM compatible, you can do it in two ways: through the settings of your Motorola or by dialing the code *#06#.
To check Motorola Edge eSIM compatibility from the settings:

  • Go to Settings → Network & Internet → Mobile network → If you see the Download new SIM option, it means your Motorola is eSIM compatible.
To check Motorola Edge eSIM compatibility from the settings:

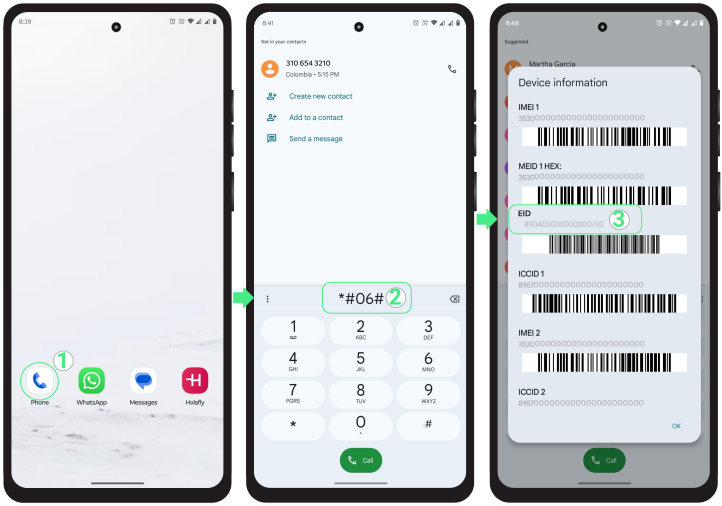
To check Motorola Edge eSIM compatibility by dialing *#06#:

  • Go to the Phone app → Tap on the keypad → Dial *#06# → If you see the EID code, your Motorola phone is compatible with eSIM.

To check Motorola Edge eSIM compatibility by dialing *#06#:

Troubleshooting Tips

What to do if you have already purchased an eSIM?

  • Use the eSIM in another compatible and unlock device. 
  • Keep the roAmigo eSIM for your next trip.
  • Give the eSIM as a gift to a family member or friend who has a compatible device.

Is the Samsung Galaxy S20 FE eSIM Compatible?

No, the Samsung Galaxy S20 FE is not compatible with eSIM. However, this technology is becoming more common in newer devices. Models like the Samsung Galaxy S20, S20+, S20+ 5G, S20 Ultra, and S20 Ultra 5G do support eSIM. Additionally, more recent models, such as the Samsung Galaxy S22 and S23 also offer eSIM. In this article, we’ll show you how to verify eSIM compatibility on your Samsung Galaxy and provide options if you’ve already purchased one.


How to Check if your Samsung Galaxy S20 FE is eSIM Compatible?

You can easily check if your Samsung is eSIM compatible directly from your device. There are two ways to check: through the settings or by dialing *#06#.

To confirm that the Samsung Galaxy S20 FE doesn’t support eSIM from the settings:

  • Go to Settings → Choose Connections → Select SIM manager → If you don’t see an option to Add eSIM or Add mobile plan, then your device doesn’t support eSIM.

To confirm that the Samsung Galaxy S20 FE doesn’t support eSIM from the settings:

To confirm that the Samsung Galaxy S20 FE doesn’t support eSIM by dialing *#06#:

  • Open the Phone app → Go to the keypad → Dial *#06# → If you don’t see the EID code, your Samsung isn’t compatible with eSIM.

Troubleshooting Tips

What to do if you have already purchased an eSIM?

  • You can use your eSIM on another compatible and unlocked device.
  • Keep the eSIM for your next trip.
  • You can also give it to a friend or family member who has a compatible device

Is the Huawei P30 Compatible with eSIM?

No, the Huawei P30 is not compatible with eSIM. This also applies to other devices in the Huawei P30 series, such as the Huawei P30 Lite and Huawei P30 Pro, which only support traditional SIM cards. However, Huawei has introduced eSIM support in newer models, such as the Huawei P40, Huawei Mate 40 Pro, and Huawei Pura 70 Pro. In this article, you’ll learn how to check if your device supports eSIM and find practical strategies to make the most of your eSIM if you’ve already purchased one.


How to Check if your Huawei P30 is eSIM Compatible?

You can easily check if your Huawei is eSIM compatible directly from your device. There are two ways to do it: through the settings or by dialing the code *#06#.
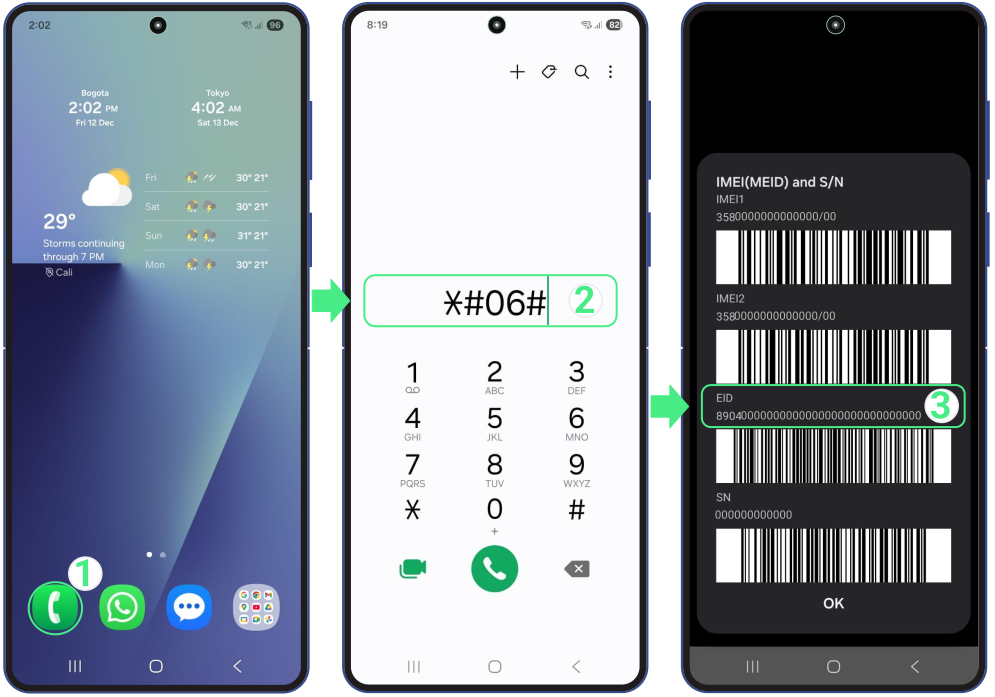
To confirm that the Huawei P30 doesn’t support eSIM from the settings:

  • Go to Settings → Go to Mobile Networks → Go to SIM Management → If you don’t see the option to Add eSIM at the bottom of the screen, your phone is not compatible with eSIM.

How to Check if your Huawei P30 PRO is eSIM Compatible?

To confirm that the Huawei P30 doesn’t support eSIM by dialing *#06#:

  • Open the Phone app → Go to the keypad → Dial *#06# → If you don’t see the EID code, your Huawei isn’t compatible with eSIM.

To confirm that the Huawei P30 doesn’t support eSIM by dialing #06#:

Troubleshooting Tips

What do you do if you have already purchased an eSIM?

  • Use the eSIM in another compatible and unlocked device. 
  • If you haven’t activated your eSIM, you can take it with you on your next trip.
  • You can also give it to a friend or family member who has a compatible device.

Is The Samsung Galaxy S10 eSIM Compatible?

No, the Samsung Galaxy S10 is not eSIM compatible. This includes all models in the Galaxy S10 series (S10 5G, S10e, S10 Lite, and S10+). However, Samsung is known for staying ahead of technological trends, and models, such as the Galaxy A55 5G, S20, S21, S22, and others do offer eSIM compatibility. In this article, we’ll explain how to check if your Samsung device supports eSIM and what to do if you’ve already purchased a Holafly eSIM.
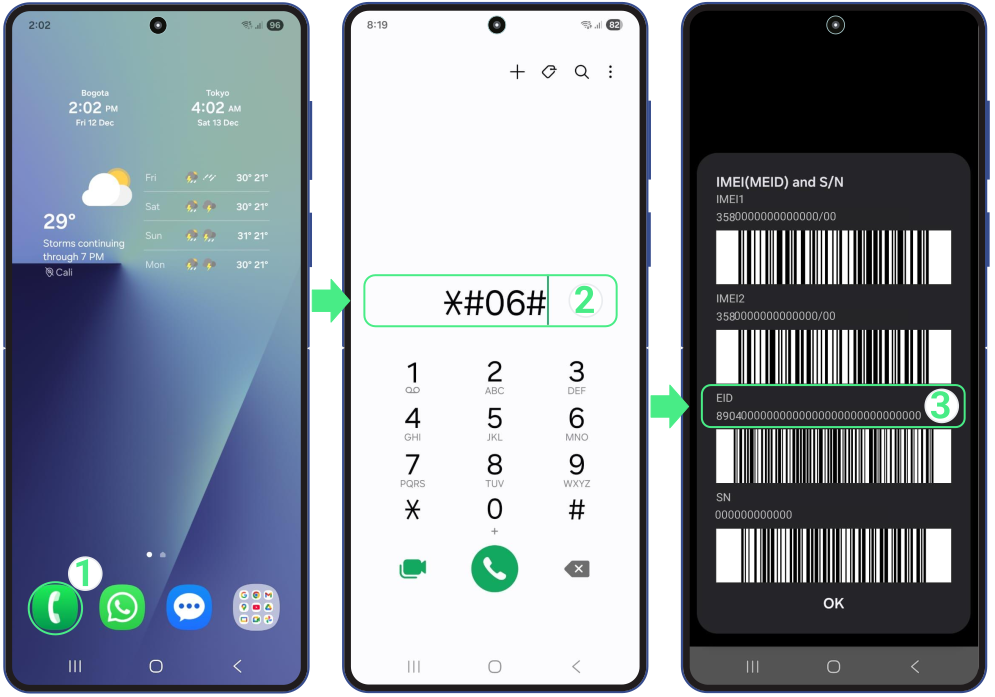
How to Check if your Samsung Galaxy S10 is eSIM Compatible?

You can easily check if your Samsung is eSIM compatible directly from your device. There are two ways to check: through the settings or by dialing *#06#.

To confirm that the Samsung Galaxy S10 doesn’t support eSIM from the settings:

  • Go to Settings → Choose Connections → Select SIM manager → If you don’t see an option Add eSIM or Add mobile plan, then your device doesn’t support eSIM.

To Check Samsung eSIM Compatibility from the Settings:

To confirm that the Samsung Galaxy S10 doesn’t support eSIM by dialing *#06#:

  • Open the Phone app → Go to the keypad → Dial *#06# → If you don’t see the EID code, your Samsung isn’t compatible with eSIM.

To confirm that the Samsung Galaxy S10 doesn't support eSIM by dialing *#06#:

Troubleshooting Tips

What to do if you have already purchased an eSIM?

  • You can use your eSIM on another compatible and unlocked device.
  • Keep the eSIM for your next trip.
  • You can also give it to a friend or family member who has a compatible device

Is the iPhone 7 eSIM Compatible?

No, the iPhone 7 does not support eSIM technology. Apple introduced eSIM functionality with the iPhone XS, iPhone XS Max, and iPhone XR. Since then, all iPhones have been eSIM compatible, including the latest models such as the iPhone 16 Pro and iPhone 16 Pro Max. In this article, we’ll explain how to check your iPhone’s compatibility and explore your options if you’ve already purchased a roAmigo eSIM.

How to Check If iPhone 7 Supports eSIM Compatibility?

Confirming whether your iPhone 7 supports eSIM is very easy. You can check directly in your device’s settings or by dialing the *#06# code.
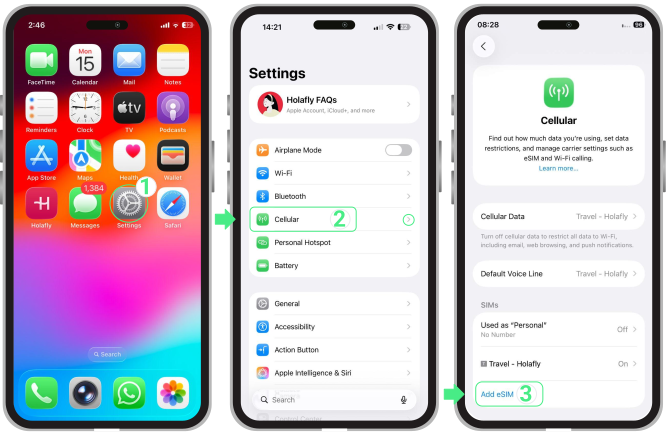
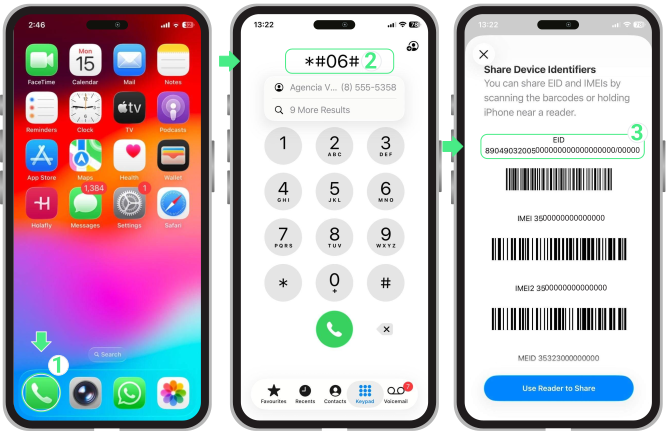
To confirm that the iPhone 7 doesn’t support eSIM from the settings:

  • Go to Settings → Tap on Cellular or Mobile Data → If the “Add eSIM” option isn’t available, your device doesn’t support eSIMs.

To confirm that the iPhone 7 doesn’t support eSIM from the settings:

To confirm that the iPhone 7 doesn’t support eSIM by dialing *#06#:

  • Open the Phone App → Go to the keypad → Dial *#06# → If you don’t see the EID code, your device isn’t compatible with eSIM.

To confirm that the iPhone 7 doesn't support eSIM by dialing *#06#:

Troubleshooting Tips

What should you do if you’ve already purchased an eSIM?

  • You can use your eSIM on another compatible and unlocked device.
  • Keep the eSIM for your next trip.
  • You can also give it to a friend or family member who has a compatible device.

How to check eSIM compatibility?

How to check eSIM compatibility?

If you want to know how to check eSIM compatibility, the fastest way is to dial *#06# on your phone. If an EID number appears on the screen, your device supports eSIM. You can also confirm compatibility directly from your phone’s settings. Since the exact steps vary depending on the operating system, below you’ll find clear instructions for checking eSIM compatibility on iPhones and Android devices, along with what to do if your phone doesn’t show these options.

Check eSIM Compatibility with a Dial Code

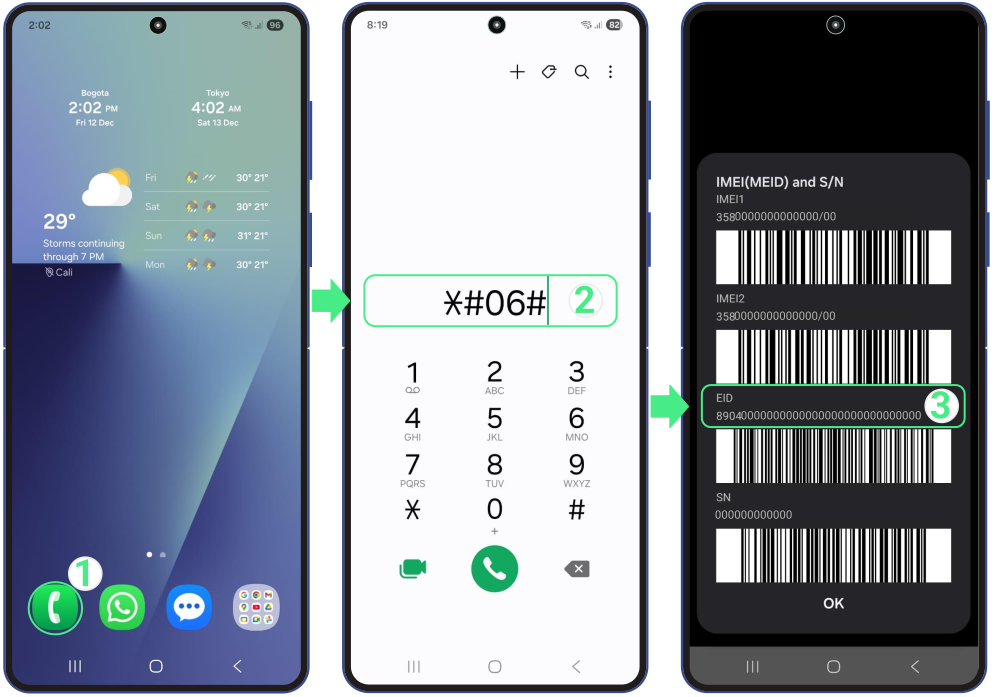
Dialing *#06# is a universal way to check eSIM compatibility, and it works regardless of the device brand. When you enter the code, an information screen with several numbers and barcodes appears.


If you see an EID (Embedded Identity Document), your phone supports eSIM. If only IMEI numbers appear and no EID is listed, the device does not support eSIM and only works with a physical SIM. This check does not place a call; the screen appears automatically after entering the final #.
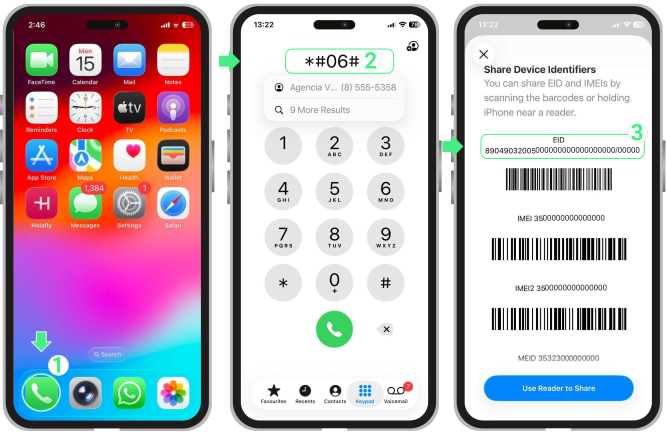

Check eSIM Compatibility with a Dial Code

Check eSIM Compatibility in Your Mobile Settings

You can also confirm eSIM compatibility directly from your phone settings. This check depends on the operating system, since the menu structure differs between iPhone and Android devices. Below, you’ll find the exact paths to follow on each system to verify whether your phone supports eSIM.

How to Find eSIM on iPhone

Checking eSIM compatibility on an iPhone is quick and simple, since the menu layout is the same across supported devices.
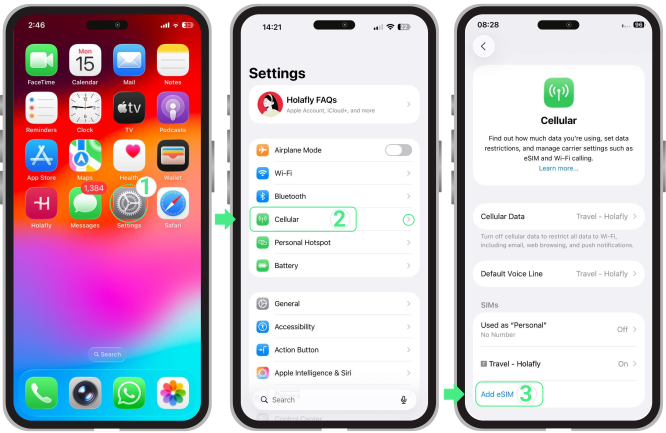

  • Go to Settings → Tap on Cellular (Mobile service) → If the “Add eSIM” option is available, your iOS device supports eSIMs.

How to Find eSIM on iPhone

How to check eSIM support on Android

On Android devices, the exact path can vary slightly depending on the manufacturer. The steps below reflect the most common setup.
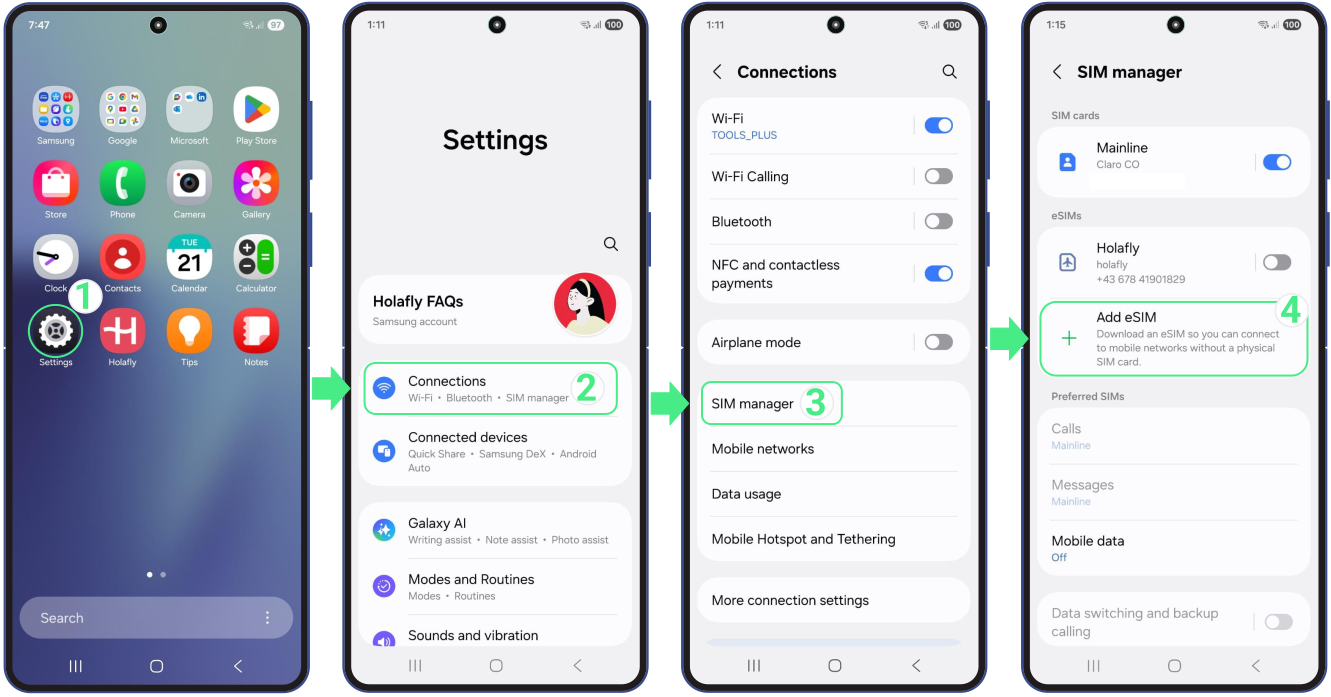

  • Go to Settings → Choose Connections → Select SIM Manager →  If the “Add eSIM” option is available, your phone is compatible.

How to check eSIM support on Android


If you’re using a different Android brand, such as Google Pixel, Motorola, Xiaomi, or Huawei, the menu path may look slightly different. You can follow the specific instructions for your device or check our general list of eSIM-compatible phones.

To Keep in Mind

Even after you check eSIM compatibility, a few external factors may influence eSIM availability on your phone.


  • Some phones are restricted to a specific carrier, which can prevent eSIM use even if the device is compatible. 
  • The country of manufacture can affect eSIM compatibility. Phones made for certain regions may use different hardware configurations, especially when purchased through international importers.
  • eSIM availability can vary between versions of the same phone series, so confirming the exact model and release helps avoid confusion.

Troubleshooting Tips

What to do if your phone is not eSIM compatible?

If you’ve completed the eSIM compatibility check, and your phone doesn’t support eSIM, don’t worry. As long as you haven’t installed the eSIM on any device yet, you still have a few good options.


  • Use the eSIM on another eSIM-compatible smartphone or tablet.
  • Save the eSIM for later if you plan to upgrade to a compatible device.
  • Gift the eSIM to a friend or family member with a compatible device.

Is the Huawei P20 eSIM Compatible?

The Huawei P20 is not compatible with eSIM, and this includes other models in the Huawei P20 series, like the Huawei P20 Lite and Huawei P20 Pro, which only support traditional SIM cards. However, Huawei continues to innovate, and newer models, such as the Huawei P40, Huawei P40 Pro, Huawei Mate 40 Pro, and Huawei Pura 70 Pro offer eSIM. In this article, we’ll explain how to check if your device supports eSIM and provide options if you’ve already purchased one.


How to Check if Your Huawei P20 is eSIM Compatible?

You can quickly verify if your Huawei supports eSIM right from your device. There are two simple methods: through the settings or by dialing the code *#06#.
To Confirm that the Huawei P20 doesn’t support eSIM from the settings:

  • Go to Settings → Go to Mobile Networks → Go to SIM Management → If you don’t see the option to Add eSIM at the bottom of the screen, your phone is not compatible with eSIM.

To Confirm that the Huawei P20 doesn’t support eSIM from the settings:

To confirm that the Huawei P20 doesn’t support eSIM by dialing *#06#:

  • Open the Phone app → Go to the keypad → Dial *#06# → If you don’t see the EID code, your Huawei isn’t compatible with eSIM.
To confirm that the Huawei P20 doesn’t support eSIM by dialing #06#:

Troubleshooting Tips

What to do if you have already purchased an eSIM?

  • Use the eSIM in another compatible and unlocked device. 
  • If you haven’t activated your eSIM, you can take it with you on your next trip.
  • You can also give it to a friend or family member who has a compatible device.

How to use cellular data for a laptop?

To use cellular data for a laptop, you need a device that supports mobile connectivity through a built-in SIM or eSIM slot and an active data plan. Once the SIM or eSIM is installed, you can enable the cellular connection from your network settings and connect to the internet without relying on Wi-Fi.


This option is especially useful for travelers, remote workers, and digital nomads who need a secure and independent connection on the go. Using cellular data on a laptop helps you avoid public Wi-Fi risks and stay connected across different destinations. In this guide, you’ll learn how to add internet to a laptop, what requirements to check, and which options work best depending on your device and travel needs.

How to Check if Your Laptop Supports Cellular Data

The fastest way to know if your laptop can use cellular data is by checking its network settings. Most laptops that support eSIM or a built-in SIM card run on Windows 10 or Windows 11, but the principle is the same for other operating systems, and the verification takes less than a minute. Below, we’ll guide you through the steps.


Note for Mac users: MacBooks do not currently include built-in cellular modems, so connecting to mobile data requires using a smartphone hotspot or an external device.


  • Go to Settings → Network & Internet → Cellular data.

How to Check if Your Laptop Supports Cellular Data
  • If you see the Cellular option, your laptop has a built-in modem and can use cellular data. 
  • If you also see Manage eSIM profiles, your device is an eSIM laptop and is ready to use an eSIM plan.
  • If the Cellular menu does not appear, your laptop doesn’t support cellular data natively. 

Options to Use Cellular Data on a Laptop 

If your laptop supports a built-in SIM or eSIM, you can connect directly to a mobile network without relying on public Wi-Fi. If it doesn’t, there are still reliable ways to stay online. Below are the main options to add internet to a laptop, ordered from the most seamless to the more manual alternatives using your phone or other devices.

Built-In eSIM or SIM slot (Best Option for Travelers)

Laptops with a built-in eSIM or SIM slot allow you to use cellular data for laptop travel without extra devices. This option offers a secure, always-on connection and avoids draining your phone’s battery.


This is the best choice if you:


  • Have a cellular-enabled laptop (with an eSIM or SIM slot).
  • Want a stable connection without hotspots.
  • Travel frequently and need reliable data access. 

If you’re unsure if your device supports this technology, you can check our updated list of eSIM-compatible laptops.

Smartphone Hotspot (The Quickest Solution)

If your laptop doesn’t support cellular data natively, using your phone as a hotspot is the quickest workaround. This method lets you use your phone as a hotspot for a laptop via Wi-Fi, USB, or Bluetooth.


This option works well if: 


  • Your phone has an active data plan and allows you to share it via hotspot.
  • You need a quick setup without buying additional devices.
  • You only need a short-term connection, since hotspot usage can drain your phone’s battery faster.
  • Your phone supports eSIM or mobile data abroad.
  • You’re traveling for a short period.

Keep in mind that hotspot usage can increase battery consumption on your phone, so it’s best used as a temporary solution.

Portable Wi-Fi or USB Modems (Your Portable Router)

Portable Wi-Fi devices and USB modems work like small, portable routers for your laptop. They create their own internet connection, so you can get online even if your laptop doesn’t support eSIM or a SIM card.


This option is useful if:


  • Your laptop has no cellular hardware.
  • You want a standalone device for mobile data.
  • You travel with multiple devices that need internet access.


Advantages of Using Cellular Data for a Laptop

  • If your laptop has built-in cellular connectivity, it works much like a smartphone. Once set up, you get instant internet access as soon as you open your device, without turning on hotspots or connecting extra hardware.
  • Cellular networks use professional encryption, making them far more secure than public Wi-Fi in airports, cafés, hotels, or shared workspaces.
  • Stay connected on trains, buses, or in areas where Wi-Fi is unstable or simply unavailable, whether you’re traveling or working remotely.
  • In many locations, 4G and 5G networks deliver more consistent speeds than overcrowded public networks, helping to avoid dropped connections during calls or online work.

To Keep in Mind

Before using cellular data for a laptop while traveling, consider the following:


  • Some laptops purchased through carriers may be locked, which can prevent the use of international SIM or eSIM options. Always confirm your device is unlocked.
  • A SIM slot doesn’t always mean the laptop supports cellular data. Checking Settings → Network & Internet → Cellular is the only reliable way to be sure.
  • Turn on the “Metered Connection” setting. This tells your laptop to stop downloading big updates in the background, so you don’t use up your data plan accidentally.
  • Enable Data Roaming so cellular data on your laptop works properly when traveling abroad.

Troubleshooting Tips

If cellular data for your laptop isn’t working as expected, check the following:


  • Make sure Data Roaming is turned ON in Windows settings. Without this option enabled, cellular data for laptop use won’t work when traveling abroad.
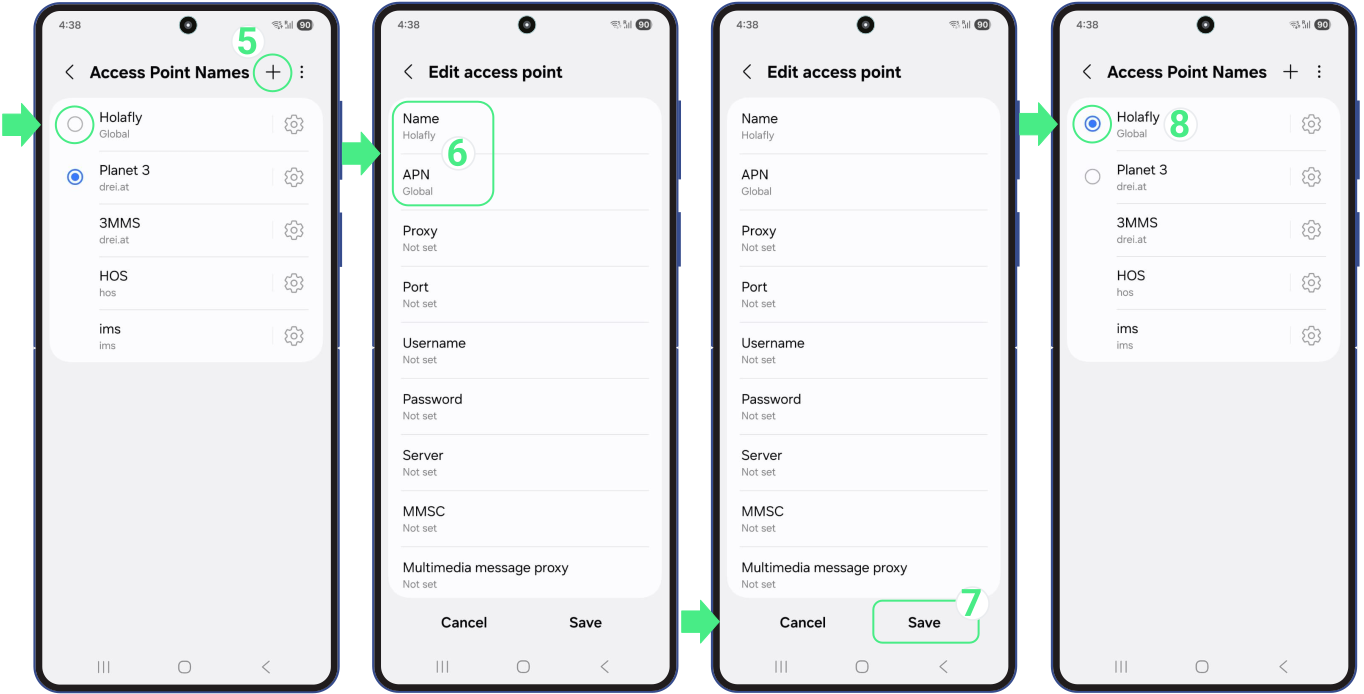
  • If your laptop with eSIM still doesn’t connect, you may need to manually add the APN provided by your eSIM or carrier to activate mobile data correctly.
  • If the device shows a signal, but there’s no internet access, turn Airplane Mode ON and OFF from the Windows taskbar to refresh the network and restore cellular data on your laptop.
  • Restart your laptop to complete the process and ensure the data connection is properly established.

설치 가이드

How to Change APN Settings on Vivo Devices?

The correct APN (Access Point Name) settings are essential for a stable and fast data usage on your Vivo device. The APN links your Vivo to the mobile network, enabling internet and other services. Most eSIMs, like roAmigo’s, come with pre-configured APN settings, but if your device doesn’t automatically detect the settings, adjustments may be needed. In this article, we’ll show you how to edit your APN settings on Android and fix common problems. Keep reading to enjoy smooth data while traveling!

How Does the roAmigo APN Works on Your Vivo Device?

By default, roAmigo eSIM comes with pre-configured APN settings. However, if you’re having trouble getting online, such as activation failure on the specific destination for which you purchased the eSIM, you may need to adjust them manually.


The roAmigo APN for Android devices is simple: just enter “Global” in the APN field to enable data and services. Keep reading for a step-by-step guide to set it up and enjoy uninterrupted browsing.
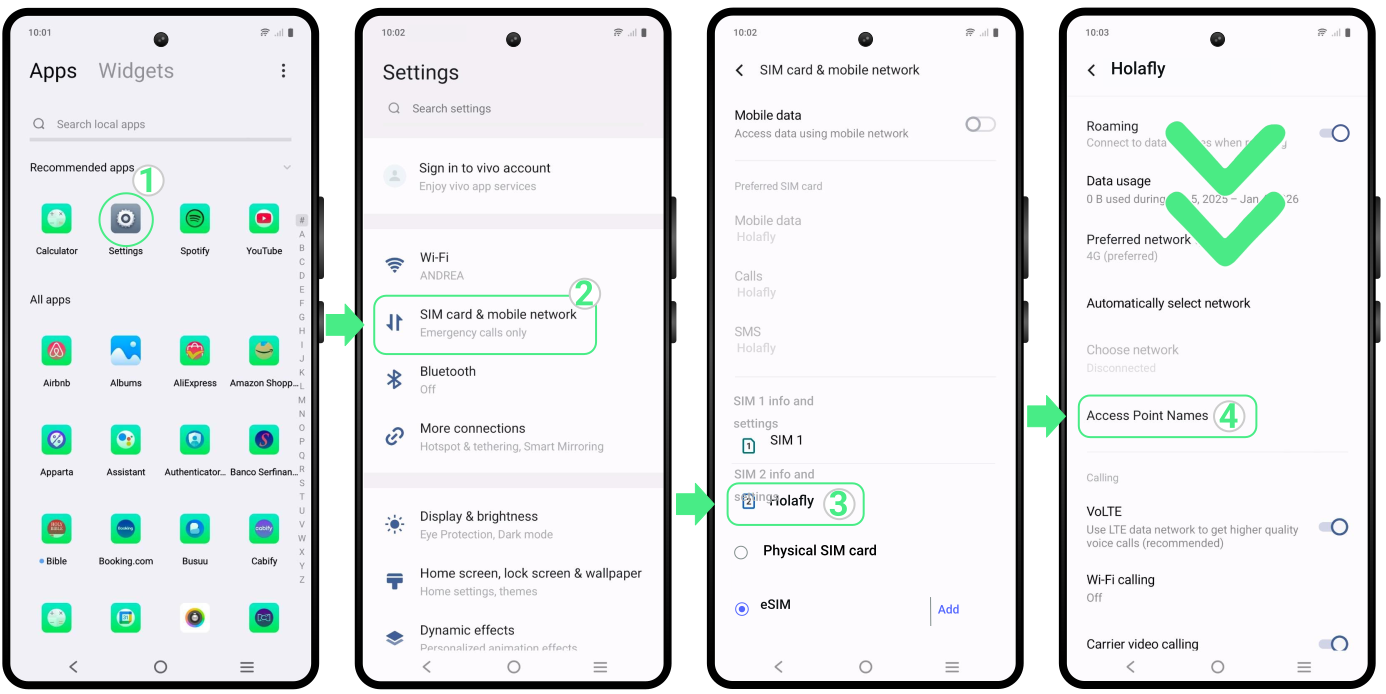
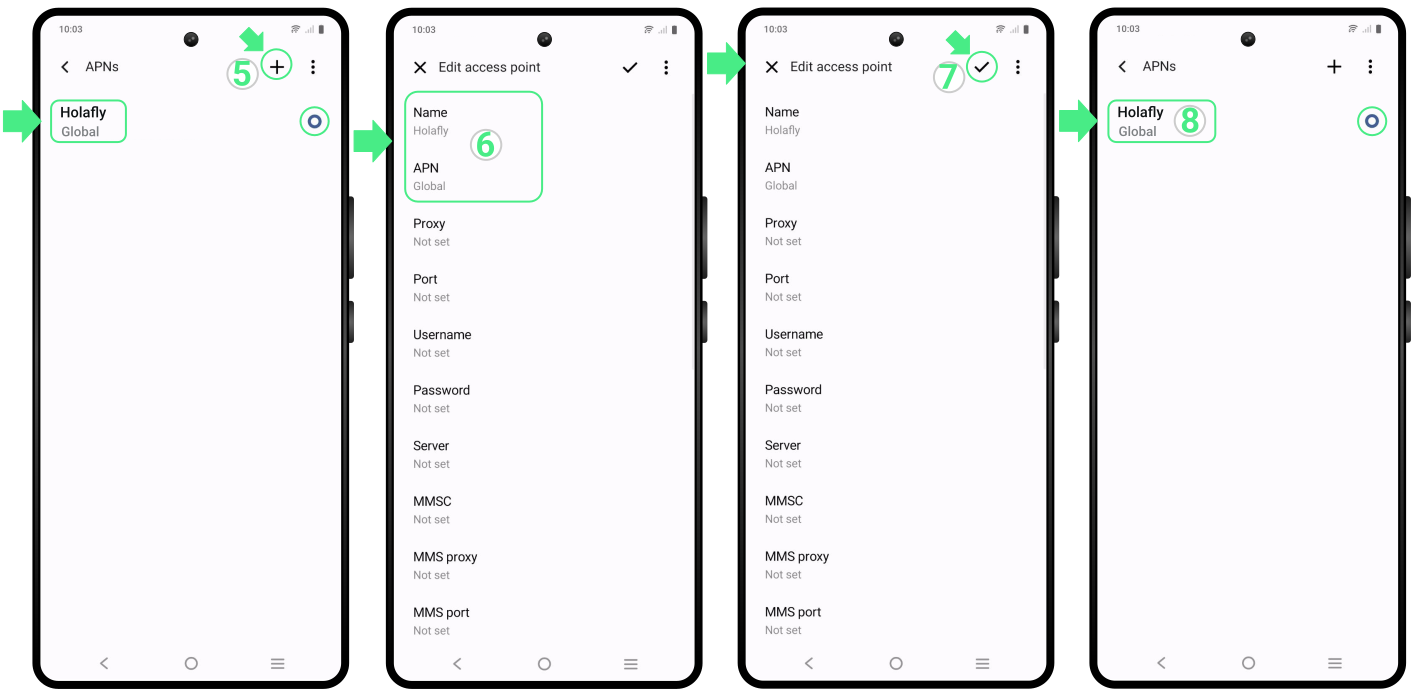
To Set Up APN Android Settings on Vivo:

  • Go to Settings → Tap on SIM card and mobile network → Select your roAmigo eSIM. → Scroll down and Tap on Access Point Names.

To Set Up APN Android Settings on Vivo:

  • Check if there is an APN labeled Global and select it. If it doesn’t appear, you’ll need to create it. To do so, press the + button → In the Name field, type roAmigo to easily recognize it → Then, in the APN field, enter Global → Tap the three dots at the top right → Choose Save → Once the changes are saved, select the newly created APN (Global)

To Set Up APN Android Settings on Vivo:

Troubleshooting Tips

1. If your roAmigo APN settings are configured but your internet connection isn’t performing optimally, resetting your APN settings on Android can resolve connectivity challenges and restore default configurations. 


Resetting network settings erases saved Wi-Fi, mobile data, and Bluetooth connections. Back up your passwords first, then follow our steps to reset network settings on your Vivo for smooth connectivity.
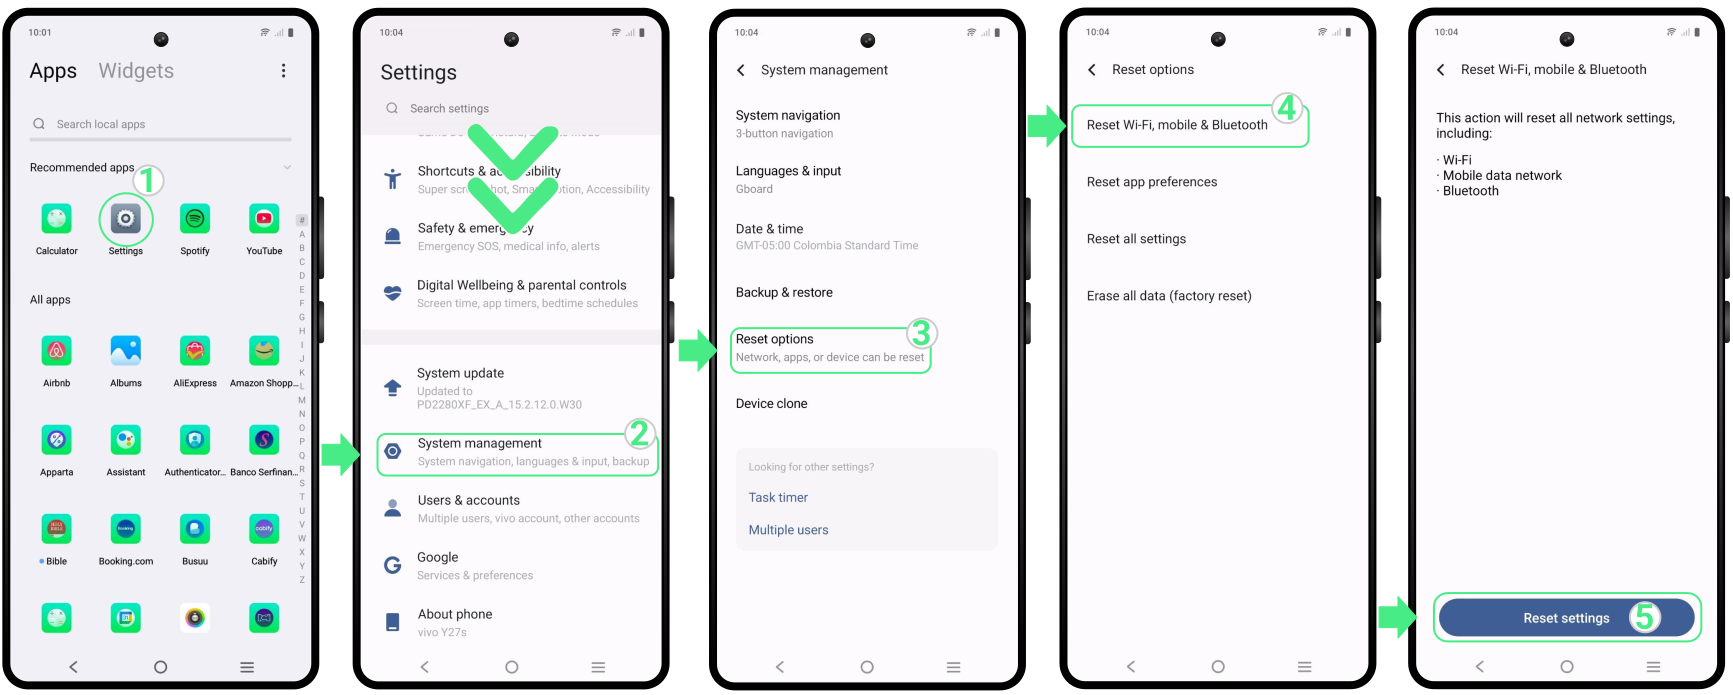
To reset network settings on a Vivo Android phone:

  • Go to Settings → Scroll down and tap on System management → Select Reset options → Tap on Reset Wi-Fi, mobile & Bluetooth → Finally, tap on Reset settings to reset your network. (If prompted, enter the PIN you use to unlock your screen and tap Next).

To reset network settings on a Vivo Android phone:

2. If your device is within the coverage area of the eSIM plan, the APN is correctly configured, and resetting the network settings hasn’t resolved the lack of internet, try changing the operator manually.


3. If your device is from another brand, like Samsung, Huawei, Xiaomi, Honor, or Pixel you’ll find step-by-step guides for each one to help you easily set up your Android APN settings.

How to Install and Activate an eSIM on an Honor Device?

Most modern Honor smartphones support eSIM technology, specifically across new releases like the Honor 600e, the flagship Magic series, and the Number series (including the Honor 90, 200, and 400 lines). This technology allows you to connect to a cellular network digitally without using a physical SIM card.


You can install the eSIM automatically if your provider has an official app. Otherwise, you can use the two universal methods that work for any line: scanning a QR code or entering the details manually. Below, you’ll find the step-by-step instructions to get your data up and running in just a few minutes.

Before you install your Honor eSIM

  • Ensure that your Honor device is compatible with eSIM and not locked by any carrier. This means your phone must be unlocked to work with other networks.
  • Make sure you’re connected to a stable and secure Wi-Fi network. 
  • Keep in mind that an eSIM can only be installed once. Never delete the profile from your settings later, or you may lose your plan.
  • For Global or Regional (Europe, Asia, South America, Africa, etc.) plans, install it no earlier than 1 day before your trip to ensure your data starts when you need it. For single-country plans, install it at any time.

How to Install an eSIM on your Honor device?

There are three methods to set up your eSIM. Choose the option that best suits your needs below and follow the step-by-step instructions: 

1. Install an eSIM on Honor using the app

Using the roAmigo eSIM is usually the fastest and easiest way to set up your line. Simply  follow the steps below:
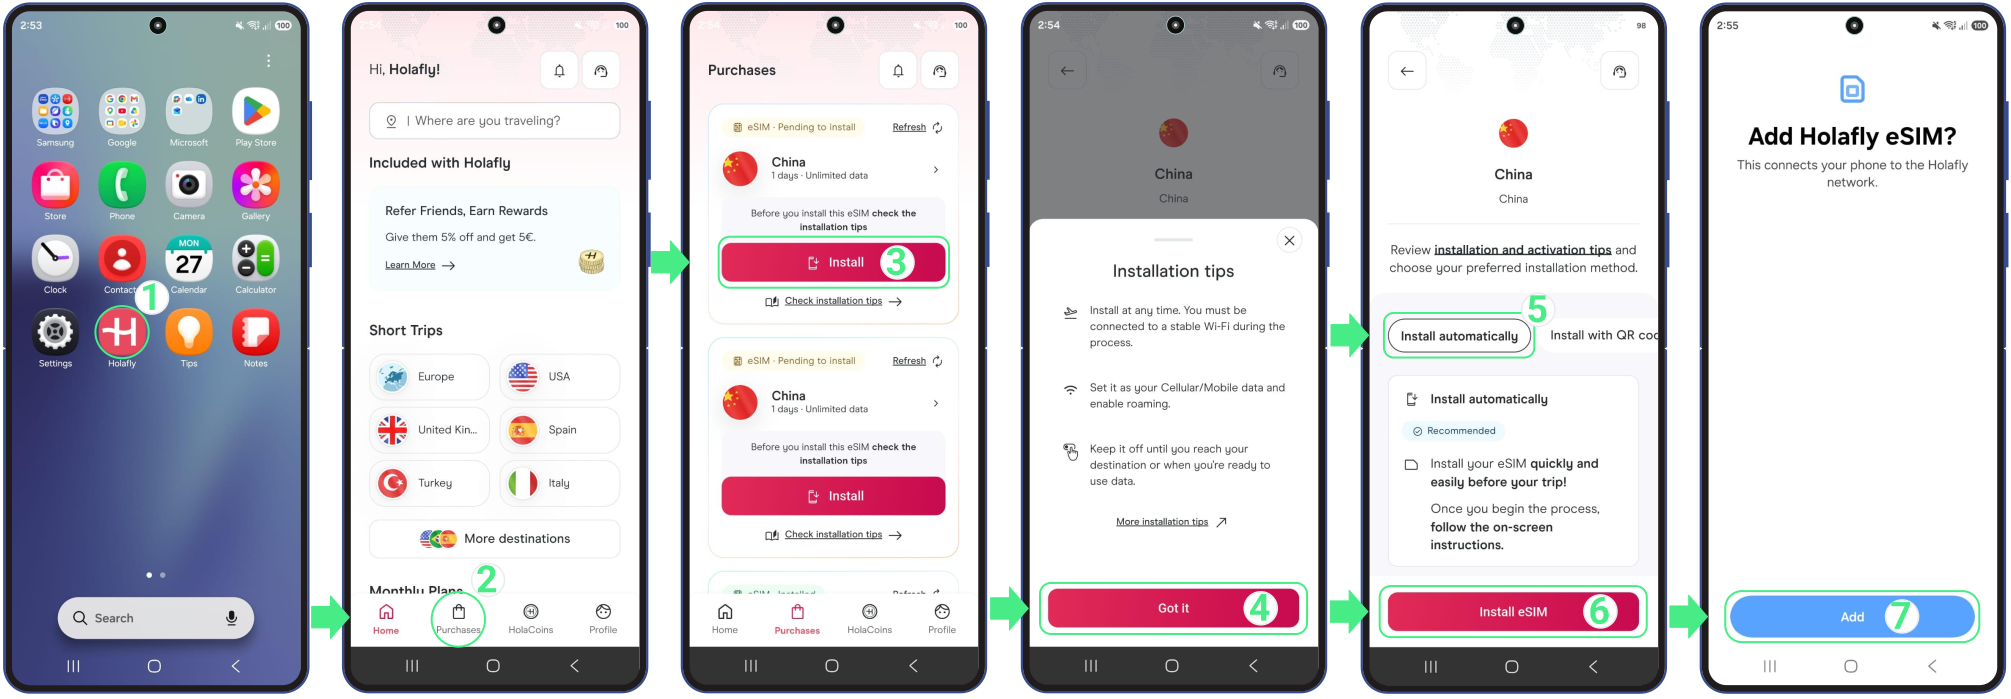
  • Go to the app on your phone → Log in with the email associated with your purchase → Go to Purchases → TapInstall on the eSIM you want to add → Read the Installation tips and tapGot it to continue → Choose Install Automatically → Tap Install eSIM  → Then, tapAdd and Continue to save your new line inside the SIM management menu in settings.

Install an eSIM using the app

2. Install an eSIM on Honor with a QR Code

You can also install your eSIM by scanning the QR code directly from your Honor settings. Before you begin, make sure the QR code is displayed on another screen or saved to your gallery if you’re using only one device.
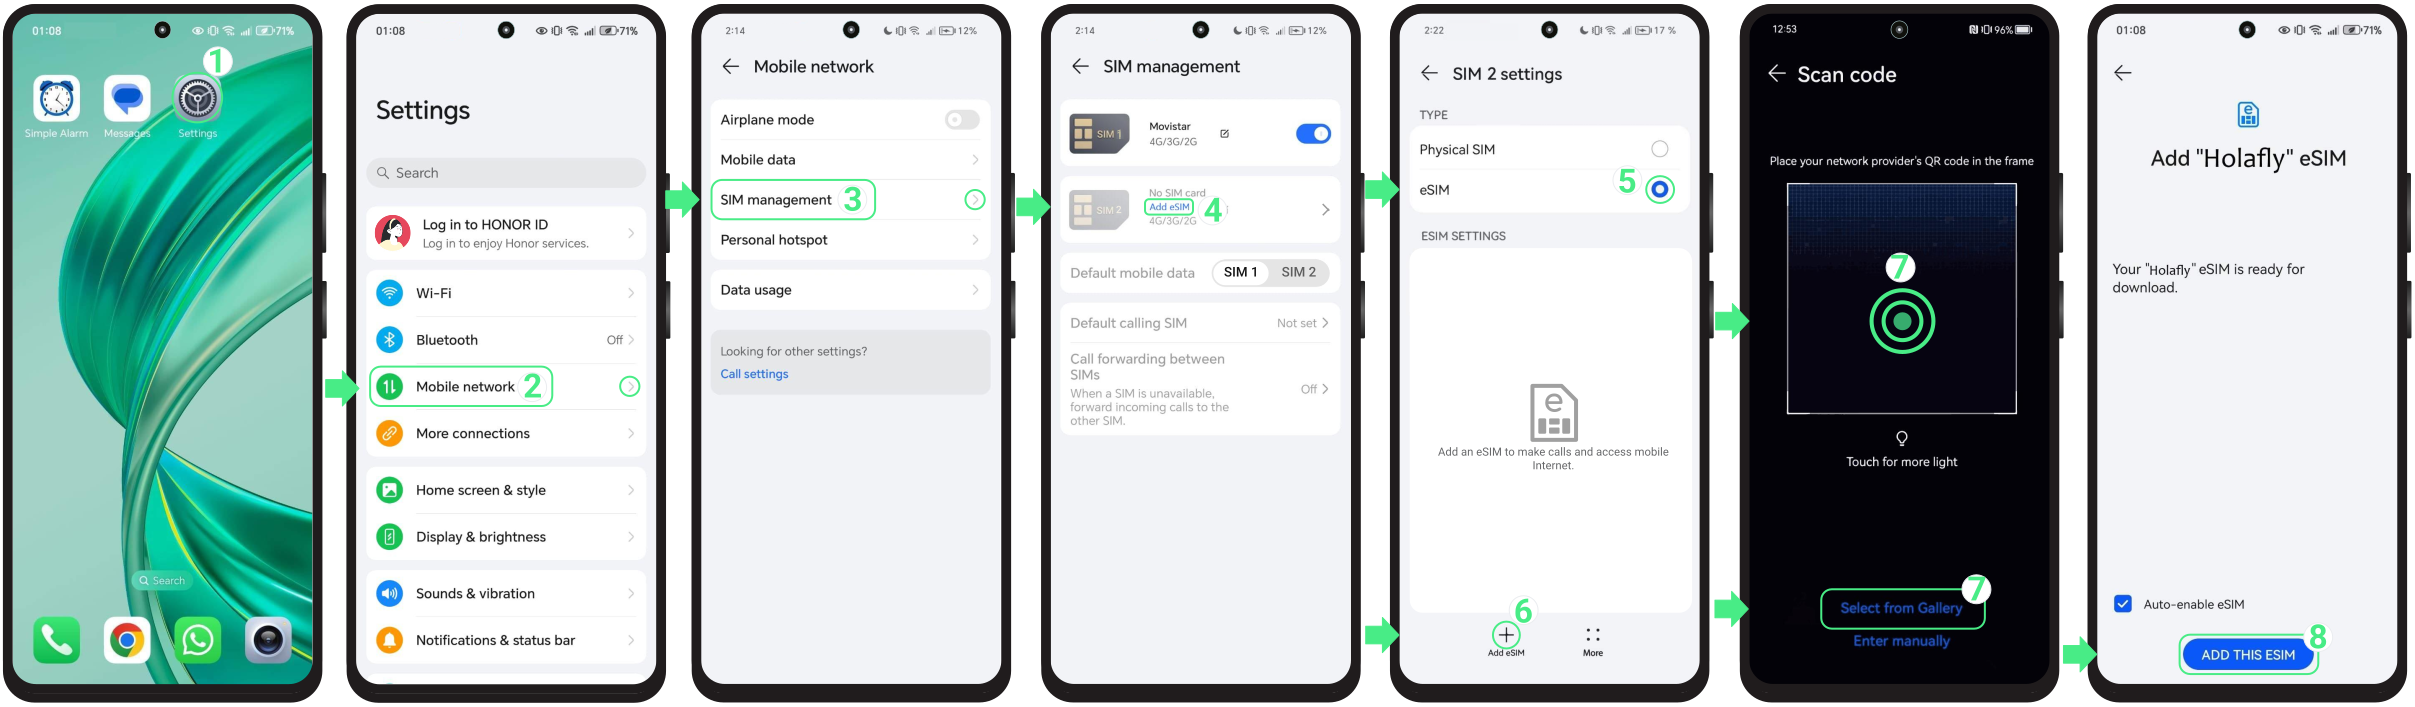

  • Go to Settings → Select Mobile network → Tap on SIM management → Select Add eSIM → Enable the eSIM option → Press the Add eSIM button in the bottom left corner of the screen → Scan the QR code or tap the “Scan from Gallery” text link below to choose it from your photos → Tap on Add this eSIM (Don’t close this window, or the installation will stop).

Install an eSIM on Honor with a QR Code

3. Install an eSIM on Honor using manual details

If you can’t scan the QR code, you can install your eSIM by manually entering the activation details received with your purchase.


  • Go to Settings → Select Mobile network → Tap on SIM management → Select Add eSIM → Enable the eSIM option → Press the Add eSIM button in the bottom left corner of the screen →  Tap on Enter Manually → Copy the two manual codes from the iOS section in your eSIM confirmation email (Honor uses the same two-field format as iOS, not Android) and paste the SM-DP+ Address and the Activation Code into their respective fields → Tap on NEXT → To finalize, tap on  Add this eSIM (Do not close the window, as this could cancel the installation).

Note: Please keep in mind that these are manual text codes, not clickable links.
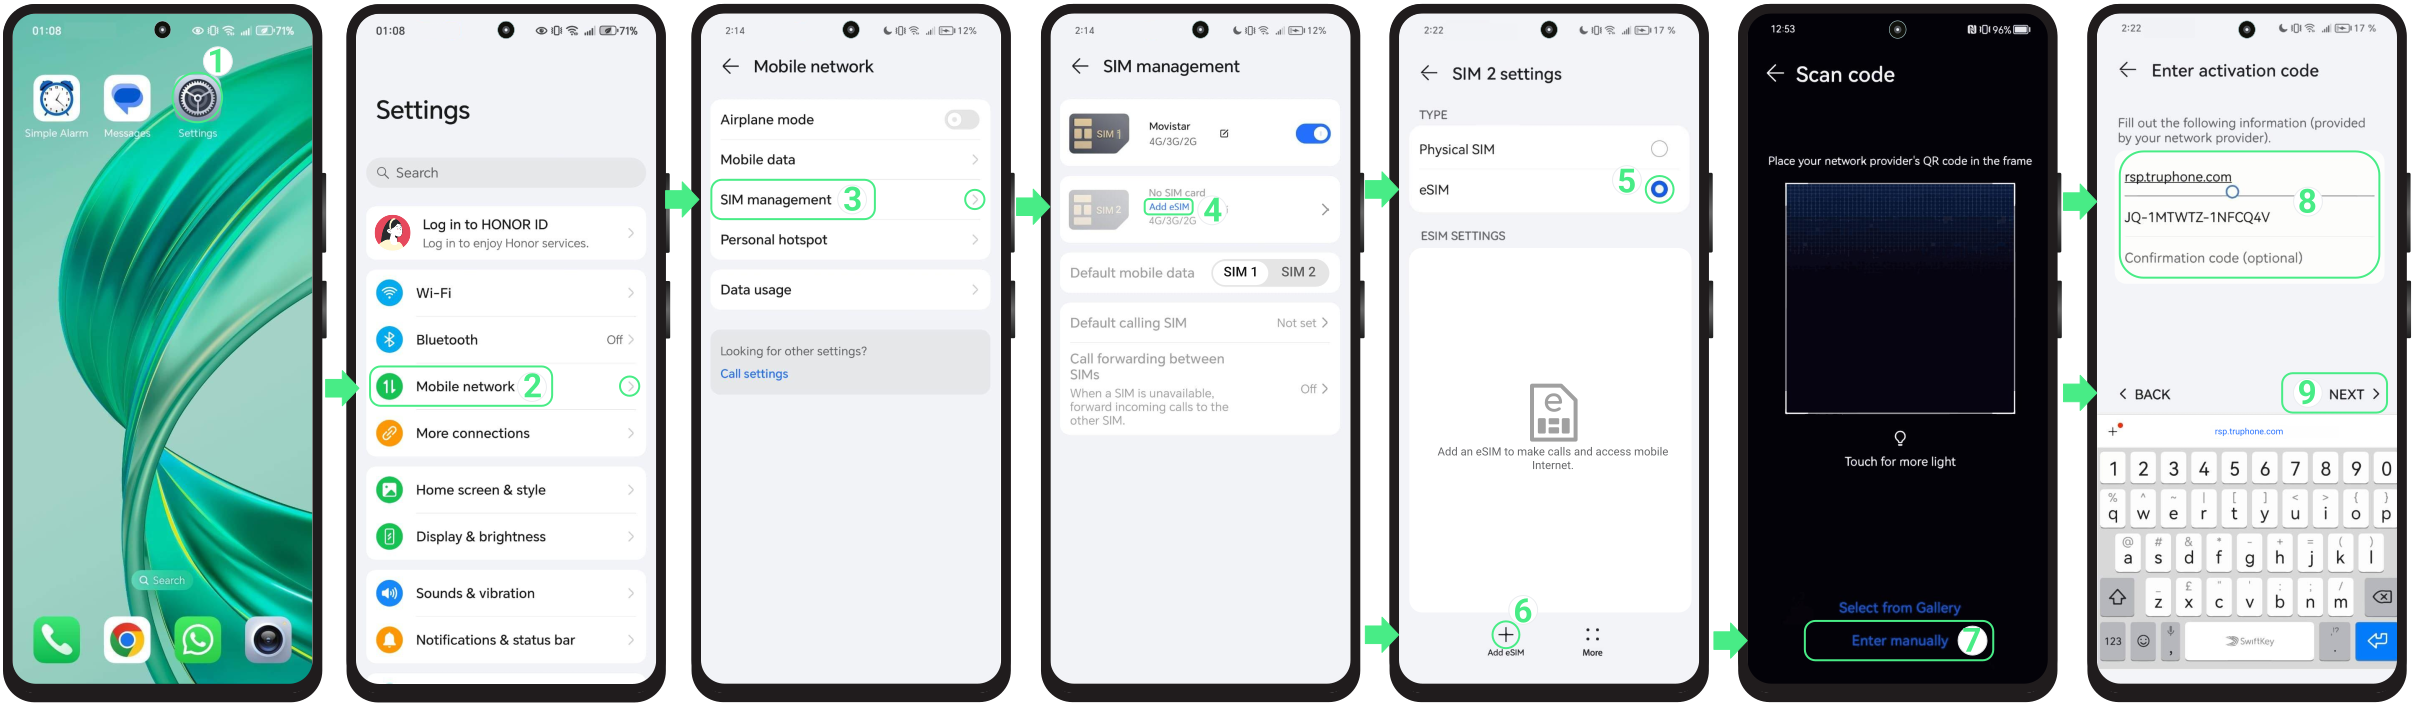

To install an eSIM on Honor using manual codes:

How to activate an eSIM on your Honor device:

After installing your eSIM, you just need to turn on the new line and select it for mobile data to activate it. You don’t need any connection to do this, simply follow the steps below directly from your phone’s settings:


Note: If you’re using a travel eSIM, it’s recommended to enable the line only after you arrive at your destination to avoid activating it too early.
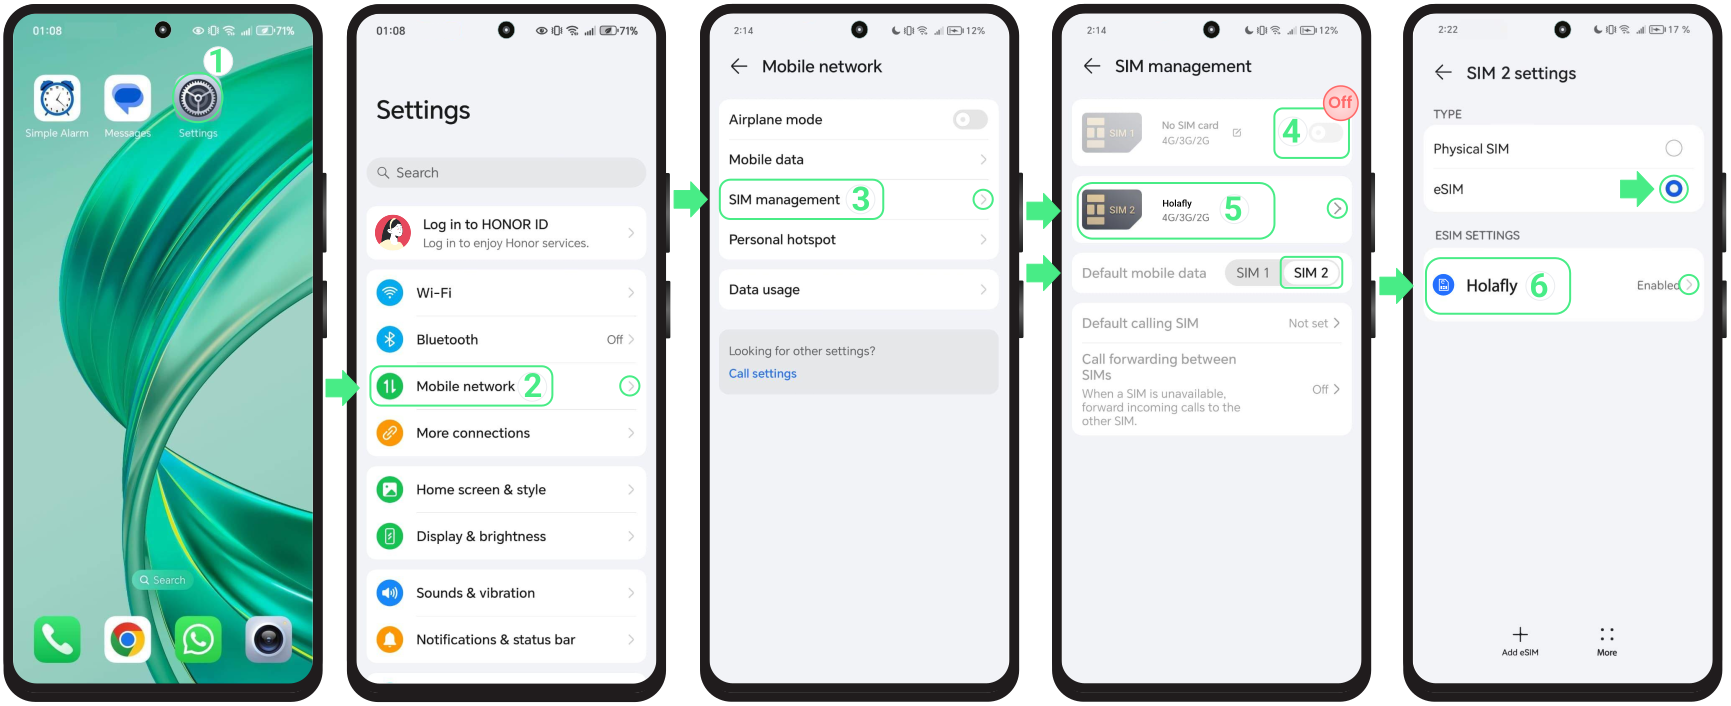
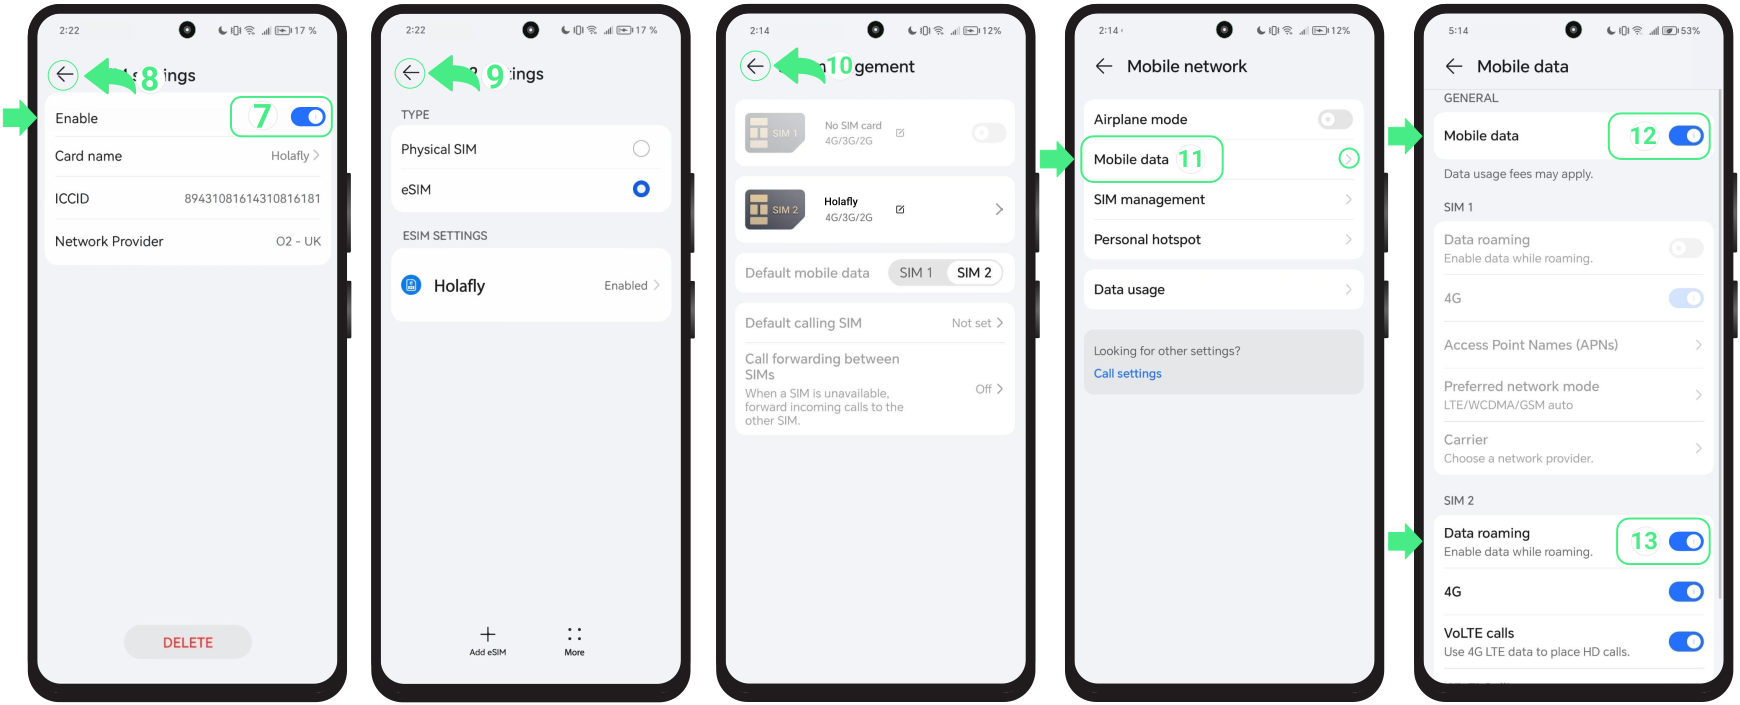
  • Go to Settings → Select Mobile network → Tap on SIM management → Set up your new eSIM as Default mobile data → Deactivate your Personal SIM/eSIM (this prevents unexpected charges from your home carrier) → Tap on the recently installed eSIM → Check that the eSIM option is selected → Tap on your New eSIM line again.

How to Activate an eSIM on Your Honor Device?
  • Then, turn on the Enable switch → Go back three times until you reach the Mobile networks menu → Choose Mobile data → Then, choose Mobile data → Turn on Mobile Data and also Data roaming if you are using a travel eSIM.

How to Activate an eSIM on Your Honor Device?

To keep in mind

  • On Honor devices with eSIM and Dual SIM support, like the Honor 90, you can use both a physical SIM and the eSIM at the same time, but only one can be active for mobile data.
  • Remember that the Honor Magic 6 Lite, Honor X9C, and Honor 70 are not compatible with eSIM,
  • When using a travel or international eSIM, disable your personal SIM once you reach your destination to avoid unexpected roaming charges from your domestic carrier.

Troubleshooting tips

During Installation

If your Honor displays a message during installation, there’s no need to start over right away. In many cases, the eSIM has already been added to your device. Before trying again, take a quick look:


  • On your phone: Go to Settings → Mobile network → SIM management. Your new eSIM should appear there, usually with the name assigned during setup or the provider name.
  • In the App: Check your eSIM status. If it says “eSIM Installed – Ready to use,” everything is ready for activation.

Using your mobile data

If you already turned on your eSIM and enabled Data Roaming but still have no internet, you can manually select a network by going to your Settings, Mobile networks, Mobile data, and Carrier. There, just turn off the Automatic switch, tap OK, and once the available networks load, test the operators one by one until you find the one with the best signal to start browsing again.


⚠️ Important: Don’t remove your eSIM. If you remove it, you most likely won’t be able to reinstall it.

How to Change APN Settings on Huawei Android?

The APN (Access Point Name) allows your Huawei to access mobile data so you can browse, share, and use your apps wherever you are. Most eSIMs, including Holafly’s, come with the APN ready to go. But in certain cases, like switching carriers or after a system update, you might need to adjust these settings manually to make the most of your connection. This article will show you how to update APN settings on Android phones and ensure you’re always connected. Let’s dive in! 

What Are the APN Settings for Holafly on Huawei?

Holafly eSIMs come with the APN preconfigured. However, sometimes it’s necessary to change these settings if you’re unable to connect after activation at your destination. The APN for Holafly is “Global,” and you just need to enter this term in the designated fields.


Please note that the process may vary slightly depending on your Huawei model and Operating System (OS) version. Follow the steps below to set up your APN and get your mobile data working properly.
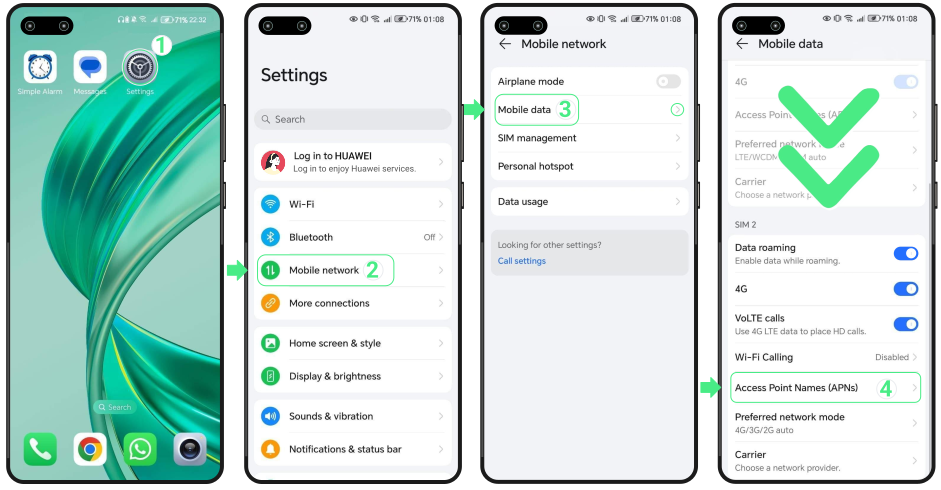
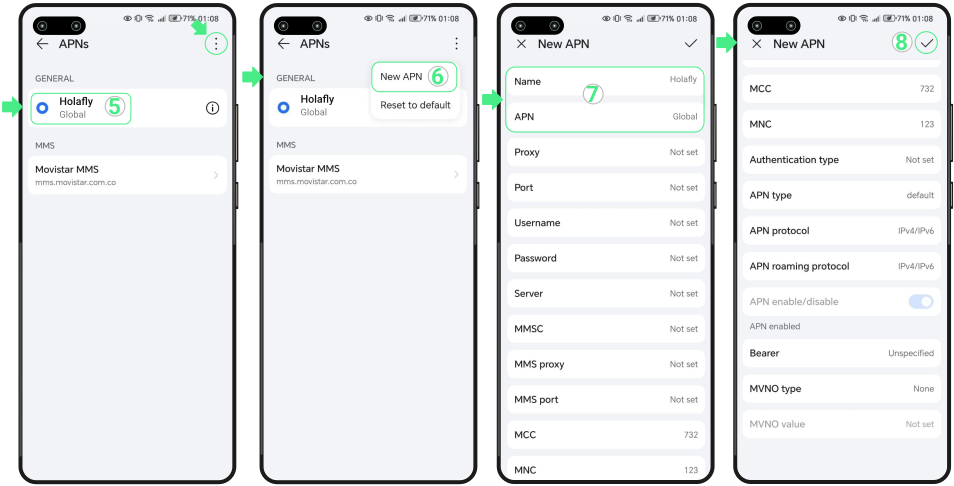
To set up APN Android settings on Huawei:

  • Go to Settings → Mobile network → Tap on Mobile data → Scroll down and select Access Point Names (APNs).

To set up APN Android settings on Huawei:
  • Check if there is an APN labeled “Global” and select it. If it doesn’t appear, you’ll need to create it. To do so, tap the three dots at the top right → Tap on New APN → In the Name field, type “Holafly” to easily recognize it → Then, in the APN field, enter the word Global → When you’re finished, tap the checkmark to save the changes. Make sure to select the newly created APN as the default for your Huawei, otherwise, it won’t activate correctly.

To set up APN Android settings on Huawei:

Troubleshooting Tips:

1. If you’ve entered the wrong APN settings for Android or are still having trouble connecting after configuring the correct APN, resetting your network settings can help restore the default connection. Keep in mind that resetting your network settings will erase Wi-Fi, mobile network, and Bluetooth connections. Make sure to back up your passwords and other connection details. 


Below, we’ll guide you through the steps:
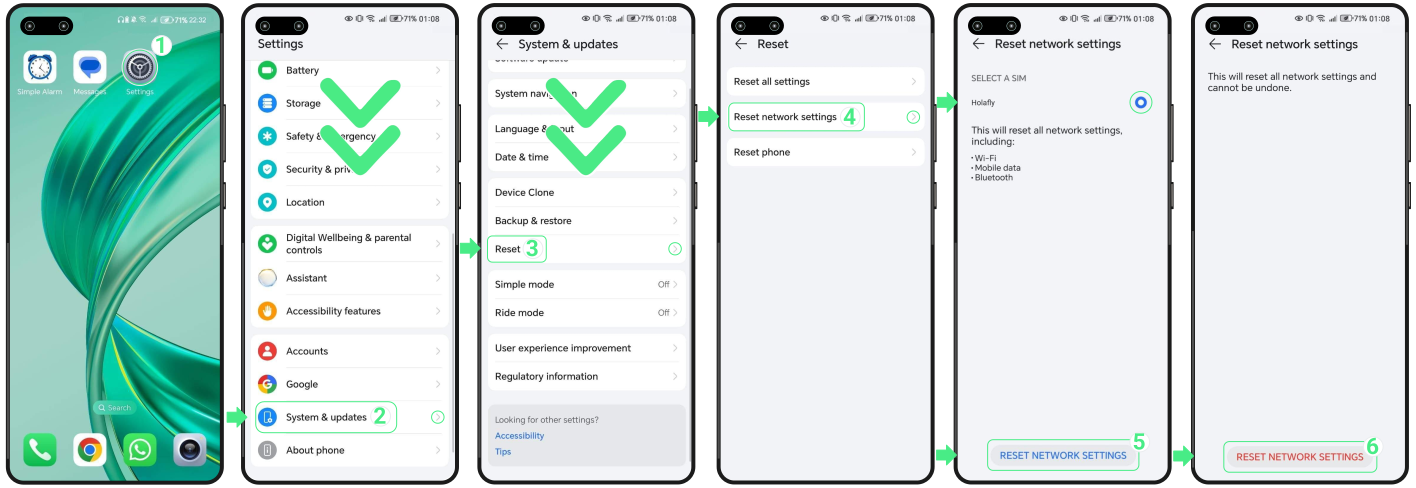
To reset network settings on Huawei phones:

  • Go to Settings → Scroll down and tap on System & updates → Select Reset option → Tap on Reset network settings → Select the eSIM ‘Holafly‘ → Finally, tap on Reset network settings. (If prompted, enter the PIN you use to unlock your screen and tap on Reset network settings again).

To reset network settings on Huawei phones:

2. If your device is within a coverage area included in the eSIM plan, and the APN is correctly configured, but after resetting network settings the internet still isn’t working, try manually switching the operator.


3. If your phone is from another brand like Samsung, Xiaomi, Motorola, Vivo, Sony, or Pixel, You’ll get easy-to-follow steps for setting up your Android APN settings without any hassle.

How to Set Up APN Settings on an Oppo Android?

The Access Point Name (APN) is the gateway that connects your mobile device to the internet, enabling you to browse, share, and stay connected effortlessly. Most eSIMs already come with APN settings preconfigured, but sometimes, like when you switch carriers or after a system update, you might need to adjust them manually. In this article, we’ll show you exactly how to update the APN settings on your Android step by step. Let’s make sure you always have access to data, no matter where you are!

Steps to Set Up roAmigo APN on Oppo

roAmigo eSIMs typically include preconfigured APN settings. However, if you’re having trouble connecting after activation, you might need to update them manually. For roAmigo, the APN is “Global“, and you’ll need to enter this term in the specified fields. Make sure to select the roAmigo eSIM as your primary data option to ensure the correct APN settings are applied on your Oppo Android device.


Keep in mind that the setup process can vary slightly depending on your Oppo model and Android version. Follow the steps below to configure your APN and stay connected effortlessly.
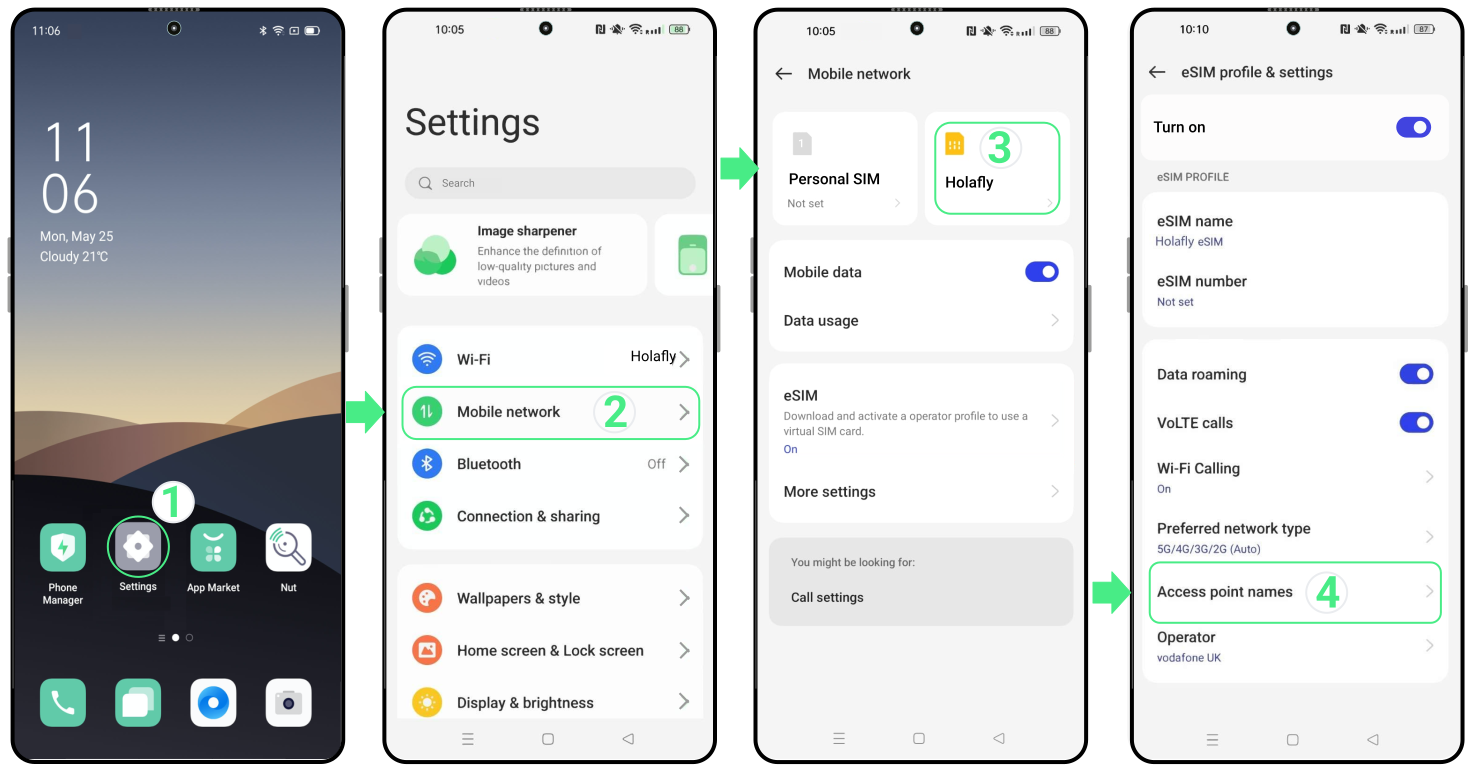
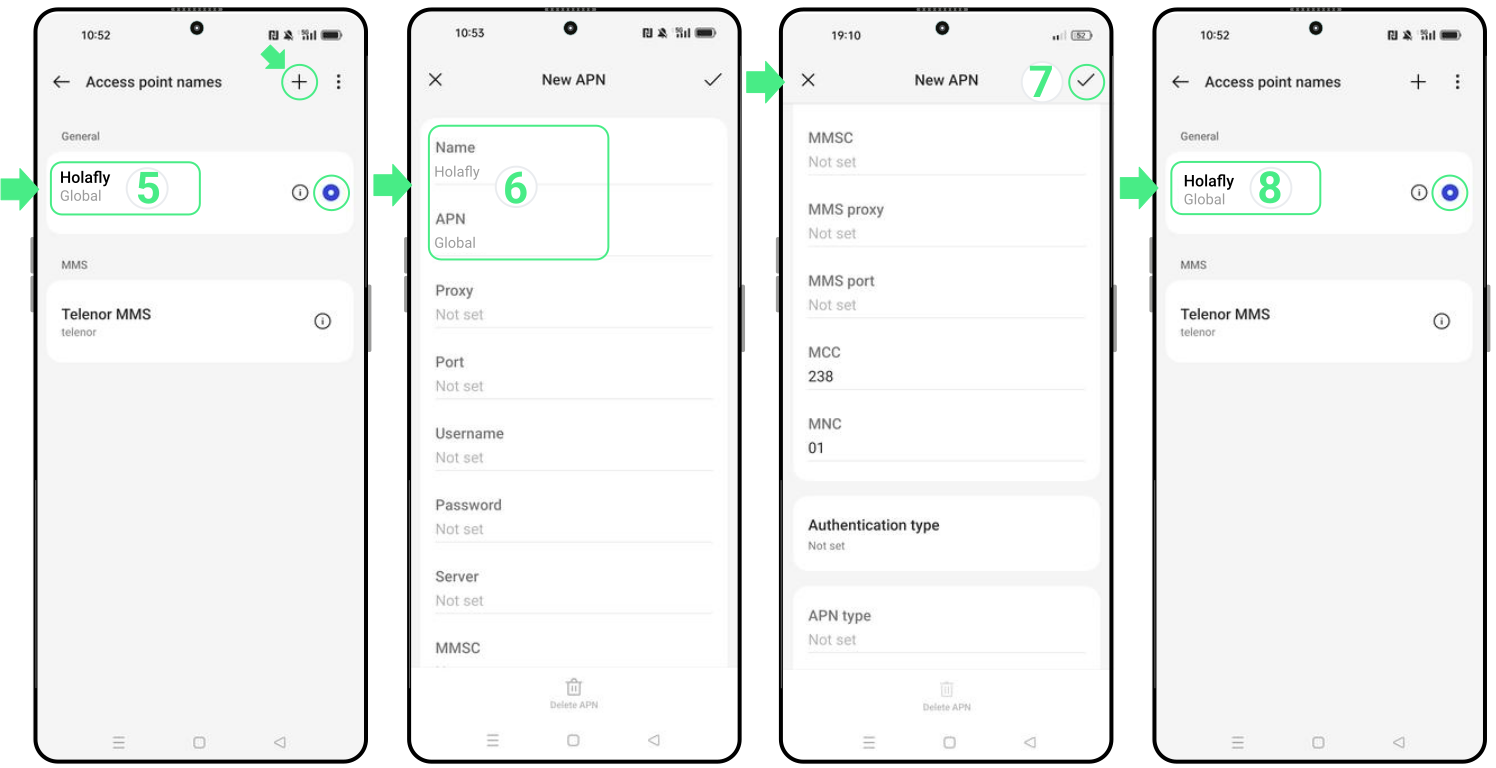
To set up APN Android settings on Oppo:

  • Go to Settings → Mobile network → Tap on your roAmigo eSIM → Select Access Point Names (APNs).

To set up APN Android settings on Oppo:

  • Check if there is an APN labeled “Global” and select it. If it doesn’t appear, you’ll need to create it. To do so, tap the + at the top right → In the Name field, type “roAmigo” to easily recognize it → Then, in the APN field, enter the word Global → When you’re finished, tap the checkmark to save the changes → Finally, make sure to select the newly created APN (Global) as the default for your Oppo, otherwise, it won’t activate correctly.

To set up APN Android settings on Oppo:

Troubleshooting Tips

1. If you’ve accidentally entered the wrong APN on your Android or are still unable to connect to the internet after configuring the correct APN, it might be time to reset your network settings. Note that this will erase saved Wi-Fi, mobile network, and Bluetooth connections, so be sure to back up your passwords. 


Below, we’ll guide you through the steps: 
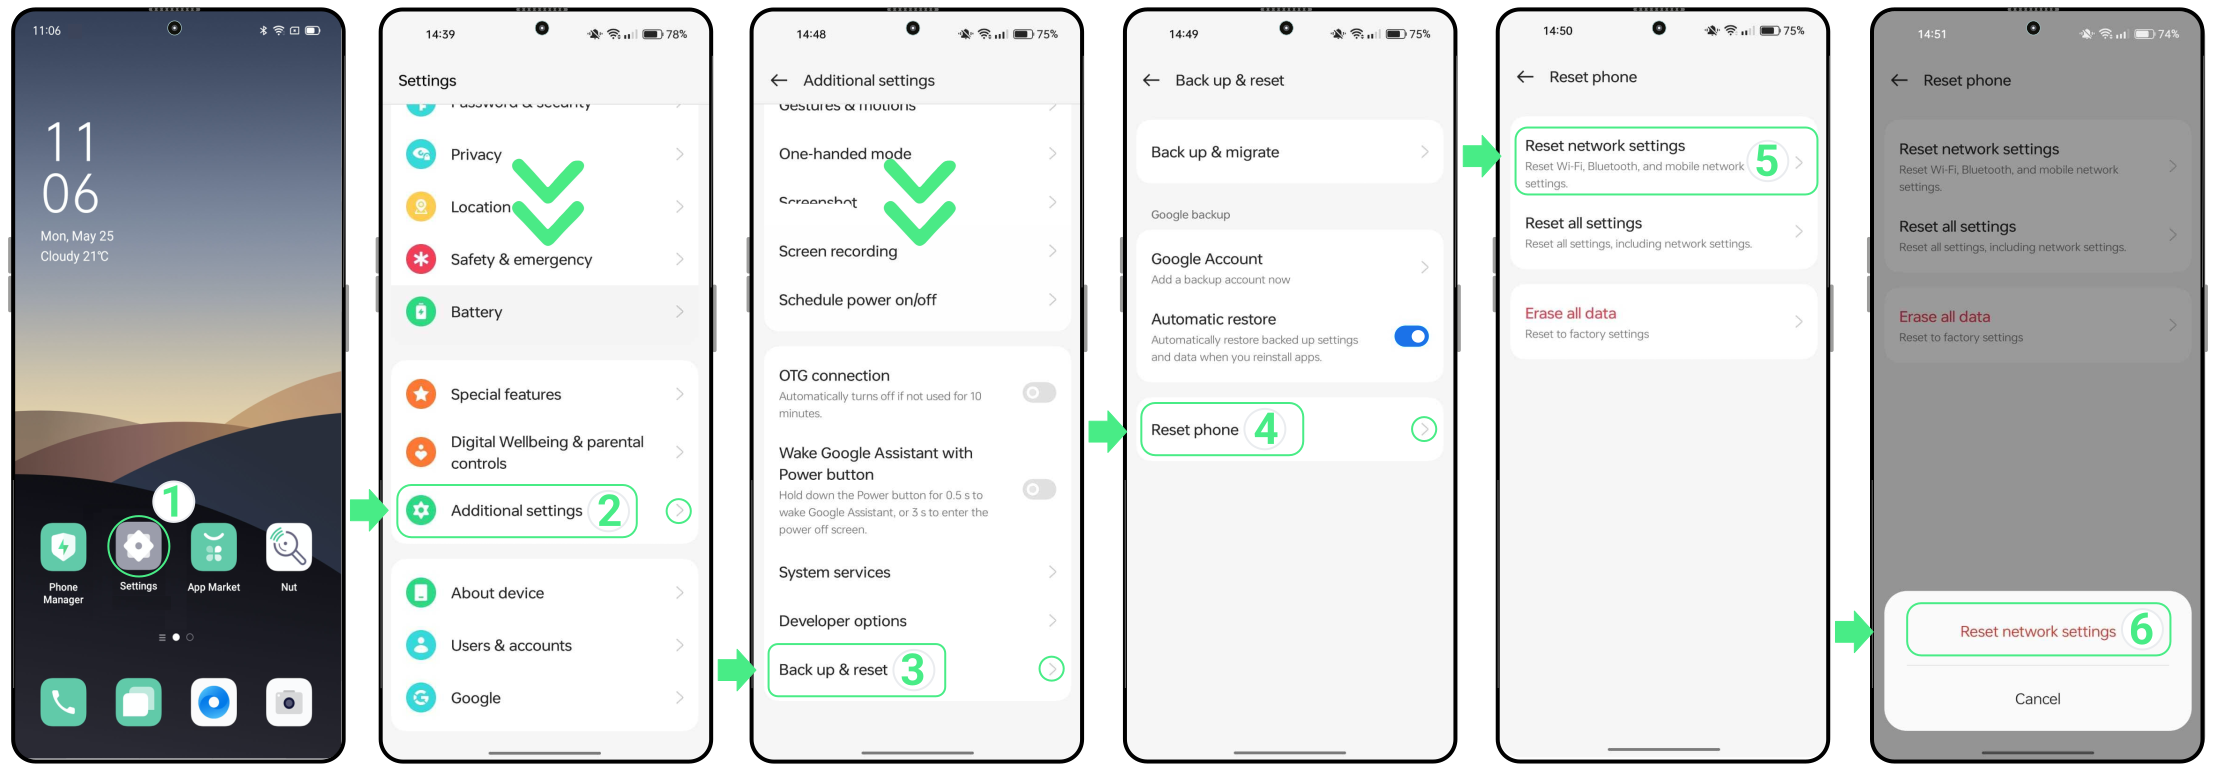

To reset network settings on Oppo phones:

  • Go to Settings → Scroll down and tap on Additional settings → Select Back up & reset → Tap on Reset Phone → Finally, tap on Reset network settings. (If prompted, enter the PIN you use to unlock your screen and tap on Reset network settings again).

To reset network settings on Oppo phones:

2. If your Oppo device is in a coverage area included in your eSIM plan and the APN is correctly configured but the internet still isn’t working after resetting network settings, try manually switching the operator.


3. If your phone is from another brand like Samsung, Xiaomi, Motorola, Vivo, Sony, Huawei, or Pixel, you’ll get easy-to-follow steps for setting up your Android APN settings without any hassle.

How to Change OnePlus APN Settings?

Staying connected is essential, and your OnePlus device depends on APN (Access Point Name) settings to enable mobile data. These settings are what allow your phone to connect to the internet, so you can browse, stream, and stay connected with ease. If you’ve switched mobile providers or need to adjust your settings for better data performance, updating the APN may be necessary. In this article, we’ll show you how to update your OnePlus APN settings and share some tips to ensure a seamless experience.

Setting Up roAmigo APN on Your OnePlus Device:

To ensure your OnePlus device works properly with roAmigo eSIM, you may need to adjust the APN settings if you’re unable to use data after activation at your destination. The key APN for roAmigo is simply “Global.” Make sure you’ve selected the roAmigo eSIM as your mobile data option. This will ensure the correct APN settings are applied on your Android, and you’ll be all set for fast and stable data services.


The steps may vary slightly based on your OnePlus model and Android version, but don’t worry! We’ll walk you through the process to ensure everything’s set up correctly.
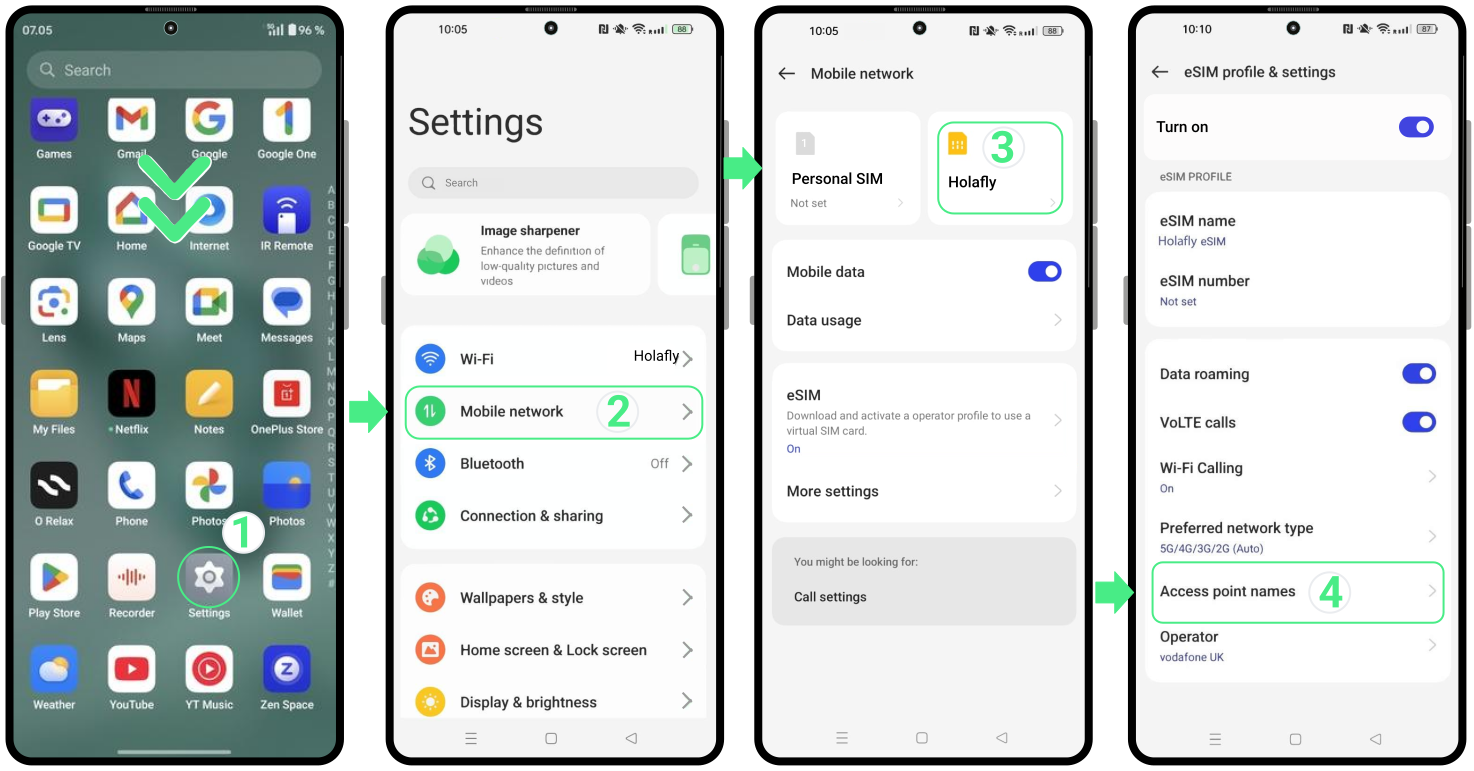
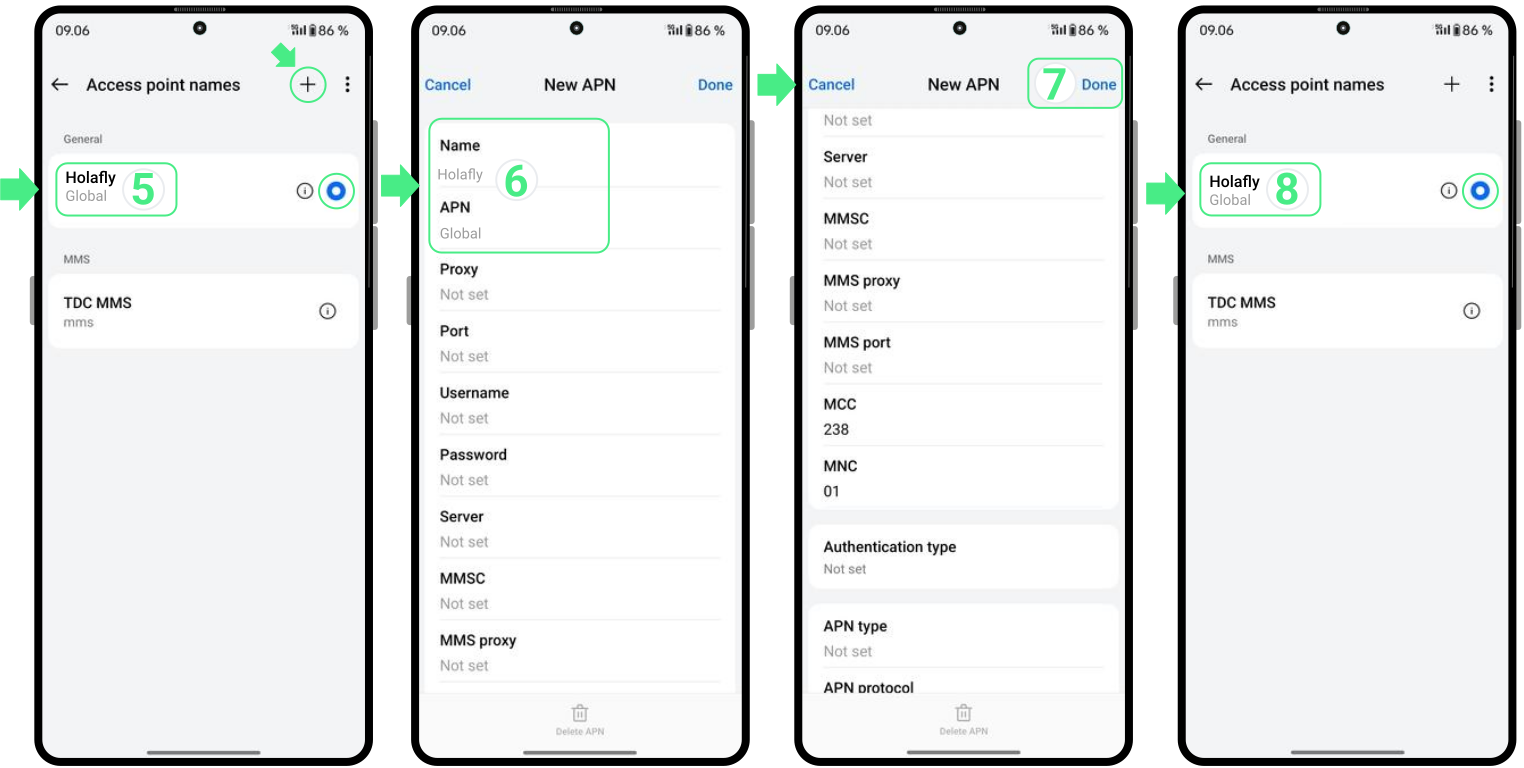
Steps to Change APN Android settings on OnePlus:

  • Go to Settings → Mobile network → Tap on your roAmigo eSIM → Select Access Point Names.

Steps to Change APN Android settings on OnePlus:

  • Check if there is an APN labeled “Global” and select it. If it doesn’t appear, you’ll need to create it. To do so, tap the + at the top right → In the Name field, type “roAmigo” to easily recognize it → Then, in the APN field, enter the word Global → When you’re finished, tap Done to save the changes → Finally, make sure to select the newly created APN (Global) as the default for your OnePlus, otherwise, it won’t activate correctly.

Steps to Change APN Android settings on OnePlus:

Troubleshooting Tips

1. If you’ve accidentally entered the wrong APN settings on your Android or, even after configuring the correct one, you’re still facing connection or data difficulties, it may be time to reset your network settings. Keep in mind that this process will remove saved Wi-Fi, mobile network, and Bluetooth connections. Make sure to back up your passwords and reconnect to your networks once the reset is complete.


Next, we’ll guide you through the process:
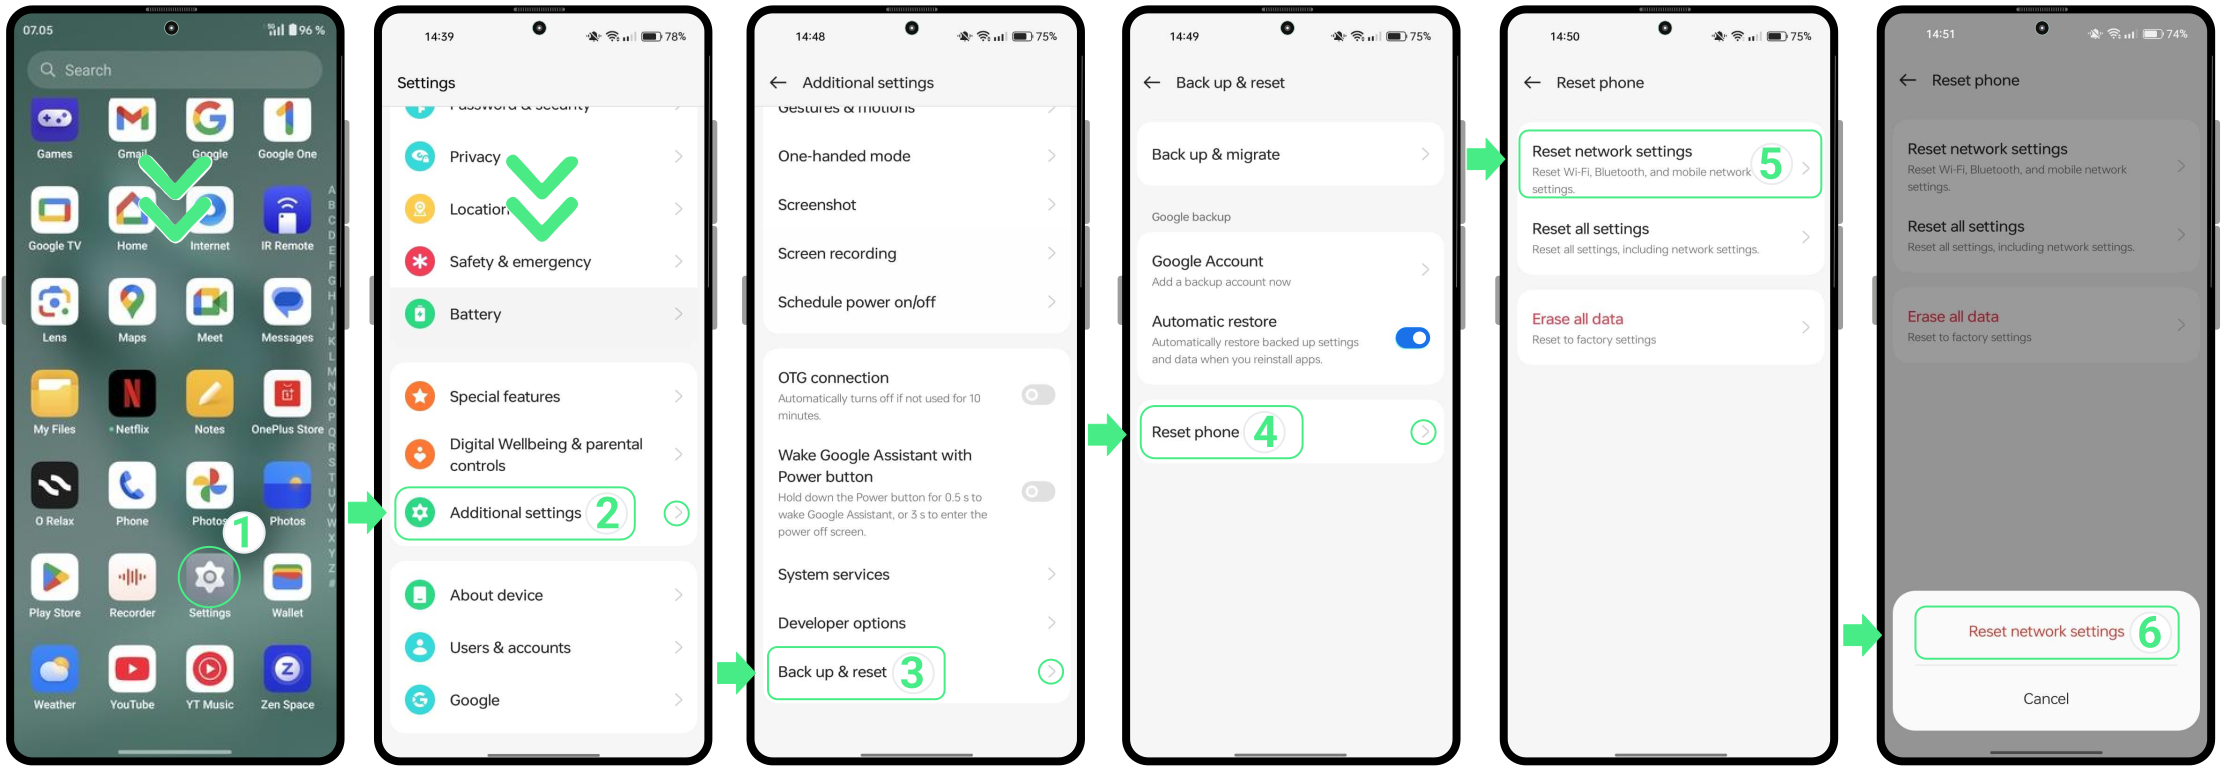
To reset network settings on OnePlus phones:

  • Go to Settings → Scroll down and tap on Additional settings → Select Back up & reset → Select Reset phone → Tap on Reset network settings (If prompted, enter the PIN you use to unlock your screen and tap on Reset network settings again).

To reset network settings on OnePlus phones:

2. If your device is within a coverage area included in the eSIM plan, and the APN is correctly configured, but after resetting network settings the internet still isn’t working, try manually switching the operator.


3. If your phone is from another brand like Samsung, Xiaomi, Motorola, Vivo, Huawei, Oppo, Sony, Nokia, or Pixel, you’ll get easy-to-follow steps for setting up your Android APN settings without any hassle.

How to Change Nokia APN Android Settings?

In today’s digital world, staying connected is essential, and the APN (Access Point Name) settings on your Nokia device are key to ensuring reliable mobile data access. While the APN configuration is similar across Android devices, the exact steps may differ depending on the model and operating system version. Generally, you’ll access mobile network settings and enter the required data. For instance, you may need to adjust your APN if you switch mobile providers or if your current settings require an update. In this article, we’ll walk you through how to update or change your APN Android settings for a seamless experience. Keep reading to stay fully connected!

Holafly’s APN Settings on Android:

Setting up the correct APN on Android helps your Holafly eSIM function smoothly on your Nokia device. If you’re unable to connect after activating your eSIM, you may need to adjust the APN settings. The APN for Holafly is simply “Global”. This term must be typed exactly as shown in the relevant fields during setup.


Make sure you’ve selected the Holafly eSIM for mobile data to ensure the correct configuration is applied. Follow the steps below for a smooth APN setup and internet access:
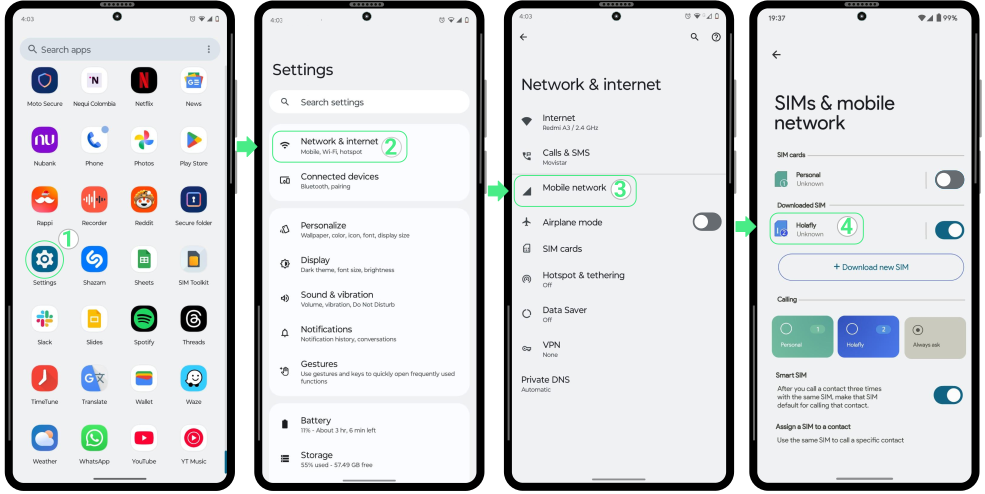
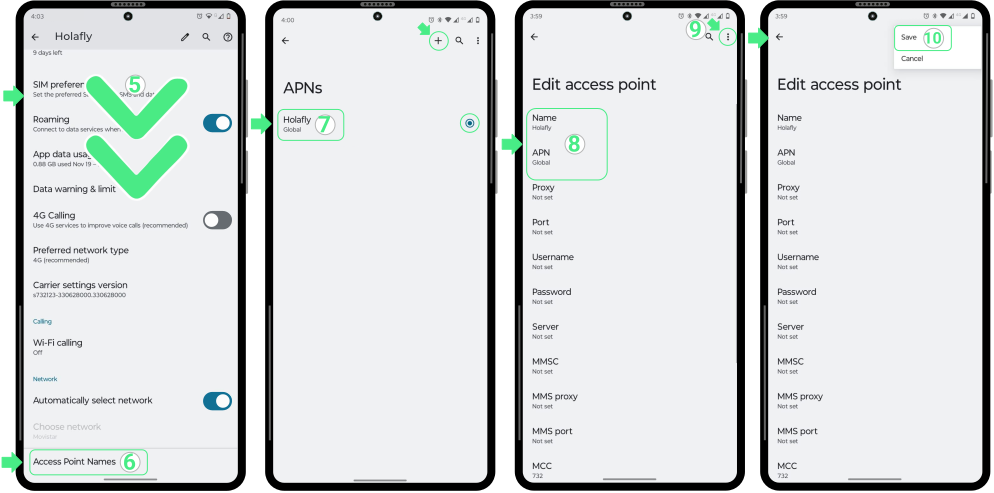
Steps to change APN Android settings on Nokia:

  • Go to Settings → Network & internet → Mobile network → Tap on your Holafly eSIM.

Steps to change APN Android settings on Nokia:
  • Scroll down and tap on Access Point Names or Advanced, and then Access Point Names → Check if there is an APN labeled “Global” and select it. If it doesn’t appear, you’ll need to create it. To do so, tap the + at the top right → In the Name field, type “Holafly” to easily recognize it → Then, in the APN field, enter the word “Global” →  Leave the other fields empty → Tap the three dots in the top right corner → Select Save → Finally, make sure to select the newly created APN (Global) as the default for your Nokia, otherwise, it won’t activate correctly.

Steps to change APN Android settings on Nokia:

Troubleshooting Tips:

1. If you’ve entered the Nokia APN settings incorrectly or, after configuring the correct APN, you still can’t connect or receive a data signal, you may need to reset your network settings. This action will help resolve network issues and restore the default connection settings.


Keep in mind that this process will remove saved Wi-Fi, mobile network, and Bluetooth connections. Make sure to back up your passwords and reconnect to your networks once the reset is complete. Next, we’ll guide you through the process:
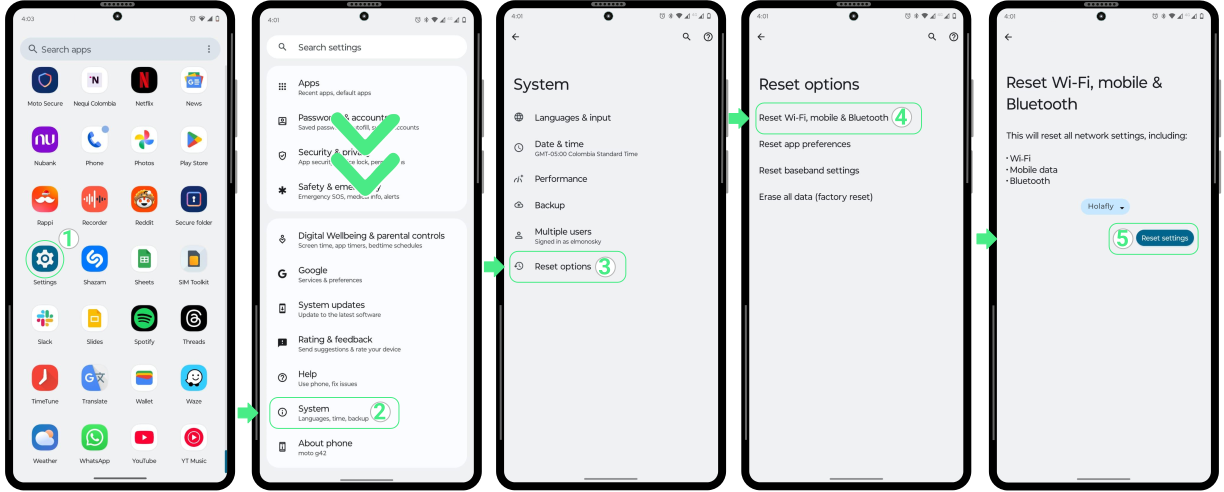
To reset network settings on Nokia phones:

  • Go to Settings → Scroll down and tap on System → Select Reset options → Choose Reset Wi-Fi, mobile & Bluetooth → Tap on Reset settings (If prompted, enter the PIN you use to unlock your screen).

To reset network settings on Nokia phones:

2. In case your device is within a coverage area covered by the eSIM plan, and the APN is set up correctly, but the internet isn’t working even after resetting the network settings, try switching the operator manually.


3. If your phone is from another brand like Samsung, Xiaomi, Motorola, Vivo, Huawei, Oppo, Sony, OnePlus or Pixel, you’ll get easy-to-follow steps for setting up your Android APN settings without any hassle.

How to Set Up Google Pixel APN Settings?

Staying connected is more important than ever, and configuring the APN (Access Point Name) settings on your Google Pixel is essential for ensuring smooth internet access. While the process for setting up an APN is similar across Android devices, the specific steps may vary depending on the model and operating system version. In general, you’ll need to access the mobile network settings and enter the correct APN. This is especially important if you’re switching mobile providers or want to optimize your data experience. In this article, we’ll show you how to update or change your Google Pixel APN settings. Keep reading to ensure you stay fully connected!

What Are the Correct APN Settings for roAmigo on Android?

When using roAmigo with your phone, it’s crucial to configure the correct Google Pixel APN settings for uninterrupted mobile data access. If you’re having trouble connecting after activating your eSIM, adjusting the APN may be necessary. Simply enter “Global” in the required fields during the setup to complete the process.


Before starting, make sure your roAmigo eSIM is activated for mobile data, as the APN setup won’t work without it. The process may vary slightly depending on your Google Pixel model and OS version (Operating System). Next, we’ll walk you through the steps:
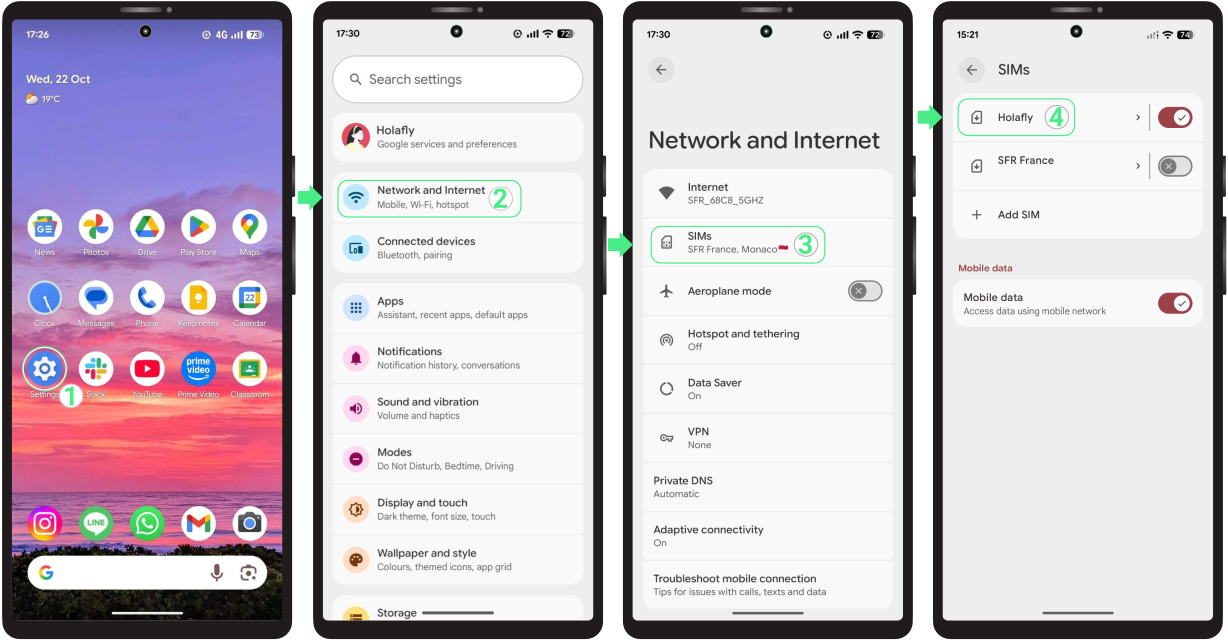
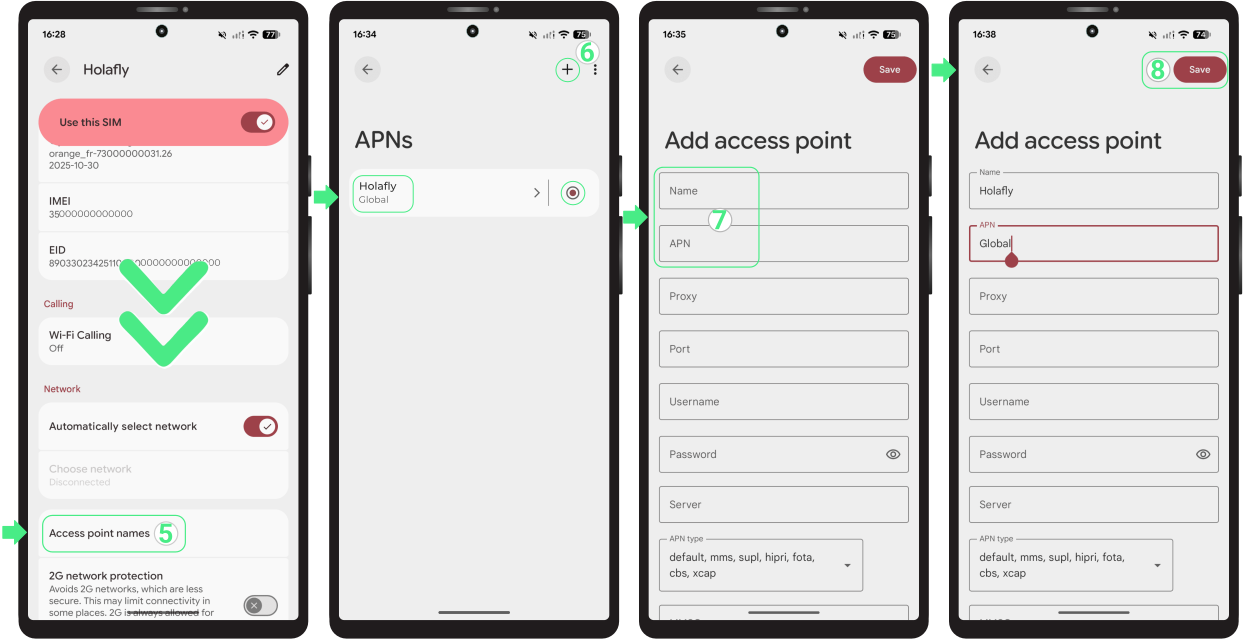
Steps to set up APN on a Google Pixel phone:

  • Go to Settings → Network and Internet → Tap on SIMs → Select your roAmigo eSIM.

Steps to set up APN on a Google Pixel phone:
  • Scroll down and select Access Point Names → Check if there is an APN labeled “Global” and select it. If it doesn’t appear, you’ll need to create it. To do so, tap the + at the top right → In the Name field, type “roAmigo” to easily recognize it → Then, in the APN field, enter the word “Global” → Leave the other fields empty → Tap the three dots in the top right corner → Select Save → Finally, make sure to select the newly created APN (Global) as the default for your Pixel, otherwise, it won’t activate correctly.

Steps to set up APN on a Google Pixel phone:

Troubleshooting Tips:

1. If you’ve entered the correct APN for roAmigo on your Google Pixel, but you’re still unable to connect or experience difficulties with your mobile data signal, it may be necessary to reset your network settings. This can help resolve any network-related errors and restore the default connection settings on your device.


Keep in mind that resetting network settings will only affect Wi-Fi, mobile network, and Bluetooth connections. It’s important to back up your passwords to avoid losing them. Next, we’ll walk you through the steps:
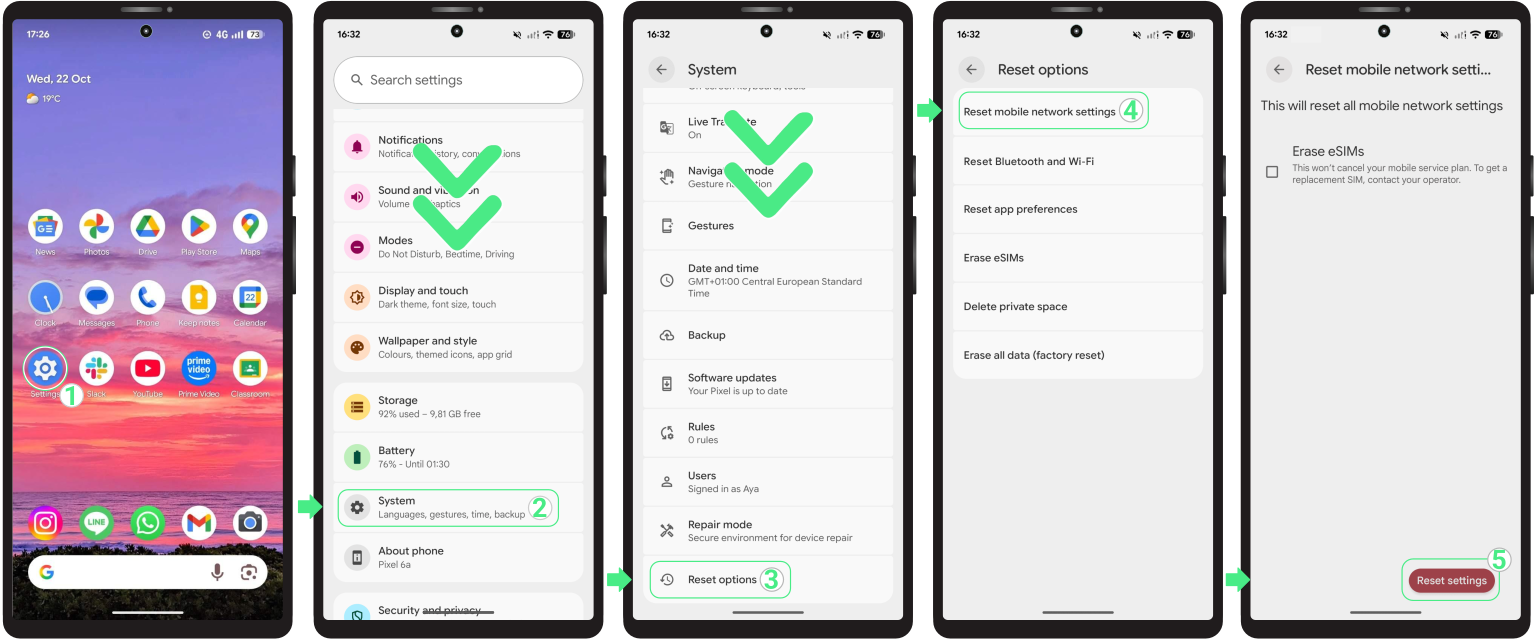
To reset network settings on Google Pixel phones:

  • Go to Settings → Scroll down and tap on System → Select Reset options → Select Reset mobile network settings → Tap on Reset settings (If prompted, enter the PIN you use to unlock your screen).

To reset network settings on Google Pixel phones:

2. In case your device is within a coverage area covered by the eSIM plan, and the APN is set up correctly, but the internet isn’t working even after resetting the network settings, try switching the operator manually.


3. If your phone is from another brand like Samsung, Xiaomi, Motorola, Vivo, Huawei, Oppo, Sony, Nokia, or OnePlus, you’ll get easy-to-follow steps for setting up your Android APN settings without any hassle.

When to activate your eSIM: Does it start when installed?

Knowing when to activate your eSIM is the key to not wasting a single day of your plan. Your eSIM doesn’t start when you install it. It only activates when you arrive at your destination and connect to a local network with data roaming turned on.


Installation and activation are two different steps. Installing your eSIM early gets everything ready, while activating it at the right moment ensures your plan starts exactly when you need it. Read on to find out the best timing for each, what to do if your eSIM shows as “Active” before your trip, and how to get the most out of your plan.

Should I install my eSIM before travelling?


We recommend installing your eSIM at least one day before your trip. This way, you can do it from home on a stable Wi-Fi connection and arrive at your destination ready to connect. 


Remember that this applies to daily eSIM plans, where the countdown only starts once you connect to a local network abroad.If you have a monthly or annual subscription, the plan works differently. Since it renews automatically, your data allowance resets each billing cycle, so you don’t need to worry about timing the installation around your trip.

When to activate your eSIM for travel

The best time to activate your eSIM is once you land at your destination. To activate it, turn on your travel eSIM line, select it as your mobile data line, and enable data roaming. Your plan will start automatically once your device connects to a local network, and you can begin using your data right away.

Troubleshooting Tips

If your device shows your eSIM as “Active” right after installation, here is everything you need to know.

My eSIM says activated, but I’m not traveling yet

Seeing “Active” or “ON” in eSIM right after installation is completely normal. It simply means the eSIM profile is ready on your device, not that your plan has started. For most travel plans, your days won’t start counting until your device connects to a supported network at your destination.


However, if you have a subscription plan, the billing cycle may start as soon as your purchase is completed, even if you haven’t started using data yet. To be sure, you can check your plan status through your provider’s app, rather than relying only on your phone settings.
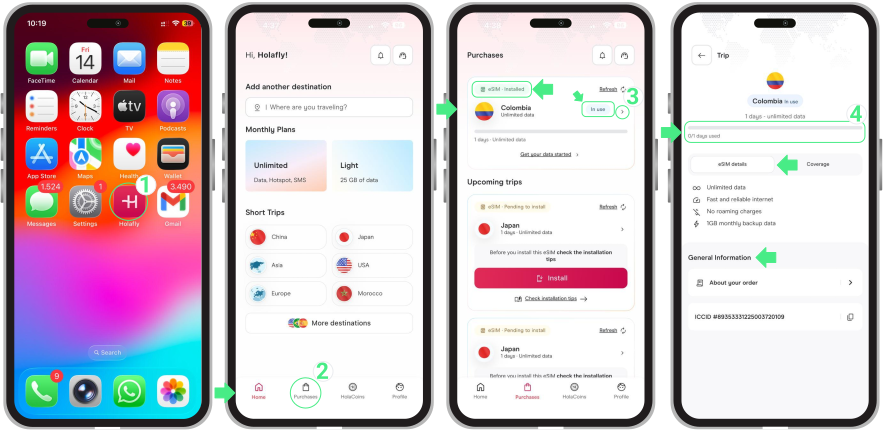
 Check your eSIM status through the provider app

  • Open the app → Tap Purchases → Here you can check the status of your eSIM (it may appear as Pending to Install, Installed – Ready to use, or Installed – In use) → If your eSIM says “In use,” your data plan is active. Tap it to view its usage details.

Check your eSIM status through the Holafly app

To keep in mind

  • If your eSIM shows as “On” before your trip, turn the line off and keep it disabled until you land.
  • Once activated, the days count continuously even if you turn the line off or switch to another eSIM.
  • For Trip eSIMs, install in advance since they only activate upon connecting to the destination network. For subscription plans, buy them the same day or one day before use.
  • Subscription plans start counting down the moment you purchase the eSIM. Always check the plan’s policy before buying to ensure you’re ready to use it.
  • If your home country is in the eSIM coverage area (Global and Regional eSIMs), wait until the day of your flight to install it.
  • If your eSIM doesn’t connect upon arrival, don’t delete the profile. Most are single-use and cannot be re-downloaded without contacting support.

Huawei eSIM: how to install and activate it on your phone

Setting up a Huawei eSIM requires two steps directly from your phone settings: installation, which involves downloading and saving the eSIM to your device, and activation, which is the final step to turn on the line and start browsing. 


This technology is compatible with popular models like the Huawei P40, P40 Pro, Mate 40 Pro, and Pura 70 Pro (though compatibility may vary by region or carrier). Below, we’ll show you how to complete this process using different setup options, and answer the most common questions to ensure you a guaranteed connection.


Before you install your Huawei eSIM

  • Confirm that your device is eSIM-compatible and unlocked (meaning it isn’t locked to the carrier you bought it from).
  • Make sure you are connected to a stable Wi-Fi network.

Important: For Global or Regional (Europe, South America, Africa, etc.) plans, install it no earlier than 1 day before your trip to ensure your data starts when you need it. For single-country plans, install it at any time.


How to install eSIM on Huawei

There are three options to install your Huawei eSIM. If available, the app that comes with your eSIM is usually the quickest option, as most of the setup is done automatically.


You can also install your eSIM using the universal methods, such as the QR code or manual activation details commonly sent to your email. Review the options below and choose the one that works best for you.

 1. Automated eSIM installation via App

For for a more direct setup and follow these steps:

  • Open the app on your phone → Log in with the email associated with your purchase → Go to Purchases → Tap Install on the eSIM you want to add → Read the Installation tips and tap Got it to continue → Choose Install Automatically → Tap Install eSIM  → Then, tap Continue and Add to save your new line inside your Huawei’s SIM management menu (Keep this window open until it finishes).

Automated eSIM installation via App

2. Installation via QR code

The QR code method is another easy way to install an eSIM on Huawei. You can scan the QR code from another screen or save it to your gallery and select it during setup. Follow the steps below through your phone’s settings (don’t use your camera app).
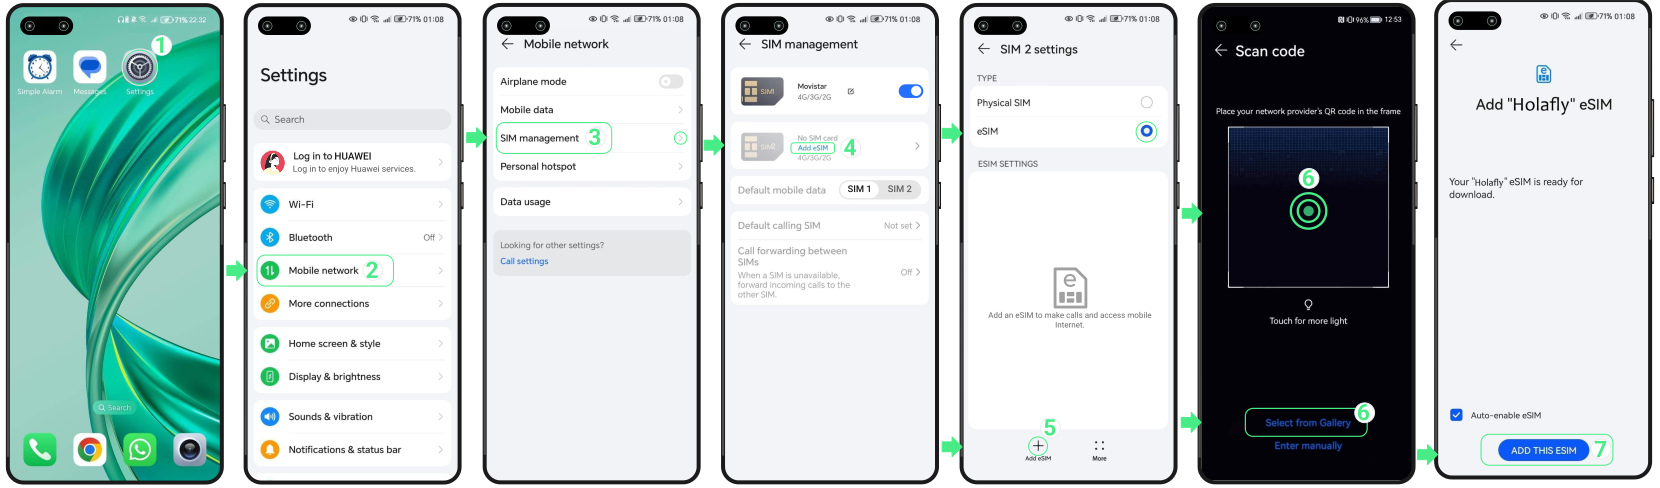

  • Go to Settings → Select Mobile network → Tap on SIM management → Select Add eSIM → Enable the eSIM option → Press the Add eSIM button in the bottom left corner of the screen → Scan the QR code, or tap the “Select from gallery” text link below to choose it from your photos  → Tap on Add this eSIM (Don’t close this window, or the installation will stop).

eSIM Installation via QR code

 3. Manual eSIM Installation on Huawei

If the other installation methods didn’t work as expected, you can also install your eSIM using the manual activation details received. Just follow the steps below:


  • Go to Settings → Select Mobile network → Tap on SIM management → Select Add eSIM → Enable the eSIM option → Press the Add eSIM button in the bottom left corner of the screen →  Tap on Enter manually → Copy the two manual codes from the iOS section in your eSIM confirmation email (Huawei uses the same two-field format as iOS, not Android) and paste the SM-DP+ Address and the Activation code into their respective fields → Tap Next → Tap Add eSIM (Keep this window open until it finishes).

Note: Please keep in mind that these are manual text codes, not clickable links.
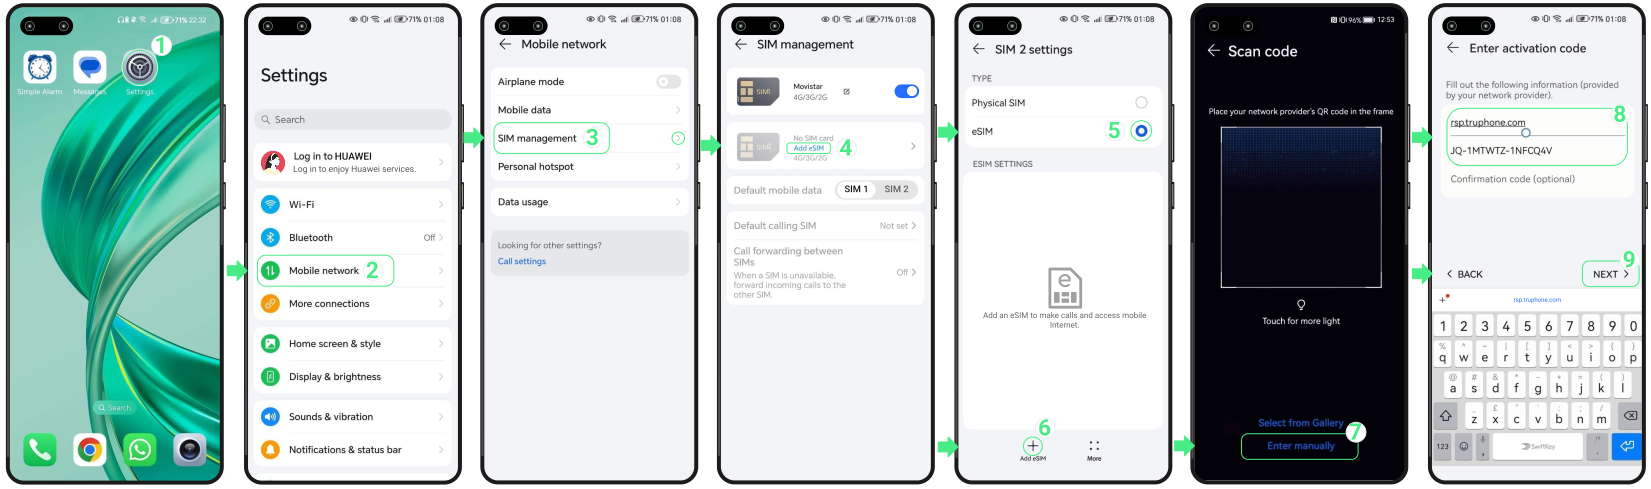

To install your eSIM manually with the SM-DP + address:

 How to activate Huawei eSIM

After installing your eSIM, activation happens from your phone settings. For travel eSIMs, your plan starts whOnce your eSIM is installed on your Huawei, you’re ready to activate it by turning on the line and setting it as your main data source.


If you are using a travel eSIM, remember that your plan will only start working once you arrive at your destination and turn on data roaming.


Follow these steps to activate it:
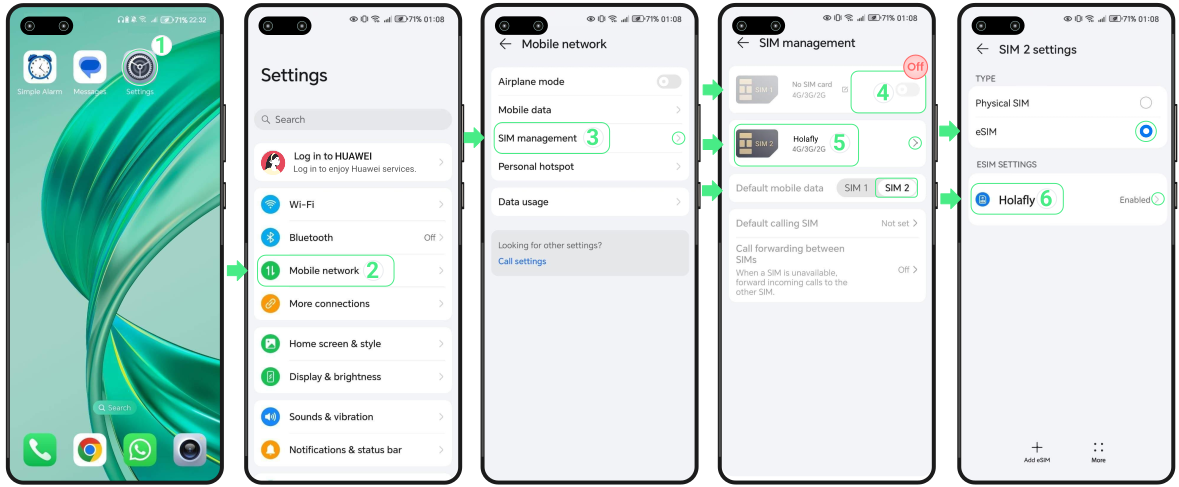

  • Go to Settings → Select Mobile network → Tap on SIM management → Set your new eSIM as Default mobile data → Deactivate your Personal SIM/eSIM (this prevents unexpected charges from your home carrier) → Tap on the recently installed eSIM → Check that the eSIM option is selected → Then, tap on your New eSIM line again.

To activate your eSIM data on your Huawei phone:
  • Turn on the Enable switch  → Go back three times until you reach the Mobile network menu → Then, choose Mobile data → Turn on Mobile data and also Data roaming if you are using a travel eSIM.

To activate your eSIM data on your Huawei phone:

And that’s it! Now you’ll have your data plan active and can enjoy reliable data service on your trip.


Troubleshooting tips

During Installation

If Huawei shows a message while adding your eSIM, there’s no need to start the installation again right away. In many cases, the eSIM has already been saved on your device. Before trying again, check the following:

  • On your phone: Go to Settings → Mobile network → SIM management. Your eSIM should appear in the SIM list, either with the provider name or the name you selected during setup.

Using your mobile data

Once you switch on your eSIM following the activation steps above, your Huawei device will automatically search for the network. Give it a few moments to establish a stable connection.


If you still don’t see any signal bars at the top of your screen after a few moments, go to your mobile network settings and select another local operator manually.


⚠️ Important: Keep your eSIM installed on your device. Don’t delete it to fix connection issues.

How to set up and activate an eSIM?

Setting up an eSIM is a quick and straightforward process you can complete directly from your device settings. It involves two stages: installation and activation. During installation, you add the digital eSIM profile to your phone using a QR code or manual details. Activation is the step that turns on mobile data and starts your plan.


For travel or international eSIMs, it’s recommended to install the eSIM before your trip and activate it once you arrive at your destination. This helps ensure your device connects to the local network at the right moment.


In this guide, you’ll learn how to set up an eSIM on iPhone and Android devices, what to check before getting started, and how to complete the process with confidence.

Before you install: What you need to check

Before setting up an eSIM, take a moment to check a few essentials. This ensures a smooth setup from start to finish.


  • Connect to a stable Wi-Fi network to install the eSIM without interruptions. Public networks are not recommended.
  • Ensure your device has at least 20% battery or keep it connected to a charger during the setup process.
  • Decide how you’ll add the eSIM to your iOS or Android device: by scanning a QR code or by entering the manual installation codes. Manual entry is useful if the QR code doesn’t scan on iOS or Android and must be entered exactly as provided.

How to Install an eSIM

This step is completed before you travel and requires a stable Wi-Fi connection. During this process, the eSIM profile is added to your device, but data usage doesn’t start yet. 

To install an eSIM on iPhone

  • Go to Settings → Tap Cellular or Mobile Data → Tap Add eSIM → Select Use QR Code → Tap Scan QR Code (from here, you can either scan the QR code or choose Enter Details Manually) → Tap Next → Continue with activation.

To install an eSIM on iPhone:
Go to Settings → Tap Cellular (Mobile Service) → Select Add eSIM → Choose Use QR Code → Scan the QR code or select Enter Details Manually → Tap Next → Tap Continue. Once the eSIM is installed, keep the line turned off or leave data roaming disabled until you arrive at your destination.

To install an eSIM on Android

  • Go to Settings → Connections → SIM Manager → Add eSIM → Tap Scan QR Code (from here, you can either scan the QR code or choose Enter activation code) → Tap Add → Continue with activation.

To install an eSIM on Android: 
Go to Settings → Tap Connections → Select SIM Manager → Tap Add eSIM → Choose Scan QR Code or Enter activation code → Paste the complete code (including LPA and colons) → Tap Add → Continue. After installation, make sure the eSIM is added correctly and avoid turning on data roaming until you reach your destination.

YouTube video

How to Activate an eSIM

Activation is the step where your eSIM connects to the local mobile network. This happens when you turn the eSIM line ON and enable data roaming after arrival.

To activate an eSIM on iPhone

  1. Go to Settings → Cellular or Mobile Service → Turn off your personal SIMs or other eSIMs by switching off Turn On This Line → Go back to Cellular or Mobile Service → Select the eSIM you want to activate (your new Travel eSIM, which may appear with a custom name).

To activate your travel eSIM on iPhone:
Go to Settings → Cellular or Mobile Service → Turn off your personal SIMs or other eSIMs by switching off Turn On This Line → Go back to Cellular or Mobile Service → Select the eSIM you want to activate (your new Travel eSIM, which may appear with a custom name).
Make sure the Turn On This Line button is enabled → Turn on Data Roaming → If prompted, tap Turn On Data Roaming to confirm → Return to Cellular or Mobile Service → Tap Cellular Data or Mobile Data and select the Travel eSIM as your data line → Check that Allow Mobile Data Switching is turned off to prevent the iPhone from switching between lines automatically.

  1. Make sure the Turn On This Line button is enabled → Turn on Data Roaming → If prompted, tap Turn On Data Roaming to confirm → Return to Cellular or Mobile Service → Tap Cellular Data or Mobile Data and select the Travel eSIM as your data line → Check that Allow Mobile Data Switching is turned off to prevent the iPhone from switching between lines automatically.

o activate your travel eSIM on iPhone:
Go to Settings → Cellular or Mobile Service → Turn off your personal SIMs or other eSIMs by switching off Turn On This Line → Go back to Cellular or Mobile Service → Select the eSIM you want to activate (your new Travel eSIM, which may appear with a custom name).
Make sure the Turn On This Line button is enabled → Turn on Data Roaming → If prompted, tap Turn On Data Roaming to confirm → Return to Cellular or Mobile Service → Tap Cellular Data or Mobile Data and select the Travel eSIM as your data line → Check that Allow Mobile Data Switching is turned off to prevent the iPhone from switching between lines automatically.

If you’re using dual SIM:


  • Use your personal line for calls and SMS only if needed, keeping in mind that your home carrier may charge for usage.
  • Set the eSIM as the default line for mobile data and turn off Cellular Data Switching to prevent your phone from using your home line for data and avoid roaming charges.

To activate an eSIM on Android

  • Go to Settings → Tap Connections → Select SIM Manager → Turn OFF any other active SIMs → Turn ON the newly installed eSIM → Tap Mobile Data and select the Travel eSIM → Go back to Connections → Tap Mobile Networks → Turn ON Data Roaming for the eSIM to start using mobile data.

To activate a travel eSIM on Android:
Go to Settings → Tap Connections → Select SIM Manager → Turn OFF any other active SIMs → Turn ON the newly installed eSIM → Tap Mobile Data and select the Travel eSIM → Go back to Connections → Tap Mobile Networks → Turn ON Data Roaming for the eSIM to start using mobile data.

On some devices, menu names may vary slightly. If data doesn’t work right away, temporarily turn off other active SIMs and confirm the travel eSIM is selected for mobile data.


If you need more detailed steps on how to set up and activate an eSIM on Android, check our device-specific guides. You’ll find step-by-step instructions for Samsung, Google Pixel, Huawei, Xiaomi, Honor, Vivo, Motorola, Nokia, Sony, OnePlus, and Oppo devices.

Troubleshooting Tips

If you followed the steps to set up and activate an eSIM, but data isn’t working yet, review the points below. In most cases, it’s just a setting that needs a quick adjustment.


  • Make sure you’ve already arrived at your destination. Data only works after you activate the eSIM at the destination.
  • Confirm the new eSIM is turned on and selected as the mobile data line.
  • Turn data roaming ON for the travel eSIM. This is the most common reason activation fails. You must enable this setting within your iPhone cellular options or Android network settings to connect correctly.
  • If you’re using a dual SIM, temporarily turn off other active SIMs to prevent them from blocking data usage.
  • Avoid deleting the eSIM. Once removed, it can’t be reinstalled and usually requires a new eSIM.

How to install and activate an eSIM on a Google Pixel?

To activate an eSIM on a Google Pixel and start using your mobile data, you just need to complete two main steps. First, add your new line to your device through the app linked to your eSIM, a QR code, or manual setup. Then, turn the line on from your phone settings to connect to the network. 


In this guide, we’ll show you how to activate an eSIM on a Google Pixel step by step. We’ll cover all installation methods and the settings to review so you can get connected in less than 5 minutes.

What you need before installing an eSIM on a Google Pixel

Before installing the eSIM, make sure your Google Pixel meets these requirements.


  • Make sure your phone has at least 20% battery to complete the setup without interruptions.
  • Your Google Pixel must support eSIM and be unlocked, as carrier restrictions can prevent activation.
  • You need a stable internet connection, such as Wi-Fi, to download the eSIM profile.
  • Have your QR code or activation details ready in case manual installation is needed.

Note: Installing your eSIM does not activate your plan or use your mobile data. However, if your regional (Europe, South America, Asia, etc.) or global eSIM includes the country you are currently in, it may start being used once it connects to a local network. We recommend installing it only one day before your trip to avoid using your plan days before you need them.

How to install the eSIM on the Google Pixel 

There are three ways to install an eSIM on a Google Pixel. Review the options below and choose the one that works best for you.

1. Installation through the app

The easiest way to install your eSIM is using the Holafly app. Download or open it here and follow these steps: 


  • Go to the app on your phone → Log in with the email associated with your purchase → Go to Purchases → Tap Install on the eSIM you want to add → Choose Install Automatically → Tap Install eSIM → Tap Set up twice → Follow the final on-screen prompts and wait a few minutes until the process is complete.

eSIM Installation through the Holafly app

2. Install eSIM on Google Pixel using a QR code

Use the QR code sent to your email to install the eSIM. Scan it from another screen, or use the “Scan from photo” option if you saved the QR code to your phone as a screenshot or photo.


  • Go to Settings → Select Network & Internet → Tap SIMs → Tap + Add SIM → Choose “Set up an eSIM” → Scan your QR code, or tap the “Scan from photo” text link below to choose it from your gallery → Select Set up → Once installed, tap Settings if you want to continue with the activation.

Install eSIM on Google Pixel using a QR code

3. Install eSIM on Google Pixel using manual codes

If you can’t scan the QR code, you can install the eSIM manually instead. You’ll just need the manual details included in your confirmation email.


Keep in mind that these are just text codes to enter yourself, and they won’t work as clickable links.


  • Go to Settings → Select Network & Internet → Tap SIMs → Tap the + Add eSIM → Choose “Set up an eSIM”

Install eSIM on Google Pixel using manual codes

  • Press “Try these troubleshooting steps” → Select Enter the details manually → Paste your provider’s activation code (including LPA and the colon ‘:’) → Make sure there are no extra spaces at the beginning or end of the code → Tap Next → Select Set up → Finally, tap Settings to continue with the activation. 

Install eSIM on Google Pixel using manual codes

Activate the eSIM on Google Pixel

Once you’re ready to start using mobile data, enable the eSIM so your Google Pixel can connect to a supported network. This is the step that starts your data service.


If you’re using a travel eSIM, it’s recommended to enable the line only after you arrive at your destination to avoid activating it too early.


  • Go to Settings → Tap Network & Internet → Select SIMs → Turn OFF your personal eSIM → Select your New Data-only eSIM → Turn Mobile data ON → Enable Use this SIM → Turn Data roaming ON (only if you are using an international travel eSIM).

Activate the eSIM on Google Pixel

Troubleshooting tips

During Installation

If your Google Pixel shows an error while installing the eSIM, don’t worry. Sometimes the phone displays a false error even when the eSIM has been successfully installed in the background. Before trying to install it again, check if it’s already on your phone:


  • On your phone: Go to Settings → Network & Internet → SIMs. Your new eSIM should appear in the SIM list, usually with the name you gave it during setup.
  • In the App: Check your eSIM status. If it says “eSIM Installed – Ready to use,” you’re all set.

Using your mobile data

If your eSIM is already fully activated following the steps mentioned above but your device is still not connecting to the internet, wait a few minutes while your phone connects to the network. If you are still offline, try selecting a network manually or restarting your phone.


⚠️ Important: Never delete your eSIM to fix a connection error.

How to Set up Mobile Network APN Settings on Sony?

Configuring the mobile network APN settings (Access Point Name) on your Sony device is crucial for ensuring a stable internet connection, especially when switching mobile data providers or troubleshooting mobile data issues. While the process of APN setup is similar across all Android devices, the steps may vary depending on the model and operating system version. In this guide, we’ll walk you through how to set up the APN on your Android Sony, step by step, so you can enjoy seamless browsing and avoid interruptions. Keep reading to learn how to improve your connection!

APN Settings for roAmigo on Android

To use the roAmigo eSIM on your Sony device, it’s essential to configure the APN correctly. If you’re unable to access the network after activating your eSIM, simply adjust the APN settings by entering “Global” in the corresponding fields. 


Make sure you’ve activated the roAmigo eSIM for Mobile Data, as it is required to configure the APN on your Sony Android. Here’s a step-by-step guide to help you set it up:

Steps to set up the APN on your Android Sony:

  • Go to Settings → Network and Internet → Select Mobile network → Select your roAmigo eSIM.

Steps to set up the APN on your Android Sony:
  • Scroll down and select Access Point Names or Advanced and then Access Point Names → Check if there is an APN labeled Global and select it. If it doesn’t appear, you’ll need to create it. To do so, tap the + at the top right → In the Name field, type roAmigo to easily recognize it → Then, in the APN field, enter the word Global → Leave the other fields empty → Tap the three dots in the top right corner → Select Save → Finally, make sure to select the newly created APN (Global) as the default for your Sony, otherwise, it won’t activate correctly.

Steps to set up the APN on your Android Sony:

Troubleshooting Tips:


1.
If you’ve mistakenly entered the wrong APN or if, after configuring the correct APN on your Android, there is still no connection or data signal, resetting the network settings may be necessary. This step helps resolve any network errors and restores the default connection settings.


Please note that resetting network settings will only erase Wi-Fi, mobile network, and Bluetooth connections. Make sure to back up your passwords in advance. Next, we’ll walk you through the steps:

To reset network settings on Sony phones:

  • Go to Settings → Scroll down and tap on System → Select Reset options → Tap on Reset Wi-Fi, mobile & Bluetooth → Tap on Reset settings (If prompted, enter the PIN you use to unlock your screen).

To reset network settings on Sony phones:

2. If your device is in an area covered by the eSIM plan and the APN is correctly configured, but you still can’t connect to the internet after resetting the network settings, try switching the operator manually.


3. If your phone is from another brand like Pixel, Samsung, Xiaomi, Motorola, Vivo, Huawei, Oppo, Nokia, or OnePlus, you’ll get easy-to-follow steps for setting up your Android APN settings without any hassle.

How to Edit APN Settings on iPhone and Samsung?

The Access Point Name (APN) acts as a bridge, linking your mobile device to data services through your carrier’s network. roAmigo eSIMs come with preconfigured APN settings for iPhone and Samsung devices, so in most cases, no adjustments are needed. However, there are scenarios where manual changes may improve your experience on iOS and Android devices. In this guide, we’ll show you how to change and update APN settings, to ensure a smooth and hassle-free use of your data. Keep reading to learn more!

Steps to Set up APN Settings on iPhone and Samsung Devices

If you need to change your APN settings for your roAmigo eSIM, the correct APN is “Global.” We’ll walk you through the steps to easily view and adjust your APN on both iPhone and Samsung devices, making sure you stay connected.

To edit APN settings on iPhone:

  • Go to Settings → Cellular or Mobile Data → Select your roAmigo eSIM → Tap on Cellular Data Network or Mobile Data Network → Complete only the fields where it says APN (Access Point Name) → Type Global → Save the settings and make sure mobile data is turned on.

To Edit APN Settings on iPhone:

To edit APN settings on Samsung:

  • Go to Settings → Go to Connections → Tap Mobile networks  → Select Access Point Names or APN.


  • Check if there is an APN with the word ‘Global‘ and select it, if it doesn’t appear, you need to create it → To create it, press the Add (+) icon → In the Name option, type roAmigo to recognize it → Then, in APN, enter the word ‘Global‘ → Tap on the Menu icon (three dots) in the top-right corner → Select Save → Once the changes are saved, select the newly created APN (Global).

To edit APN settings on Android:

Troubleshooting Tips

If you’re unable to access data or have entered an incorrect APN, resetting your network settings will restore defaults and fix errors. Below are the steps to reset network settings on iPhone and Samsung devices. Please note that resetting networks on iPhones will erase all saved Wi-Fi passwords.

To Reset Network Settings on iPhone:

  • Go to Settings → Tap on General → Scroll down → Select Transfer or Reset iPhone → Then on Reset → Choose Reset Network Settings and confirm your selection with the Reset Network Settings option.

To Reset Network Settings on iPhone:

To Reset Network Settings on Samsung:

  • Go to Settings → Scroll down → Select General management → Then on Reset → Choose Reset mobile network settings (If you’re prompted to enter a PIN, enter the code you use to unlock the screen and tap Next) → Confirm your selection with the Reset settings option.

To Reset Network Settings on Android:

If your Android is from another brand, such as Xiaomi, Huawei, Motorola, Vivo, Pixel, Nokia, Sony, One Plus, Oppo, or Honor, you can check out our specific guides for each model to easily configure the APN settings on Android.

How to Transfer eSIM to Another Phone?

Transferring your eSIM to a new phone is easy with most providers, whether you’re upgrading, switching devices temporarily, or changing phones for any other reasons. If you have an eSIM from roAmigo, please note that it can’t be transferred to another device.


To transfer your eSIM, you’ll just need to remove it from your old phone, restart it, and install it on your new one. After that, activate eSIM and you’re ready to go. Keep reading to learn how to transfer your eSIM to another phone, whether it’s from an iPhone or Android!

To Keep in Mind

Before transferring your eSIM to a new phone, remember that roAmigo doesn’t support eSIM transfers, meaning the steps in this article won’t apply. However, if you’re using a different eSIM carrier, make sure to keep these key points to ensure a smooth process:


  • Verify that the target phone supports eSIM and is carrier-unlocked. Compatibility varies by region. Many phones from mainland China, for instance, do not support eSIM.
  • Connect to a strong and stable Wi-Fi network during the transfer to avoid installation errors.
  • Finish the transfer process completely, as leaving it midway can cause errors or issues with your data connection.
  • If you experience installation errors on your new iOS or Android device, try the other installation method (QR code or manual entry).


Steps to Transfer eSIM to Another Device

1. Delete or remove eSIM from the current phone

The process to remove your eSIM is generally the same across devices, though it may vary slightly depending on the model. Just follow these steps to get started.

To delete an eSIM on your iPhone:

  • Go to Settings → Mobile Data or Cellular → Select the eSIM to delete → Scroll to the bottom → Tap Delete eSIM → Confirm Delete eSIM → Confirm Delete eSIM again.

To delete an eSIM on your iPhone:

To delete an eSIM on your Android:

  • Go to Settings → Connections → SIM Manager → Choose the eSIM you want to delete → Then tap on Remove → Confirm Remove.

To delete an eSIM on your Android:

2. Restart or reboot the phone:

Restarting your phone ensures the eSIM is fully removed and ready for transfer. Sometimes, the eSIM may still show up in the list after removal, but this is normal. As long as it was deleted properly, the transfer will go smoothly.

3. Install and activate eSIM on your new phone:

The final step to transfer your eSIM is installing it on your new device. You can do this either by scanning a QR code or manually entering the details. Here’s how to transfer eSIM to your new phone and activate it successfully.

To transfer the eSIM to an iPhone:

  • Go to Settings → Select Connections → Then, tap SIM Manager → Add eSIM → Tap Scan QR Code (from here, you can either scan the QR code or choose Enter activation code) → Tap Add → Continue with Activation. (Enable Data roaming to start using it on your new device).

To transfer the eSIM to an Android:

  • Go to Settings → Select Connections → Then, tap SIM Manager → Add eSIM → Tap Scan QR Code (from here, you can either scan the QR code or choose Enter activation code) → Tap Add → Continue with Activation. (enable Data roaming to start using it on your new device).

Troubleshooting Tips:

  • If your eSIM device is lost or stolen, contact us 24/7 at roamigo@roamigoesim.com, WhatsApp +82 10 3076 8751, or through chat on Instagram, Facebook, website, or app.

eSIM Xiaomi: How to install and activate it

Setting up an eSIM on your Xiaomi is a fast, fully digital process that can be completed in just a couple of minutes. Depending on your eSIM provider, you can install it automatically through their official app, or do it in your phone’s settings using a QR code or by entering the activation details manually.  eSIM compatibility is available on many recent Xiaomi models worldwide, including devices like the Xiaomi 15, Xiaomi 14T Pro, and Redmi Note 14 Pro+, although compatibility may vary by region.


Below, you’ll find the steps to install and activate an eSIM on your Xiaomi, so you can enjoy a smooth and reliable mobile connection right away.

What you need before installing an eSIM on Xiaomi

Before starting the setup, make sure your device meets the basic requirements:


  • Confirm your Xiaomi model supports eSIM, as availability can vary by region. Also, make sure your phone is unlocked so it can work with SIMs and eSIMs from different carriers.
  • Connect to a stable Wi-Fi network for a smooth setup process.
  • For Global or Regional (Europe, South America, Africa, etc.) eSIM plans, install it no earlier than 1 day before your trip to ensure your data starts when you need it. For single-country plans, install it at any time.

How to install an eSIM on Xiaomi

Installing your eSIM means adding your new line to your phone. You can complete this step using any of the 3 methods below. The roAmigo eSIM is usually the quickest and easiest option, but the other universal methods will also get your eSIM installed and ready for activation. Choose the one that works best for you.

1. Install your eSIM using the App

This is the fastest way to do it. If your eSIM provider has an official app, you can use it to install your line automatically with just a few taps.

To use the Holafly app, just download or open it here and follow these steps:


  • Go to the app on your phone → Log in with the email associated with your purchase → Go to Purchases → TapInstall on the eSIM you want to add → Read the Installation tips and tapGot it to continue → Choose Install Automatically → Tap Install eSIM  → Then, tap Add to save your new line to your phone’s Mobile networks settings.

Install your eSIM using the App

2. Install an eSIM on Xiaomi using a QR code

The QR code is the traditional method to install an eSIM on Xiaomi. This is the best option if your phone’s memory is full or if you don’t want to download anything extra right now.


To use it, you will open a special scanner inside your phone’s Settings. If you don’t have a second screen to scan the code, don’t worry! You can save the QR code as a photo and upload it directly from your gallery inside that same menu.


Follow these simple steps to start:


  • Go to Settings → Select Mobile Networks → Tap Manage eSIM (if you don’t see it, turn on the “Use eSIM” switch first) → Then, tap Add eSIM → Scan the QR code (or tap the Gallery icon and select the QR image if you saved it as a photo)  → Then, tap Add to allow the system to complete the download.

Install an eSIM on Xiaomi using a QR code

3. Install an eSIM on Xiaomi using manual codes

If the previous installation methods don’t work as expected, you can also install your eSIM on Xiaomi using the manual activation details received. Follow the steps below to complete the installation.


  • Go to Settings → Select Mobile networks →  Tap Manage eSIM (if you don’t see it, turn on the “Use eSIM” switch first) → Then, tap Add eSIM → Select Add manually instead → Tap on Use activation code → Copy and paste the full activation code exactly as provided (Including “LPA” and the colon “:”) → Tap OK → Tap Add to complete the installation process → Continue with the activation.

Note: Please keep in mind that this is a manual text code, not a clickable link.


Install an eSIM on Xiaomi using manual codes

How to activate an eSIM on Xiaomi

Activating an eSIM on Xiaomi is done directly from your phone settings and doesn’t require an internet connection. This step simply turns the eSIM on and sets it as the line used for mobile data. 


For travel eSIMs, full activation may occur only once you reach your destination and enable Data Roaming. Follow these steps to activate your eSIM on Xiaomi:


  • Go to Settings → Select Mobile networks → Turn OFF your Personal SIM → Verify that Mobile data is turned on and that the new eSIM is selected for Data SIM → Tap Manage eSIM → Turn ON your eSIM → Go back to Mobile networks → Tap Data roaming → Select International roaming.

How to Activate an eSIM on Your Xiaomi?

To keep in mind

  • Most modern Xiaomi phones support eSIM, but devices bought in China, Hong Kong, or Macao only work with physical SIMs.
  • Depending on your software version, the menu path might slightly change. If you don’t see Mobile networks, look for SIM cards & mobile networks.
  • You can use one physical SIM and one eSIM on your Xiaomi at the same time, but activating an eSIM may disable your second physical SIM slot.
  • You can store multiple eSIM profiles on your phone, but only one can be active at a time for mobile data.

Troubleshooting tips

During installation

If your Xiaomi shows an error or gets stuck when starting or finishing the setup, don’t worry! This doesn’t mean it failed. Before trying again, check if the line was already successfully added:


  • On your phone: Go to Settings → Mobile Networks. If a new card with your provider’s name, a generic label, or a custom name appears in this menu, your eSIM is already installed.
  • In the App: Check your eSIM status. If it says “eSIM Installed – Ready to use,” you are all set!


Using mobile data

If your eSIM appears as Enabled but mobile data isn’t working, your phone is just completing a quick connection handshake with the local network. Simply restart your Xiaomi to fix this. If it still doesn’t work, go to your network settings and select the best local operator manually.


⚠️ Important: Never delete your eSIM to fix a connection issue. Removing the profile will permanently invalidate your plan, and it cannot be reinstalled.

Motorola eSIM: How to install and activate it

A Motorola eSIM allows you to connect to a cellular network digitally without using a physical SIM card. This technology is available only on certain newer models within the Razr, Edge, and Moto G series.


You can install an eSIM automatically using the app linked to your data plan, scan a QR code, or enter the details manually, and then activate it by simply turning on the line. Below, you’ll find the step-by-step instructions to get your data up and running in just a few minutes.

Before you install your Motorola eSIM

  • Check the full list of Motorola-compatible devices to confirm that your model supports eSIM. You can also dial *#06# on your phone; if an EID number appears, your device is eSIM-compatible. 
  • Make sure your phone is unlocked so it can connect to plans from different mobile networks.
  • Make sure you are connected to a stable WiFi network.

Important:  For Global or Regional plans (Europe, South America, Asia, etc.), install your eSIM at most 1 day before your trip. For single-country plans, you can install it days or weeks ahead, as it only activates at your destination.


How to Install an eSIM on a Motorola

There are three ways to install an eSIM on a Motorola device. The quickest option is through the app included with your eSIM, which automates most of the setup process.


You can also install your eSIM using the universal methods with the QR code or manual activation details received. The sections below will guide you through each installation method step by step.

 1. Automatic installation via the app

This is the easiest and most modern way to set up your eSIM. If you are using roAmigo, and follow these steps:


  • Go to the app on your phone → Log in with the email associated with your purchase → Go to Purchases → Tap Install on the eSIM you want to add → Read the Installation tips and tapGot it to continue → Choose Install Automatically → Tap Install eSIM  → Then, select Add and Set up to save your new line inside your Motorola’s Mobile Network menu → Once installed, tap Settings if you want to continue with the activation.

Automatic installation via the app

2. Install eSIM on Motorola using a QR code

If you received a QR code with your purchase, open it on another device before you begin. If you only have one phone, you can save the QR code to your gallery and select it during setup. Then, follow these steps from your phone’s settings (not through the Camera app):


  • Go to Settings → Access Network & Internet → Choose Mobile network → Tap Download new SIM → Choose Set up an eSIM → Scan your QR code or tap the Scan from photo text link below to choose it from your gallery → Then, tap on the Set up Button → Once added, tap Settings to turn on the toggle to activate your new eSIM line.

Install eSIM on Motorola using a QR code

3. Install eSIM on Motorola using manual codes:

If your QR code won’t scan, you can copy the activation code from your confirmation email and paste it directly into your phone’s settings by following the steps below:


  • Go to Settings → Access Network & Internet → Choose Mobile network →  Tap Download new SIM → Choose Set up an eSIM.

To install an eSIM on Motorola using manual codes:
  • Tap on“Try these troubleshooting steps” → Select “Enter activation code” → Paste the manual code you received (including LPA and the colons “:”) → Tap Next → Then, select the Set up Button →  And finally, tap Settings if you want to continue with the activation.

To install an eSIM on Motorola using manual codes:

How to activate an eSIM on Motorola

Once your eSIM is installed, you can activate it from your Motorola’s settings by turning on the line and selecting it for mobile data. If you’re using a travel eSIM, wait until you arrive at your destination before turning it on to avoid activating your plan too early.


Follow the steps below to complete the activation.


  • Go to Settings → Select Network & internet → Tap on Mobile network → Disable the other SIMs to avoid charges from your carrier (Your personal SIMs/eSIMs) → Select your newly installed eSIM → Then, turn on the Use SIM switch and also enable Roaming if you are using a travel eSIM.

How to Activate an eSIM on Your Motorola?

Troubleshooting Tips:

During Installation

If your Motorola shows an error while installing the eSIM, don’t worry. Sometimes the eSIM is successfully added even if the setup process doesn’t finish as expected. Before trying again, check whether it’s already installed:

  • On your phone: Go to Settings → Network & internet → Mobile network. Your new eSIM should appear in the Downloaded SIMs section, usually with the name assigned during setup.

Using your mobile data

If your connection doesn’t start immediately, wait a few minutes while your Motorola connects to a local network. If you’re still offline, try selecting a network manually.


Important: Don’t remove your eSIM. Once deleted, it can’t be installed again, and you won’t be able to use that data plan.

Oppo eSIM: how to install and activate it

Setting up an Oppo eSIM is a quick and simple process you can complete in just a few minutes. If your device supports eSIM, you’ll be connected in just a few steps.


To get started, you’ll go through two quick stages: first, installing the eSIM on your phone using the app linked to your eSIM, a QR code, or manual activation details, and second, activating it for mobile data. Below, you’ll find everything you need to start browsing in no time.


What you need to install an eSIM on Oppo devices

Before setting up your new Oppo eSIM, it’s important to check the basic requirements.


  • An unlocked and eSIM-compatible Oppo phone, though you should verify compatibility since not all models support eSIM by region, and your device must be unlocked to use another provider.
  • A stable Wi-Fi connection. This is required to download and add the eSIM to your device.
  • For Global or Regional (Europe, South America, Africa, etc.) eSIM plans, install it no earlier than 1 day before your trip to ensure your data starts when you need it. For single-country plans, install it at any time.

How to install an eSIM on Oppo

The fastest way to set up an eSIM is directly through your provider’s app. However, you can also use two universal methods: a QR code or a manual code. Both methods follow a similar path in your phone’s settings and work across all compatible Oppo models.

1. Automated eSIM installation via App

Installing your eSIM through the app is simple and only takes a few minutes. Just download or open the app here and follow these steps:


  • Go to the app on your phone → Log in with the email associated with your purchase → Go to Purchases → Tap Install on the eSIM you want to add → Read the Installation tips and tapGot it to continue → Choose Install Automatically → Tap Install eSIM → Then, tapAdd  and Download to save your new line inside the Mobile Network menu in settings.

Automated eSIM installation via App

2. Install an eSIM on Oppo using a QR code

The QR code method is another easy way to install an eSIM on Oppo. Since you’ll need to scan the QR code with your phone’s camera through settings phone, open the QR code received on another device before you begin. Then, follow the steps below.


  • Go to Settings → Mobile network → Tap on eSIM → Toggle on the eSIM switch  → Tap Add eSIM → Select Next → Scan the QR code you received → Tap Download and wait for the installation to complete (keep this screen open until the process finishes) → Confirm that the eSIM has been added to your device.

Install an eSIM on Oppo using a QR code:

3. Install an eSIM on Oppo using manual installation details

If your QR code won’t scan, you can copy the activation code from your confirmation email and paste it directly into your phone’s settings by following the steps below:


Note: These are text codes that you need to type or copy manually because they are not clickable links.


  • Go to Settings → Select Mobile Network → Tap on eSIM → Toggle on the eSIM switch → Tap Add eSIM.

Install an eSIM on Oppo using manual installation details

  • Tap on Next → Select Need help? → Choose Enter it manually → Copy and paste the full installation details exactly as provided (Including “LPA” and the colon “:”) → Tap Continue → Select Download and wait for the installation to finish (keep this screen open) → Confirm that the eSIM appears on your device.

Install an eSIM on Oppo using manual installation details

How to activate an eSIM on Oppo

Once the eSIM is installed, activating it only requires turning on the new line and selecting it for mobile data. This step can be done directly from your phone settings and does not require an internet connection.

If you’re using a travel eSIM, it’s recommended to enable the line only after you arrive at your destination to avoid activating it too early.

Follow these steps to activate your new eSIM:


  • Go to Settings → Select Mobile network → Disable your main SIM card/eSIM (optional, if you want to avoid extra charges with your home carrier) → Tap eSIM and make sure it’s enabled by turning on the switch → Tap the three dots next to the Data eSIM of the new installed eSIM and select Enable to confirm activation →  Go back to Mobile network and select the New eSIM → Turn on the Enable switch → Toggle Data roaming switch (only if you are using an international travel eSIM).

How to activate an eSIM on Oppo

Troubleshooting tips

During Installation

If Oppo displays a message during installation, there’s no need to start over right away. In many cases, the eSIM has already been added to your phone. Before trying again, take a quick look:


  • On your phone: Go to Settings → Mobile network. Your new eSIM should appear there as a new card, either with the provider name or the custom name you chose during setup.
  • In the App: Check your eSIM status. If it says “eSIM Installed – Ready to use,” everything is ready for activation.


Using your mobile data

If you’re not connected right away after following the activation steps, give your Oppo a few minutes to register on a local network. If you still don’t have a connection, try selecting a network manually.


⚠️ Important: Don’t remove your eSIM. Once deleted, it couldn’t be installed again, and you won’t be able to use that data plan.

How to install and activate an eSIM on a Sony phone?

To install and activate an eSIM on a Sony device, you can use the app associated with your eSIM or universal methods like scanning a QR code or entering the installation details manually. Either option will add the line to your device in just a few minutes. Once installed, the final step is activation, which is when you turn it on to connect to the network.


eSIM technology is available across many Sony Xperia models, from popular devices like the Xperia 1 IV, Xperia 5 IV, and Xperia 1 V to newer releases such as the Xperia 1 VII and Xperia 10 VII. Follow the step-by-step instructions below to complete your eSIM setup in just a few minutes.

What you need to know before setting up 

  • Make sure your Sony device supports eSIM technology and is unlocked (this means it can be used with any mobile company, not just the one where you bought it).
  • Ensure you’re connected to a stable, secure Wi-Fi network instead of a public one.
  • For Global or Regional (Europe, South America, Africa, etc.) plans, install it no earlier than 1 day before your trip to ensure your data starts when you need it. For single-country plans, install it at any time.


How to install an eSIM on your Sony device

There are three ways to install an eSIM on your Sony device. Choose the installation method that best matches your setup. If eSIM app installation is available, we recommend using it for the quickest setup experience.

1. Automatic installation via the app

This is the easiest and most modern way to set up your eSIM line. If you are using roAmigo, and follow these steps:


  • Go to the app on your phone → Log in with the email associated with your purchase → Go to Purchases → Tap Install on the eSIM you want to add →  Read the Installation tips and tapGot it to continue → Choose Install Automatically → Tap Install eSIM → Then, tapAdd and Set up to save the new line inside your Sony’s Mobile network menu → Once installed, tap Settings if you want to continue with the activation.

2. Install an eSIM on Sony by using a QR code

You can add your eSIM directly from your phone’s settings, either by scanning the QR code or by selecting its image from your photo gallery. Before you begin, make sure you have the QR code displayed on another screen or saved as an image on your device.


It is highly important to complete this setup directly through your Sony’s settings menu instead of using your default camera app, as the standard camera will not recognize the mobile configuration. Follow these steps:


  • Go to Settings → Access Network & Internet → Tap on Mobile network  → Tap on Download new SIM → Select Set up an eSIM → Scan your QR code or tap the “Scan from photo” text link at the bottom to choose it from your gallery → Then, tap on the Set up button to successfully add your eSIM → Once added, tap Settings to turn on the toggle to activate your new eSIM line.

Install an eSIM on Sony by using a QR code

3. Install an eSIM on Sony by entering details manually

Alternatively, you can complete the installation by entering the manual activation code you received directly into your Sony settings.


  • Go to Settings → Access Network & Internet → Tap on Mobile network  → Click on Download new SIM → Choose Set up an eSIM.

Install an eSIM on Sony by entering details manually
  • Tap on Try following these troubleshooting steps → Select Enter activation code → Copy and Paste the manual code for Android that you received (including LPA and the colons “:”) → Tap on Next → Select Set up to successfully add your eSIM → And finally, select Settings if you want to continue with the activation.

Note: Please keep in mind that this is a manual text code, not a clickable link.


To install an eSIM on Sony using manual codes:

How to activate an eSIM on Sony

Once your eSIM is installed, you can activate it by turning on the new line and selecting it for mobile data. For travel eSIMs, wait until you arrive at your destination before turning it on to avoid activating your plan too early.


Follow the steps below to complete the activation once you’re ready:


  • Go to Settings → Select Network & Internet → Tap on Mobile network → Disable the other SIMs to avoid charges from your home carrier (Your personal SIMs/eSIMs) → Select your newly installed eSIM → Then, turn on the Use SIM switch and also always enable Roaming when you are using a travel eSIM.

How to activate an eSIM on Sony

To keep in mind

  • eSIM support on Sony devices may vary depending on the carrier and the country of manufacture. 
  • Xperia models in the U.S. generally do not support eSIM, while some versions in Europe do.
  • For Sony devices with eSIM and Dual SIM support, you can use both a physical SIM and the eSIM simultaneously, but only one can be active for mobile data at a time.

Troubleshooting tips

During Installation

If your Sony device shows a message during installation, there’s no need to restart the process immediately. In some cases, the eSIM is installed successfully even if the setup doesn’t finish as expected. Before trying again, check whether it’s already available on your device:


  • On your Sony device: Go to Settings → Network & internet → Mobile network. If you see a new eSIM listed there under your downloaded SIMs (showing your provider’s name or a custom label), your line has already been successfully installed.
  • In the App: Check your eSIM status. If it says “eSIM Installed – Ready to use,” you can proceed with activation.

Using your mobile data

Once you arrive at your destination and have turned on your eSIM following the activation steps above, your Sony device should register on a local network within a few minutes. If you still don’t have internet after waiting a moment, simply select a network operator manually from your eSIM’s network settings.


⚠️ Important: Don’t delete your eSIM. If you remove it, you most likely won’t be able to reinstall it.

How to install and activate an eSIM on a Nokia phone?

To install an eSIM on your Nokia, you have three options, use your provider’s app, scan the QR code they sent you, or enter the details manually. In any case, the final step after installation is to activate the line from your phone’s settings to get connected.


This eSIM technology is available on select Nokia models, including the Nokia X30 5G, Nokia G60 5G, and Nokia XR21. In this guide, you’ll learn how to set up your eSIM in just a few minutes.

Before you start setting up your Nokia with eSIM:

  • Make sure your specific model is fully compatible with this technology and unlocked by your carrier, which means your phone must be contract-free to use a line from any other provider.
  • Connect to a stable Wi-Fi network to avoid interruptions.
  • For Global or Regional plans (Europe, South America, Asia, etc.), install your eSIM at most 1 day before your trip. For single-country plans, you can install it days or weeks ahead, as it only activates at your destination.

How to install an eSIM on Nokia

To begin the installation, choose which of the three methods you prefer to use to set up the line on your phone. Below, we explain each alternative step-by-step so you can choose the most convenient one for you.

Install your eSIM using the app

This method is the ideal choice for a quick and automated setup. If you are using roAmigo, download or open the app here and follow these steps:


  • Go to the app on your phone → Log in with the email associated with your purchase → Go to Purchases → Tap Install on the eSIM you want to add → Read the Installation tips and tapGot it to continue → Choose Install Automatically → Tap Install eSIM → Then, tap Add and Set up to save your new line inside your Nokia’s Mobile Network menu → Once installed, tap Settings if you want to continue with the activation.

Install your eSIM using the app

Install an eSIM on Nokia with a QR code

A QR code is a simple way to add an eSIM to your Nokia phone. You can scan it from another device or upload it directly if it’s saved as a photo or screenshot.


  • Go to Settings → Access Network & Internet → Choose Mobile Network → Tap Download new SIM → Choose Set up an eSIM → Scan your QR code or tap the “Scan from photo” text link below to choose it from your gallery → Then, tap on the Set up Button → Once added, tap Settings to turn on the toggle to activate your new eSIM line.

Install an eSIM on Nokia with a QR code

Install an eSIM on Nokia using manual codes

Manual installation is a useful alternative if you can’t scan a QR code. This method allows you to add the eSIM by entering the activation details directly into your Nokia settings.


  • Go to Settings → Access Network & Internet → Choose Mobile Network →  Tap Download new SIM → Choose Set up an eSIM.

Install an eSIM on Nokia using manual codes

  • Tap on“Try these troubleshooting steps” → Select “Enter activation code” → Paste the manual code you received (including LPA and the colons “:“) → Tap on Next → Then, select the Set up button →  And finally, tap Settings if you want to continue with the activation.


How to activate an eSIM on Nokia

Once your eSIM is installed, you can activate it by turning on the new line and selecting it for mobile data. If you’re using a travel eSIM, wait until you arrive at your destination before turning it on to avoid starting your plan too early.


Follow the steps below to complete the activation when you’re ready:


  • Go to Settings → Select Network & Internet → Tap on Mobile Network → Disable the other SIMs to avoid charges from your home carrier (Your personal SIMs/eSIMs) → Select your newly installed eSIM → Then, turn on the Use SIM switch and also always enable Roaming when you are using a travel eSIM.

How to Activate an eSIM on Nokia?

To keep in mind

  • eSIM compatibility on Nokia devices may vary depending on the carrier and country of manufacture.
  • Nokia devices can store up to 10 eSIMs. If you run out of space, you can remove one you’re not using via Settings.
  • On Nokia phones that support both eSIM and Dual SIM, you can use a physical SIM and eSIM simultaneously, but only one can be active for mobile data at a time.

Troubleshooting tips

During installation

If your Nokia shows a message while installing the eSIM, don’t worry. In some cases, the eSIM may have been added successfully even if the installation didn’t appear to finish correctly. Before attempting a new installation, check the following:


  • On your phone: Go to Settings → Network & Internet → Mobile Network. Your eSIM should appear in the list of Downloaded SIM with your provider’s name or a custom label.

  • In the app: Open the Purchases section and check the status of your eSIM. If it shows “eSIM Installed – Ready to use,” the installation was completed successfully.

Using your mobile data

If your eSIM is successfully activated, but you still don’t have internet, try selecting a network manually. To do this, go to Settings → Network & internet → Mobile network and select your eSIM. From there, turn off the Automatically select network option. Once the list loads, test the available operators one by one until you find the one that gives you the best signal for browsing.


Important: Never delete your eSIM while trying to restore your connection. Once removed, it couldn’t be installed again.

How to activate an eSIM on iPad

To activate an eSIM on iPad,  first you need to install the eSIM and then turn it on from your device settings. The full process takes about five minutes and is done directly on the iPad, either by scanning a QR code or by entering the activation details manually.


This setup is especially important on the newer iPad models like the iPad Pro (M4 and M5) and iPad Air (M2 and M3), which no longer include a physical SIM tray and rely entirely on eSIM for cellular data. Below, you’ll find the exact steps to install and activate your eSIM and get connected.

Before adding an eSIM to your iPad

These quick checks help prepare your iPad for eSIM setup and only take a moment to review.


  • Make sure your iPad is a Wi-Fi + Cellular model.
  • Confirm that your iPad is eSIM compatible and carrier-unlocked.
  • Connect to a stable Wi-Fi network to download the eSIM profile.
  • Have your QR code or activation details ready.
  • Keep your iPad charged or connected to power during setup.

iPad eSIM compatibility (Updated List – 2026)

To use an eSIM on an iPad, you must have a Wi-Fi + Cellular model. Wi-Fi–only iPads don’t include the hardware needed for mobile data, even if the software is up to date.


Important: iPad models released in 2024 and 2025, such as the iPad Pro (M4/M5) and iPad Air (M2/M3), are eSIM-only. They don’t have a physical SIM tray, so activating an eSIM is the only way to use mobile data.


iPad Pro

  • iPad Pro 13-inch (M4)
  • iPad Pro 11-inch (M4)
  • Pad Pro 13‑inch (M5)
  • iPad Pro 11‑inch (M5)
  • iPad Pro 12.9-inch (3rd to 6th generation)
  • iPad Pro 11-inch (1st to 4th generation)

iPad Air

  • iPad Air 13-inch (M3)
  • iPad Air 11-inch (M3)
  • iPad Air 13-inch (M2)
  • iPad Air 11-inch (M2)
  • iPad Air (3rd to 5th generation)

iPad (standard models)

  • iPad (A16)
  • iPad (7th to 10th generation)

iPad mini

  • iPad mini (A17 Pro)
  • iPad mini (5th and 6th generation)

How to install an eSIM on iPad

There are three universal ways to install an eSIM on an iPad, depending on how your carrier provides it. You only need to follow one of these methods.


After completing any installation method, iPadOS will guide you through a short configuration flow. At this point, the eSIM is already installed, but it’s important to finish all on-screen steps so the line is correctly set for cellular data and preferences. 

1.  Install an eSIM for iPad using a carrier app

Most carrier apps (such as roAmigo) allow you to install an eSIM directly from the app on iPads running iOS 17.5 or later. If your device meets this requirement, you can install the eSIM by following the steps below.


  • Open your carrier’s app on your iPad (for example, roAmigo) → Sign in with the email associated with your purchase → Go to My eSIMs → Select the eSIM you want to install → Tap Install and Activate → Choose Automatically → Tap Install and Activate again.


  • Review the setup instructions and tap Understood → Tap Continue and Allow when prompted → Tap Continue when the Activate eSIM screen appears (this step continues the setup but does not activate the eSIM yet) → Follow the on-screen steps to complete the setup.

2. Install an eSIM on iPad by scanning a QR code

  • Go to Settings → Open Cellular or Mobile Data → Tap Add a New Plan → Select Use QR Code → Scan the QR code → Tap Continue when the Activate eSIM screen appears (this step only advances the setup; the eSIM won’t activate yet) → Continue following the on-screen setup.

Install an eSIM on iPad by scanning a QR code

3. Install an eSIM on iPad by entering details manually

  • Go to Settings → Open Cellular or Mobile Data → Tap Add a New Plan → Select Use QR Code

Install an eSIM on iPad by entering details manually
  • Then select Enter Details Manually → Copy and paste the SM-DP Address and Activation Code from your purchase confirmation email → Tap Next → Tap Continue when the Activate eSIM screen appears (this step only moves the setup forward; the eSIM won’t activate yet) → Continue with the setup.

Install an eSIM on iPad by entering details manually

To complete the eSIM setup on your iPad

  • Tap Done when the Cellular Setup Complete screen appears → Assign a name to your new line (for example, your provider name plus the destination) → Choose your default line for Messages and Calls → Select Personal to keep using your regular number for iMessage and FaceTime → Select the Travel eSIM as your line for Cellular Data.

To complete the eSIM setup on your iPad

How to activate an eSIM on iPad

To start using cellular data, the line must be turned on and selected for mobile data. For local plans, activation happens as soon as the line is enabled. For travel plans, the connection completes only after you arrive at your destination and turn Data Roaming ON. To activate it on your iPad:


  • Go to Settings → Tap on Cellular or Mobile Data → Turn Cellular Data ON → Select the newly added line and make sure it is checked (blue checkmark) as the active line for Cellular Data → Tap Cellular Data Options → Turn Data Roaming ON (travel plans only).

How to activate an eSIM on iPad:
Go to Settings → Tap on Cellular or Mobile Data → Turn Cellular Data ON → Select the newly added line and make sure it is checked (blue checkmark) as the active line for Cellular Data → Tap Cellular Data Options → Turn Data Roaming ON (travel plans only).

Troubleshooting tips

If your iPad shows the line as Active, but iPad cellular data isn’t working, this usually isn’t related to the installation. In most cases, the device is still completing a brief connection process to the local network. Restarting the iPad after activation often resolves this. If the connection still doesn’t come through, manually selecting a network can help the device connect to the correct carrier.

Important: Never delete your eSIM to fix a connection error. Removing the profile can permanently invalidate the plan and, in some cases, prevent reinstallation.


How to manually select a network on an iPad

  • Go to Settings → Open Cellular → Select the eSIM you just activated → Tap Network Selection → Turn Automatic network selection OFF and wait for available carriers to load → Test the carriers listed on your screen one by one → Choose the one with the strongest signal → Try browsing again.

How to manually select a network on an iPad

How to install and activate an eSIM on a Samsung Phone

To install and activate an eSIM on a Samsung phone, you first need to add your eSIM to your device and then turn on the line when you’re ready to use it. Follow this guide to learn how to activate an eSIM on a Samsung phone in less than five minutes.

Before you start: Pre-installation checklist for Samsung

Before installing an eSIM on a Samsung phone:


  • Confirm that your Samsung phone supports eSIM and is unlocked to use eSIMs from other carriers.
  • Connect to a stable Wi-Fi connection before you begin.
  • Depending on your samsung model, some menu names look slightly different, but the process is the same.


Note: Installing your eSIM does not activate your plan or use your mobile data. However, if your regional (Europe, South America, Asia, etc.) or global eSIM includes the country you are currently in, it may start being used once it connects to a local network. We recommend installing it only one day before your trip to avoid using your plan days before you need them.

How to Install an eSIM on a Samsung Phone (3 Easy Methods)

There are three ways to install an eSIM on your Samsung phone. Choose the option that works best for you and follow the steps below.

1. Install your eSIM using the App:

This is the easiest option for a quick setup. You can download or open the roAmigo website here and follow these steps:


  • Go tothe app on your phone → Log in with the email associated with your purchase → Go to Purchases → Tap Install on the eSIM you want to add → Read the Installation tips and tap Got it to continue  → Choose Install Automatically → Tap Install eSIM  → Add → Wait a few minutes while your device verifies the eSIM information → After the eSIM is added, follow the on-screen prompts to complete the setup.

Install your eSIM using the Holafly App:

2. Install an eSIM using a QR Code

Using a QR code is a simple way to add an eSIM on a Samsung phone. If you’ve saved the QR code as a photo or screenshot, you can upload it directly from your gallery instead of scanning it from another device. Follow these steps:


  • Go to Settings → Tap on Connections → Select SIM Manager → Then on Add eSIM → Tap on Scan QR Code button → Then, scan the QR code or tap the gallery icon in the bottom right corner to upload the QR code image from your photos → Finally, Add the eSIM → Your mobile plan will be automatically downloaded.

Install an eSIM  using a QR Code

3. Manual eSIM Installation

This is a good backup option if you can’t use the app or a QR code. It lets you complete the setup by entering the eSIM details received directly into the phone’s settings. Follow these steps:


  • Go to Settings → Tap on Connections → Select SIM Manager → Select Add eSIM → Tap on Scan QR Code → Select Enter activation code → Type or paste the full activation code (including LPA and the colon ‘:’) → Tap on Done → And finally, tap on Add → Once the eSIM is downloaded, continue through the remaining steps to finish the setup.

Don’t forget that these are text codes to enter manually (copy and paste) because they aren’t direct clickable links.


Manual eSIM Installation on Samsung

Complete the eSIM setup

After adding the eSIM to your Samsung, your device will guide you through a short setup process to configure how you want to use your lines. During these steps, you can assign names to your SIM/eSIM cards and choose which line to use for calls, messages, and mobile data when needed.


  • When the Add new eSIM? screen appears, tap Add → Edit the SIM name and icon (use a descriptive name you’ll easily recognize later, such as provider or destination) → Tap Done → Confirm the new SIM name and tap Next → Choose your main line as the preferred SIM for calls → Tap Next → Select your main line to send messages and keep it as default → Tap Next → Set the newly named eSIM as the preferred SIM for Mobile data → Tap Done to finish the setup.

Complete the eSIM Setup on Samsung: After adding the eSIM to your Samsung, your device will guide you through a short setup process to configure how you want to use your lines. During these steps, you can assign names to your SIM/eSIM cards and choose which line to use for calls, messages, and mobile data when needed.

When the Add new eSIM? screen appears, tap Add → Edit the SIM name and icon (use a descriptive name you’ll easily recognize later, such as provider or destination) → Tap Done → Confirm the new SIM name and tap Next → Choose your main line as the preferred SIM for calls → Tap Next → Select your main line to send messages and keep it as default → Tap Next → Set the newly named eSIM as the preferred SIM for Mobile data → Tap Done to finish the setup.

How to Activate an eSIM on Samsung Phone

Activating your eSIM on Samsung is the final step to get your line up and running. You only need to enable the eSIM profile and select it for mobile data in your settings. If you are using a travel eSIM, this should only be done once you arrive at your destination to ensure your device connects correctly and your plan starts at the right time.


  • Go to Settings → Tap on Connections → Then on SIM Manager → Turn off your personal SIM to avoid charges from your home carrier → Turn your New eSIM ON → Select this eSIM under Mobile data (it will appear with the name you assigned or as the most recently added eSIM) → Go back to Connections → Tap Mobile networks → Turn on Data Roaming for the travel eSIM to start using mobile data.

How to Activate an eSIM on Samsung Phone:
Activating your eSIM on Samsung is the final step to get your line up and running. You only need to enable the eSIM profile and select it for mobile data in your settings. If you are using a travel eSIM, this should only be done once you arrive at your destination to ensure your device connects correctly and your plan starts at the right time.

Troubleshooting Tips

During Installation

If your Samsung screen says “Can’t add eSIM,” don’t worry! This usually means it was installed successfully on the first attempt. Before trying again, check if it’s already there:


  • On your phone: Go to Settings → Connections → SIM manager. Your new line should appear in your eSIM list, usually named eSIM 1, eSIM 2, or any custom name you assigned.
  • In the App: Check your eSIM status. If it says “eSIM Installed – Ready to use,” you are all set!


Using your mobile data

Once your eSIM data plan is turned on, your Samsung should connect to the internet automatically. However, if your data doesn’t start working right away, ensure Data Roaming is enabled (for travelers only) and give your phone a few minutes to complete the connection. If you still face issues, simply go to Mobile networks → Network operators to select a carrier manually.


⚠️ Important: Never delete your eSIM to fix a connection error.

iPhone XR eSIM: how to install and activate it

The iPhone XR supports eSIM technology, as it was among the first Apple devices to introduce digital SIM capabilities alongside the iPhone XS and XS Max. This feature allows you to use a digital cellular plan without needing a physical nano-SIM and can be set up in 5 minutes directly from your device settings.


The eSIM can be installed by scanning the QR code, directly through your eSIM app, or by entering the activation details manually. Once installed, it is activated by selecting the line for mobile data. Below are the steps to get started with an eSIM on your iPhone XR.

What you need to use eSIM on an iPhone XR

Before installing an eSIM on an iPhone XR, it’s helpful to confirm the basics to ensure the setup goes smoothly.


  • A compatible model. Most iPhone XR devices include eSIM, except for those manufactured for China, Hong Kong, or Macao.
  • Your iPhone must be unlocked. If your phone is tied to your current company, it won’t let you add any other SIM or eSIM.
  • Stable Wi-Fi and enough battery. Make sure you have a good internet connection and keep your phone plugged in during the eSIM setup.
  • For Global or Regional plans (Europe, South America, Asia, etc.), install your eSIM at most 1 day before your trip. For single-country plans, you can install it days or weeks ahead, as it only activates at your destination.

How to install an eSIM on iPhone XR

There are several ways to install an eSIM on iPhone XR. If your eSIM includes app installation (iOS 17.4 or later), that’s usually the quickest option. You can also install it using universal methods such as via a QR code or manual activation details.


Follow the instructions below for the method that works best for you.


Note: For travel eSIMs, we recommend completing the installation before your trip and activating it once you arrive at your destination.

eSIM Installation via the app

Perfect for a quicker setup on iOS 17.4 or later. You can add your eSIM directly from the roAmigo website in just a few taps:


  • Open the app → Sign in with the email used for your purchase → Go to Purchases → Select the eSIM you want to install → Tap Install → Choose Install Automatically → Tap Install eSIM → Select Activate to begin the setup → When the Activate eSIM screen appears, tap Continue to move to the next step.

eSIM Installation via the app

Install an eSIM on iPhone XR using a QR code

This is another easy way to install an eSIM on iPhone XR. To scan it, open it on another device before you begin, then follow the steps below:


  • Go to Settings → Cellular or Mobile Data → Add eSIM → Use QR Code → Scan the QR code → Tap Continue when the “Activate eSIM” screen appears (this step moves the setup forward but does not activate the eSIM yet) → Continue with the on-screen setup until it finishes.

Install an eSIM on iPhone XR using a QR code

Manual eSIM installation for iPhone XR

A perfect alternative if you can’t scan the QR code right now. Just use the activation text details received with your purchase and follow these steps:


Note: Please keep in mind that these are manual text codes, not clickable links.


  • Go to Settings → Cellular or Mobile Data → Add eSIM → Use QR Code → Tap Enter Details Manually → Copy and paste the complete SM-DP+ address and activation code into the designated fields  → Tap Next → Tap Continue when the “Activate eSIM” screen appears → Complete the setup on screen.

Install an eSIM on iPhone XR by entering the details manually

Complete the eSIM setup on iPhone XR

Once the installation is complete, iPhone XR will guide you through a few final setup steps. If you already have another line on your device, you’ll be asked to label each one so you can easily tell them apart. If the new eSIM is for cellular data only, make sure to select it for Cellular Data while keeping your personal line for calls and messages.


Note: These configuration steps apply to iPhone XR, XS and models running iOS 18 or earlier.


  • When the Cellular Setup Complete screen appears, tap Done → Assign a name to your new eSIM line and tap Continue → Choose your Default Line for calls and messages, Select Continue → Select Primary to keep using your main number for iMessage and FaceTime, tap Continue  → Set the new eSIM as your Cellular Data line.

Complete the eSIM setup on iPhone XR


How to activate an eSIM on iPhone XR

Once the eSIM is installed and configured, the final step is activation. Activating an eSIM on iPhone XR only requires turning the line on and selecting it for mobile data from your device settings.


For local plans, the eSIM activates immediately after you turn it on.
For travel eSIMs, activation is completed by enabling Data Roaming once you arrive at your destination.


  • Go to Settings → Cellular or Mobile Data → Turn off your physical SIM or other lines to avoid conflicts with your home carrier →  Go back to Cellular.

  • Select your New installed eSIM → Make sure Turn On This Line is enabled → Turn on Data Roaming (only required for travel eSIMs) → Go back to Cellular menu → Tap Cellular Data and select the new eSIM as your data line → Confirm that Allow Cellular Data Switching is turned off.

How to activate an eSIM on iPhone XR

Troubleshooting tips

During Installation

If your iPhone XR shows a message during installation, don’t worry. In many cases, the eSIM has already been added successfully. Before starting over, check whether it’s already installed:


  • On your iPhone: Go to Settings → Cellular or Mobile Service. Your new eSIM should appear in the list of available lines, usually with the name assigned during setup.
  • In the App: Check your eSIM status. If it says “eSIM Installed – Ready to use,” you’re ready to continue with activation.


Using your mobile data

Once your eSIM is fully activated following the steps above, your iPhone XR should automatically connect to the network within a few minutes.


If you don’t see any signal after a short wait, you can resolve this by going to your cellular settings and selecting a network operator manually.


⚠️ Important: Don’t remove your eSIM. Once deleted, it can’t be installed again, and you won’t be able to use that data plan.

How to Change Motorola APN Settings?

When it comes to staying connected on the go, having the correct Access Point Name (APN) settings on your Motorola device is essential. Think of the APN as the address that directs your device to the internet for smooth browsing and online access. While most eSIMs, like roAmigo’s, come with preconfigured APN settings, you might need to adjust them if your device doesn’t detect the APN or struggles to connect. In this guide, you’ll learn what an APN is, how to change and reset Motorola APN settings. Let’s dive in and get you connected!

What is the APN for roAmigo eSIM?

A roAmigo eSIM, like most internet providers, usually comes with pre-configured APN settings, so you can start using data right away. However, if you experience issues, such as activation failure on the specific destination for which you purchased the eSIM, you may need to adjust the APN settings on your Motorola to stay connected. The correct APN for roAmigo eSIM is “Global“, which should be entered in the APN field on your Motorola device. Follow the steps below to learn how to set up APN settings on your APN Android device and restore your mobile data:

To Set Up APN Android Settings on Motorola:

  • Go to Settings → Network & Internet → Tap on Mobile Network → Select your roAmigo eSIM.

To Set Up APN Android Settings on Motorola:

  • Scroll down and tap on Access Point Names → Check if there is an APN labeled ‘Global’ and select it. If it doesn’t appear, you’ll need to create it. To do so, press the + button → In the Name field, type “roAmigo” to easily recognize it → Then, in the APN field, enter the word Global → Tap the three dots at the top right → Choose Save → Once the changes are saved, select the newly created APN (Global) → Finally, restart your device to apply the settings.

To Set Up APN Android Settings on Motorola:

Troubleshooting Tips:

1. If you’ve entered the correct APN settings for Motorola and still can’t use data, it may be necessary to reset your network settings. This step will restore the default configuration and help resolve any issues preventing your eSIM from working properly. Next, we’ll show you how to do it.


To Reset Network Settings on a Motorola Phone:

  • Go to Settings → Scroll down and tap on System → Select Reset options → Tap on Reset Wi-Fi, mobile & Bluetooth → Finally, tap on Reset settings to reset your network. (If prompted, enter the PIN you use to unlock your screen and tap Next).


2. If your device is within a coverage area included in the eSIM plan, the APN is correctly configured, and resetting network settings hasn’t restored the connection, try manually switching the operator.


3. If your phone is from another brand, such as Samsung, Huawei, or Xiaomi, Sony, Honor or Pixel, you can find detailed guides for each device to help you easily configure your Android APN settings.

How to Change APN Settings on Vivo Devices?

The correct APN (Access Point Name) settings are essential for a stable and fast data usage on your Vivo device. The APN links your Vivo to the mobile network, enabling internet and other services. Most eSIMs, like roAmigo’s, come with pre-configured APN settings, but if your device doesn’t automatically detect the settings, adjustments may be needed. In this article, we’ll show you how to edit your APN settings on Android and fix common problems. Keep reading to enjoy smooth data while traveling!

How Does the roAmigo APN Works on Your Vivo Device?

By default, roAmigo eSIM comes with pre-configured APN settings. However, if you’re having trouble getting online, such as activation failure on the specific destination for which you purchased the eSIM, you may need to adjust them manually.


The roAmigo APN for Android devices is simple: just enter “Global” in the APN field to enable data and services. Keep reading for a step-by-step guide to set it up and enjoy uninterrupted browsing.

To Set Up APN Android Settings on Vivo:

  • Go to Settings → Tap on SIM card and mobile network → Select your roAmigo eSIM. → Scroll down and Tap on Access Point Names.
  • Check if there is an APN labeled Global and select it. If it doesn’t appear, you’ll need to create it. To do so, press the + button → In the Name field, type roAmigo to easily recognize it → Then, in the APN field, enter Global → Tap the three dots at the top right → Choose Save → Once the changes are saved, select the newly created APN (Global)

To Set Up APN Android Settings on Vivo:

Troubleshooting Tips

1. If your roAmigo APN settings are configured but your internet connection isn’t performing optimally, resetting your APN settings on Android can resolve connectivity challenges and restore default configurations. 


Resetting network settings erases saved Wi-Fi, mobile data, and Bluetooth connections. Back up your passwords first, then follow our steps to reset network settings on your Vivo for smooth connectivity.

To reset network settings on a Vivo Android phone:

  • Go to Settings → Scroll down and tap on System management → Select Reset options → Tap on Reset Wi-Fi, mobile & Bluetooth → Finally, tap on Reset settings to reset your network. (If prompted, enter the PIN you use to unlock your screen and tap Next).

To reset network settings on a Vivo Android phone:

2. If your device is within the coverage area of the eSIM plan, the APN is correctly configured, and resetting the network settings hasn’t resolved the lack of internet, try changing the operator manually.


3. If your device is from another brand, like Samsung, Huawei, Xiaomi, Honor, or Pixel you’ll find step-by-step guides for each one to help you easily set up your Android APN settings.

How to Install and Activate an eSIM on an Honor Device?

Most modern Honor smartphones support eSIM technology, specifically across new releases like the Honor 600e, the flagship Magic series, and the Number series (including the Honor 90, 200, and 400 lines). This technology allows you to connect to a cellular network digitally without using a physical SIM card.


You can install the eSIM automatically if your provider has an official app. Otherwise, you can use the two universal methods that work for any line: scanning a QR code or entering the details manually. Below, you’ll find the step-by-step instructions to get your data up and running in just a few minutes.

Before you install your Honor eSIM

  • Ensure that your Honor device is compatible with eSIM and not locked by any carrier. This means your phone must be unlocked to work with other networks.
  • Make sure you’re connected to a stable and secure Wi-Fi network. 
  • Keep in mind that an eSIM can only be installed once. Never delete the profile from your settings later, or you may lose your plan.
  • For Global or Regional (Europe, Asia, South America, Africa, etc.) plans, install it no earlier than 1 day before your trip to ensure your data starts when you need it. For single-country plans, install it at any time.

How to Install an eSIM on your Honor device?

There are three methods to set up your eSIM. Choose the option that best suits your needs below and follow the step-by-step instructions: 

1. Install an eSIM on Honor using the app

Using the roAmigo website is usually the fastest and easiest way to set up your line. Simply download or open the app here and follow the steps below:


  • Go to the app on your phone → Log in with the email associated with your purchase → Go to Purchases → TapInstall on the eSIM you want to add → Read the Installation tips and tapGot it to continue → Choose Install Automatically → Tap Install eSIM  → Then, tapAdd and Continue to save your new line inside the SIM management menu in settings.

Install an eSIM using the app

2. Install an eSIM on Honor with a QR Code

You can also install your eSIM by scanning the QR code directly from your Honor settings. Before you begin, make sure the QR code is displayed on another screen or saved to your gallery if you’re using only one device.


  • Go to Settings → Select Mobile network → Tap on SIM management → Select Add eSIM → Enable the eSIM option → Press the Add eSIM button in the bottom left corner of the screen → Scan the QR code or tap the “Scan from Gallery” text link below to choose it from your photos → Tap on Add this eSIM (Don’t close this window, or the installation will stop).

Install an eSIM on Honor with a QR Code

3. Install an eSIM on Honor using manual details

If you can’t scan the QR code, you can install your eSIM by manually entering the activation details received with your purchase.


  • Go to Settings → Select Mobile network → Tap on SIM management → Select Add eSIM → Enable the eSIM option → Press the Add eSIM button in the bottom left corner of the screen →  Tap on Enter Manually → Copy the two manual codes from the iOS section in your eSIM confirmation email (Honor uses the same two-field format as iOS, not Android) and paste the SM-DP+ Address and the Activation Code into their respective fields → Tap on NEXT → To finalize, tap on  Add this eSIM (Do not close the window, as this could cancel the installation).

Note: Please keep in mind that these are manual text codes, not clickable links.

How to activate an eSIM on your Honor device:

After installing your eSIM, you just need to turn on the new line and select it for mobile data to activate it. You don’t need any connection to do this, simply follow the steps below directly from your phone’s settings:


Note: If you’re using a travel eSIM, it’s recommended to enable the line only after you arrive at your destination to avoid activating it too early.


  • Go to Settings → Select Mobile network → Tap on SIM management → Set up your new eSIM as Default mobile data → Deactivate your Personal SIM/eSIM (this prevents unexpected charges from your home carrier) → Tap on the recently installed eSIM → Check that the eSIM option is selected → Tap on your New eSIM line again.
How to Activate an eSIM on Your Honor Device?
  • Then, turn on the Enable switch → Go back three times until you reach the Mobile networks menu → Choose Mobile data → Then, choose Mobile data → Turn on Mobile Data and also Data roaming if you are using a travel eSIM.

How to Activate an eSIM on Your Honor Device?

To keep in mind

  • On Honor devices with eSIM and Dual SIM support, like the Honor 90, you can use both a physical SIM and the eSIM at the same time, but only one can be active for mobile data.
  • Remember that the Honor Magic 6 Lite, Honor X9C, and Honor 70 are not compatible with eSIM,
  • When using a travel or international eSIM, disable your personal SIM once you reach your destination to avoid unexpected roaming charges from your domestic carrier.

Troubleshooting tips

During Installation

If your Honor displays a message during installation, there’s no need to start over right away. In many cases, the eSIM has already been added to your device. Before trying again, take a quick look:


  • On your phone: Go to Settings → Mobile network → SIM management. Your new eSIM should appear there, usually with the name assigned during setup or the provider name.
  • In the App: Check your eSIM status. If it says “eSIM Installed – Ready to use,” everything is ready for activation.

Using your mobile data

If you already turned on your eSIM and enabled Data Roaming but still have no internet, you can manually select a network by going to your Settings, Mobile networks, Mobile data, and Carrier. There, just turn off the Automatic switch, tap OK, and once the available networks load, test the operators one by one until you find the one with the best signal to start browsing again.


⚠️ Important: Don’t remove your eSIM. If you remove it, you most likely won’t be able to reinstall it.

How to Update APN Settings for Honor Devices?

Ensuring your Honor device has the correct APN settings is the key for a smooth internet experience. The APN (Access Point Name) connects your device to the carrier’s network, enabling fast internet, email access, and app downloads. While most eSIMs, like roAmigo, come with pre-configured APN settings, there are times when you might need to adjust them manually. In this article, we’ll show you exactly how to update APN settings for your Honor device. Keep reading to easily stay connected!

APN Settings You Need for roAmigo eSIM:

By default, roAmigo eSIMs come with the APN automatically configured, However, if you encounter challenges connecting to the internet once you arrive at your destination and activate your eSIM, you may need to adjust the settings manually.


The APN for roAmigo is “Global“, and you simply need to enter this word in the designated fields. Below, we guide you through the steps to set up the APN on your Honor Android device and enjoy uninterrupted mobile data during your trip.

To set up APN Android settings on Honor:

  • Go to Settings → Mobile network → Tap on Mobile data → Scroll down and select Access Point Names (APNs).
  • Check if there is an APN labeled “Global” and select it. If it doesn’t appear, you’ll need to create it. To do so, tap the three dots at the top right → Tap on New APN → In the Name field, type “roAmigo” to easily recognize it → Then, in the APN field, enter the word Global → When you’re finished, tap the checkmark to save the changes.

Troubleshooting Tips:

1. If you’ve updated your APN settings for Honor and still don’t have a data connection, resetting your network settings can help restore everything to default and get you back online. This step will reset the default connection settings and help resolve any network-related issues.


Resetting network settings erases saved Wi-Fi, mobile data, and Bluetooth connections. Back up your passwords first. Next, we’ll guide you through the correct process.

To reset network settings on Honor phones:

  • Go to Settings → Scroll down and tap on System & updates → Select Reset option → Tap on Reset network settings → Select the eSIM ‘roAmigo‘ → Finally, tap on Reset network settings. (If prompted, enter the PIN you use to unlock your screen and tap on Reset network settings again).


2. If your device is within a coverage area included in the eSIM plan, the APN is correctly configured, and resetting network settings hasn’t restored mobile data access, try manually switching the operator.


3. If your phone is from another brand like Samsung, Huawei, Xiaomi, Motorola, Sony, or Pixel, you’ll find detailed guides for each device to help you configure your Android APN settings effortlessly.

How to Change APN Settings on Huawei Android?

The APN (Access Point Name) allows your Huawei to access mobile data so you can browse, share, and use your apps wherever you are. Most eSIMs, including roAmigo’s, come with the APN ready to go. But in certain cases, like switching carriers or after a system update, you might need to adjust these settings manually to make the most of your connection. This article will show you how to update APN settings on Android phones and ensure you’re always connected. Let’s dive in! 

What Are the APN Settings for roAmigo on Huawei?

roAmigo eSIMs come with the APN preconfigured. However, sometimes it’s necessary to change these settings if you’re unable to connect after activation at your destination. The APN for roAmigo is “Global,” and you just need to enter this term in the designated fields.


Please note that the process may vary slightly depending on your Huawei model and Operating System (OS) version. Follow the steps below to set up your APN and get your mobile data working properly.

To set up APN Android settings on Huawei:

  • Go to Settings → Mobile network → Tap on Mobile data → Scroll down and select Access Point Names (APNs).

To set up APN Android settings on Huawei:
  • Check if there is an APN labeled “Global” and select it. If it doesn’t appear, you’ll need to create it. To do so, tap the three dots at the top right → Tap on New APN → In the Name field, type “roAmigo” to easily recognize it → Then, in the APN field, enter the word Global → When you’re finished, tap the checkmark to save the changes. Make sure to select the newly created APN as the default for your Huawei, otherwise, it won’t activate correctly.

To set up APN Android settings on Huawei:

Troubleshooting Tips:

1. If you’ve entered the wrong APN settings for Android or are still having trouble connecting after configuring the correct APN, resetting your network settings can help restore the default connection. Keep in mind that resetting your network settings will erase Wi-Fi, mobile network, and Bluetooth connections. Make sure to back up your passwords and other connection details. 


Below, we’ll guide you through the steps:

To reset network settings on Huawei phones:

  • Go to Settings → Scroll down and tap on System & updates → Select Reset option → Tap on Reset network settings → Select the eSIM ‘roAmigo‘ → Finally, tap on Reset network settings. (If prompted, enter the PIN you use to unlock your screen and tap on Reset network settings again).

To reset network settings on Huawei phones:

2. If your device is within a coverage area included in the eSIM plan, and the APN is correctly configured, but after resetting network settings the internet still isn’t working, try manually switching the operator.


3. If your phone is from another brand like Samsung, Xiaomi, Motorola, Vivo, Sony, or Pixel, You’ll get easy-to-follow steps for setting up your Android APN settings without any hassle.

How to Set Up APN Settings on an Oppo Android?

The Access Point Name (APN) is the gateway that connects your mobile device to the internet, enabling you to browse, share, and stay connected effortlessly. Most eSIMs already come with APN settings preconfigured, but sometimes, like when you switch carriers or after a system update, you might need to adjust them manually. In this article, we’ll show you exactly how to update the APN settings on your Android step by step. Let’s make sure you always have access to data, no matter where you are!

Steps to Set Up roAmigo APN on Oppo

roAmigo eSIMs typically include preconfigured APN settings. However, if you’re having trouble connecting after activation, you might need to update them manually. For roAmigo, the APN is “Global“, and you’ll need to enter this term in the specified fields. Make sure to select the roAmigo eSIM as your primary data option to ensure the correct APN settings are applied on your Oppo Android device.


Keep in mind that the setup process can vary slightly depending on your Oppo model and Android version. Follow the steps below to configure your APN and stay connected effortlessly.

To set up APN Android settings on Oppo:

  • Go to Settings → Mobile network → Tap on your roAmigo eSIM → Select Access Point Names (APNs).

To set up APN Android settings on Oppo:

  • Check if there is an APN labeled “Global” and select it. If it doesn’t appear, you’ll need to create it. To do so, tap the + at the top right → In the Name field, type “roAmigo” to easily recognize it → Then, in the APN field, enter the word Global → When you’re finished, tap the checkmark to save the changes → Finally, make sure to select the newly created APN (Global) as the default for your Oppo, otherwise, it won’t activate correctly.

To set up APN Android settings on Oppo:

Troubleshooting Tips

1. If you’ve accidentally entered the wrong APN on your Android or are still unable to connect to the internet after configuring the correct APN, it might be time to reset your network settings. Note that this will erase saved Wi-Fi, mobile network, and Bluetooth connections, so be sure to back up your passwords. 


Below, we’ll guide you through the steps: 


To reset network settings on Oppo phones:

  • Go to Settings → Scroll down and tap on Additional settings → Select Back up & reset → Tap on Reset Phone → Finally, tap on Reset network settings. (If prompted, enter the PIN you use to unlock your screen and tap on Reset network settings again).

To reset network settings on Oppo phones:

2. If your Oppo device is in a coverage area included in your eSIM plan and the APN is correctly configured but the internet still isn’t working after resetting network settings, try manually switching the operator.


3. If your phone is from another brand like Samsung, Xiaomi, Motorola, Vivo, Sony, Huawei, or Pixel, you’ll get easy-to-follow steps for setting up your Android APN settings without any hassle.

How to Change OnePlus APN Settings?

Staying connected is essential, and your OnePlus device depends on APN (Access Point Name) settings to enable mobile data. These settings are what allow your phone to connect to the internet, so you can browse, stream, and stay connected with ease. If you’ve switched mobile providers or need to adjust your settings for better data performance, updating the APN may be necessary. In this article, we’ll show you how to update your OnePlus APN settings and share some tips to ensure a seamless experience.

Setting Up roAmigo APN on Your OnePlus Device:

To ensure your OnePlus device works properly with roAmigo eSIM, you may need to adjust the APN settings if you’re unable to use data after activation at your destination. The key APN for roAmigo is simply “Global.” Make sure you’ve selected the roAmigo eSIM as your mobile data option. This will ensure the correct APN settings are applied on your Android, and you’ll be all set for fast and stable data services.


The steps may vary slightly based on your OnePlus model and Android version, but don’t worry! We’ll walk you through the process to ensure everything’s set up correctly.

Steps to Change APN Android settings on OnePlus:

  • Go to Settings → Mobile network → Tap on your roAmigo eSIM → Select Access Point Names.

Steps to Change APN Android settings on OnePlus:

  • Check if there is an APN labeled “Global” and select it. If it doesn’t appear, you’ll need to create it. To do so, tap the + at the top right → In the Name field, type “roAmigo” to easily recognize it → Then, in the APN field, enter the word Global → When you’re finished, tap Done to save the changes → Finally, make sure to select the newly created APN (Global) as the default for your OnePlus, otherwise, it won’t activate correctly.

Steps to Change APN Android settings on OnePlus:

Troubleshooting Tips

1. If you’ve accidentally entered the wrong APN settings on your Android or, even after configuring the correct one, you’re still facing connection or data difficulties, it may be time to reset your network settings. Keep in mind that this process will remove saved Wi-Fi, mobile network, and Bluetooth connections. Make sure to back up your passwords and reconnect to your networks once the reset is complete.


Next, we’ll guide you through the process:

To reset network settings on OnePlus phones:

  • Go to Settings → Scroll down and tap on Additional settings → Select Back up & reset → Select Reset phone → Tap on Reset network settings (If prompted, enter the PIN you use to unlock your screen and tap on Reset network settings again).

To reset network settings on OnePlus phones:

2. If your device is within a coverage area included in the eSIM plan, and the APN is correctly configured, but after resetting network settings the internet still isn’t working, try manually switching the operator.


3. If your phone is from another brand like Samsung, Xiaomi, Motorola, Vivo, Huawei, Oppo, Sony, Nokia, or Pixel, you’ll get easy-to-follow steps for setting up your Android APN settings without any hassle.

How to Change Nokia APN Android Settings?

In today’s digital world, staying connected is essential, and the APN (Access Point Name) settings on your Nokia device are key to ensuring reliable mobile data access. While the APN configuration is similar across Android devices, the exact steps may differ depending on the model and operating system version. Generally, you’ll access mobile network settings and enter the required data. For instance, you may need to adjust your APN if you switch mobile providers or if your current settings require an update. In this article, we’ll walk you through how to update or change your APN Android settings for a seamless experience. Keep reading to stay fully connected!

roAmigo’s APN Settings on Android:

Setting up the correct APN on Android helps your roAmigo eSIM function smoothly on your Nokia device. If you’re unable to connect after activating your eSIM, you may need to adjust the APN settings. The APN for roAmigo is simply “Global”. This term must be typed exactly as shown in the relevant fields during setup.


Make sure you’ve selected the roAmigo eSIM for mobile data to ensure the correct configuration is applied. Follow the steps below for a smooth APN setup and internet access:

Steps to change APN Android settings on Nokia:

  • Go to Settings → Network & internet → Mobile network → Tap on your roAmigo eSIM.

Steps to change APN Android settings on Nokia:
  • Scroll down and tap on Access Point Names or Advanced, and then Access Point Names → Check if there is an APN labeled “Global” and select it. If it doesn’t appear, you’ll need to create it. To do so, tap the + at the top right → In the Name field, type “roAmigo” to easily recognize it → Then, in the APN field, enter the word “Global” →  Leave the other fields empty → Tap the three dots in the top right corner → Select Save → Finally, make sure to select the newly created APN (Global) as the default for your Nokia, otherwise, it won’t activate correctly.

Steps to change APN Android settings on Nokia:

Troubleshooting Tips:

1. If you’ve entered the Nokia APN settings incorrectly or, after configuring the correct APN, you still can’t connect or receive a data signal, you may need to reset your network settings. This action will help resolve network issues and restore the default connection settings.


Keep in mind that this process will remove saved Wi-Fi, mobile network, and Bluetooth connections. Make sure to back up your passwords and reconnect to your networks once the reset is complete. Next, we’ll guide you through the process:

To reset network settings on Nokia phones:

  • Go to Settings → Scroll down and tap on System → Select Reset options → Choose Reset Wi-Fi, mobile & Bluetooth → Tap on Reset settings (If prompted, enter the PIN you use to unlock your screen).

To reset network settings on Nokia phones:

2. In case your device is within a coverage area covered by the eSIM plan, and the APN is set up correctly, but the internet isn’t working even after resetting the network settings, try switching the operator manually.


3. If your phone is from another brand like Samsung, Xiaomi, Motorola, Vivo, Huawei, Oppo, Sony, OnePlus or Pixel, you’ll get easy-to-follow steps for setting up your Android APN settings without any hassle.

How to Set Up Google Pixel APN Settings?

Staying connected is more important than ever, and configuring the APN (Access Point Name) settings on your Google Pixel is essential for ensuring smooth internet access. While the process for setting up an APN is similar across Android devices, the specific steps may vary depending on the model and operating system version. In general, you’ll need to access the mobile network settings and enter the correct APN. This is especially important if you’re switching mobile providers or want to optimize your data experience. In this article, we’ll show you how to update or change your Google Pixel APN settings. Keep reading to ensure you stay fully connected!

What Are the Correct APN Settings for roAmigo on Android?

When using roAmigo with your phone, it’s crucial to configure the correct Google Pixel APN settings for uninterrupted mobile data access. If you’re having trouble connecting after activating your eSIM, adjusting the APN may be necessary. Simply enter “Global” in the required fields during the setup to complete the process.


Before starting, make sure your roAmigo eSIM is activated for mobile data, as the APN setup won’t work without it. The process may vary slightly depending on your Google Pixel model and OS version (Operating System). Next, we’ll walk you through the steps:

Steps to set up APN on a Google Pixel phone:

  • Go to Settings → Network and Internet → Tap on SIMs → Select your roAmigo eSIM.

Steps to set up APN on a Google Pixel phone:
  • Scroll down and select Access Point Names → Check if there is an APN labeled “Global” and select it. If it doesn’t appear, you’ll need to create it. To do so, tap the + at the top right → In the Name field, type “roAmigo” to easily recognize it → Then, in the APN field, enter the word “Global” → Leave the other fields empty → Tap the three dots in the top right corner → Select Save → Finally, make sure to select the newly created APN (Global) as the default for your Pixel, otherwise, it won’t activate correctly.

Steps to set up APN on a Google Pixel phone:

Troubleshooting Tips:

1. If you’ve entered the correct APN for roAmigo on your Google Pixel, but you’re still unable to connect or experience difficulties with your mobile data signal, it may be necessary to reset your network settings. This can help resolve any network-related errors and restore the default connection settings on your device.


Keep in mind that resetting network settings will only affect Wi-Fi, mobile network, and Bluetooth connections. It’s important to back up your passwords to avoid losing them. Next, we’ll walk you through the steps:

To reset network settings on Google Pixel phones:

  • Go to Settings → Scroll down and tap on System → Select Reset options → Select Reset mobile network settings → Tap on Reset settings (If prompted, enter the PIN you use to unlock your screen).

To reset network settings on Google Pixel phones:

2. In case your device is within a coverage area covered by the eSIM plan, and the APN is set up correctly, but the internet isn’t working even after resetting the network settings, try switching the operator manually.


3. If your phone is from another brand like Samsung, Xiaomi, Motorola, Vivo, Huawei, Oppo, Sony, Nokia, or OnePlus, you’ll get easy-to-follow steps for setting up your Android APN settings without any hassle.

When to activate your eSIM: Does it start when installed?

Knowing when to activate your eSIM is the key to not wasting a single day of your plan. Your eSIM doesn’t start when you install it. It only activates when you arrive at your destination and connect to a local network with data roaming turned on.


Installation and activation are two different steps. Installing your eSIM early gets everything ready, while activating it at the right moment ensures your plan starts exactly when you need it. Read on to find out the best timing for each, what to do if your eSIM shows as “Active” before your trip, and how to get the most out of your plan.

Should I install my eSIM before travelling?


We recommend installing your eSIM at least one day before your trip. This way, you can do it from home on a stable Wi-Fi connection and arrive at your destination ready to connect. 


Remember that this applies to daily eSIM plans, where the countdown only starts once you connect to a local network abroad.If you have a monthly or annual subscription, the plan works differently. Since it renews automatically, your data allowance resets each billing cycle, so you don’t need to worry about timing the installation around your trip.

When to activate your eSIM for travel

The best time to activate your eSIM is once you land at your destination. To activate it, turn on your travel eSIM line, select it as your mobile data line, and enable data roaming. Your plan will start automatically once your device connects to a local network, and you can begin using your data right away.

Troubleshooting Tips

If your device shows your eSIM as “Active” right after installation, here is everything you need to know.

My eSIM says activated, but I’m not traveling yet

Seeing “Active” or “ON” in eSIM right after installation is completely normal. It simply means the eSIM profile is ready on your device, not that your plan has started. For most travel plans, your days won’t start counting until your device connects to a supported network at your destination.


However, if you have a subscription plan, the billing cycle may start as soon as your purchase is completed, even if you haven’t started using data yet. To be sure, you can check your plan status through your provider’s app, rather than relying only on your phone settings.

 Check your eSIM status through the provider app

  • Open the app → Tap Purchases → Here you can check the status of your eSIM (it may appear as Pending to Install, Installed – Ready to use, or Installed – In use) → If your eSIM says “In use,” your data plan is active. Tap it to view its usage details.

Check your eSIM status through the Holafly app

To keep in mind

  • If your eSIM shows as “On” before your trip, turn the line off and keep it disabled until you land.
  • Once activated, the days count continuously even if you turn the line off or switch to another eSIM.
  • For Trip eSIMs, install in advance since they only activate upon connecting to the destination network. For subscription plans, buy them the same day or one day before use.
  • Subscription plans start counting down the moment you purchase the eSIM. Always check the plan’s policy before buying to ensure you’re ready to use it.
  • If your home country is in the eSIM coverage area (Global and Regional eSIMs), wait until the day of your flight to install it.
  • If your eSIM doesn’t connect upon arrival, don’t delete the profile. Most are single-use and cannot be re-downloaded without contacting support.

Huawei eSIM: how to install and activate it on your phone

Setting up a Huawei eSIM requires two steps directly from your phone settings: installation, which involves downloading and saving the eSIM to your device, and activation, which is the final step to turn on the line and start browsing. 


This technology is compatible with popular models like the Huawei P40, P40 Pro, Mate 40 Pro, and Pura 70 Pro (though compatibility may vary by region or carrier). Below, we’ll show you how to complete this process using different setup options, and answer the most common questions to ensure you a guaranteed connection.


Before you install your Huawei eSIM

  • Confirm that your device is eSIM-compatible and unlocked (meaning it isn’t locked to the carrier you bought it from).
  • Make sure you are connected to a stable Wi-Fi network.

Important: For Global or Regional (Europe, South America, Africa, etc.) plans, install it no earlier than 1 day before your trip to ensure your data starts when you need it. For single-country plans, install it at any time.


How to install eSIM on Huawei

There are three options to install your Huawei eSIM. If available, the app that comes with your eSIM is usually the quickest option, as most of the setup is done automatically.


You can also install your eSIM using the universal methods, such as the QR code or manual activation details commonly sent to your email. Review the options below and choose the one that works best for you.

 1. Automated eSIM installation via App

If your eSIM provider has its own app (like roAmigo), just download it for a more direct setup and follow these steps:


  • Open the app on your phone → Log in with the email associated with your purchase → Go to Purchases → Tap Install on the eSIM you want to add → Read the Installation tips and tap Got it to continue → Choose Install Automatically → Tap Install eSIM  → Then, tap Continue and Add to save your new line inside your Huawei’s SIM management menu (Keep this window open until it finishes).

Automated eSIM installation via App

2. Installation via QR code

The QR code method is another easy way to install an eSIM on Huawei. You can scan the QR code from another screen or save it to your gallery and select it during setup. Follow the steps below through your phone’s settings (don’t use your camera app).


  • Go to Settings → Select Mobile network → Tap on SIM management → Select Add eSIM → Enable the eSIM option → Press the Add eSIM button in the bottom left corner of the screen → Scan the QR code, or tap the “Select from gallery” text link below to choose it from your photos  → Tap on Add this eSIM (Don’t close this window, or the installation will stop).

eSIM Installation via QR code

 3. Manual eSIM Installation on Huawei

If the other installation methods didn’t work as expected, you can also install your eSIM using the manual activation details received. Just follow the steps below:


  • Go to Settings → Select Mobile network → Tap on SIM management → Select Add eSIM → Enable the eSIM option → Press the Add eSIM button in the bottom left corner of the screen →  Tap on Enter manually → Copy the two manual codes from the iOS section in your eSIM confirmation email (Huawei uses the same two-field format as iOS, not Android) and paste the SM-DP+ Address and the Activation code into their respective fields → Tap Next → Tap Add eSIM (Keep this window open until it finishes).

Note: Please keep in mind that these are manual text codes, not clickable links.


To install your eSIM manually with the SM-DP + address:

 How to activate Huawei eSIM

After installing your eSIM, activation happens from your phone settings. For travel eSIMs, your plan starts whOnce your eSIM is installed on your Huawei, you’re ready to activate it by turning on the line and setting it as your main data source.


If you are using a travel eSIM, remember that your plan will only start working once you arrive at your destination and turn on data roaming.


Follow these steps to activate it:
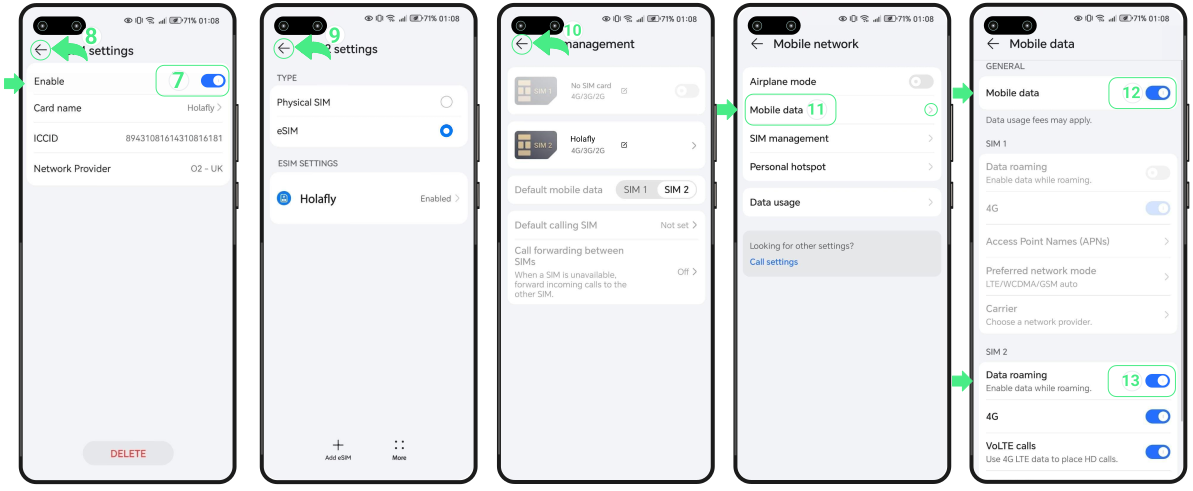

  • Go to Settings → Select Mobile network → Tap on SIM management → Set your new eSIM as Default mobile data → Deactivate your Personal SIM/eSIM (this prevents unexpected charges from your home carrier) → Tap on the recently installed eSIM → Check that the eSIM option is selected → Then, tap on your New eSIM line again.

To activate your eSIM data on your Huawei phone:
  • Turn on the Enable switch  → Go back three times until you reach the Mobile network menu → Then, choose Mobile data → Turn on Mobile data and also Data roaming if you are using a travel eSIM.

To activate your eSIM data on your Huawei phone:

And that’s it! Now you’ll have your data plan active and can enjoy reliable data service on your trip.


Troubleshooting tips

During Installation

If Huawei shows a message while adding your eSIM, there’s no need to start the installation again right away. In many cases, the eSIM has already been saved on your device. Before trying again, check the following:


  • On your phone: Go to Settings → Mobile network → SIM management. Your eSIM should appear in the SIM list, either with the provider name or the name you selected during setup.
  • In the App: Check your eSIM status. If it says “eSIM Installed – Ready to use,” your eSIM is installed and ready for activation.


Using your mobile data

Once you switch on your eSIM following the activation steps above, your Huawei device will automatically search for the network. Give it a few moments to establish a stable connection.


If you still don’t see any signal bars at the top of your screen after a few moments, go to your mobile network settings and select another local operator manually.


⚠️ Important: Keep your eSIM installed on your device. Don’t delete it to fix connection issues.

How to set up and activate an eSIM?

Setting up an eSIM is a quick and straightforward process you can complete directly from your device settings. It involves two stages: installation and activation. During installation, you add the digital eSIM profile to your phone using a QR code or manual details. Activation is the step that turns on mobile data and starts your plan.


For travel or international eSIMs, it’s recommended to install the eSIM before your trip and activate it once you arrive at your destination. This helps ensure your device connects to the local network at the right moment.


In this guide, you’ll learn how to set up an eSIM on iPhone and Android devices, what to check before getting started, and how to complete the process with confidence.

Before you install: What you need to check

Before setting up an eSIM, take a moment to check a few essentials. This ensures a smooth setup from start to finish.


  • Connect to a stable Wi-Fi network to install the eSIM without interruptions. Public networks are not recommended.
  • Ensure your device has at least 20% battery or keep it connected to a charger during the setup process.
  • Decide how you’ll add the eSIM to your iOS or Android device: by scanning a QR code or by entering the manual installation codes. Manual entry is useful if the QR code doesn’t scan on iOS or Android and must be entered exactly as provided.

How to Install an eSIM

This step is completed before you travel and requires a stable Wi-Fi connection. During this process, the eSIM profile is added to your device, but data usage doesn’t start yet. 
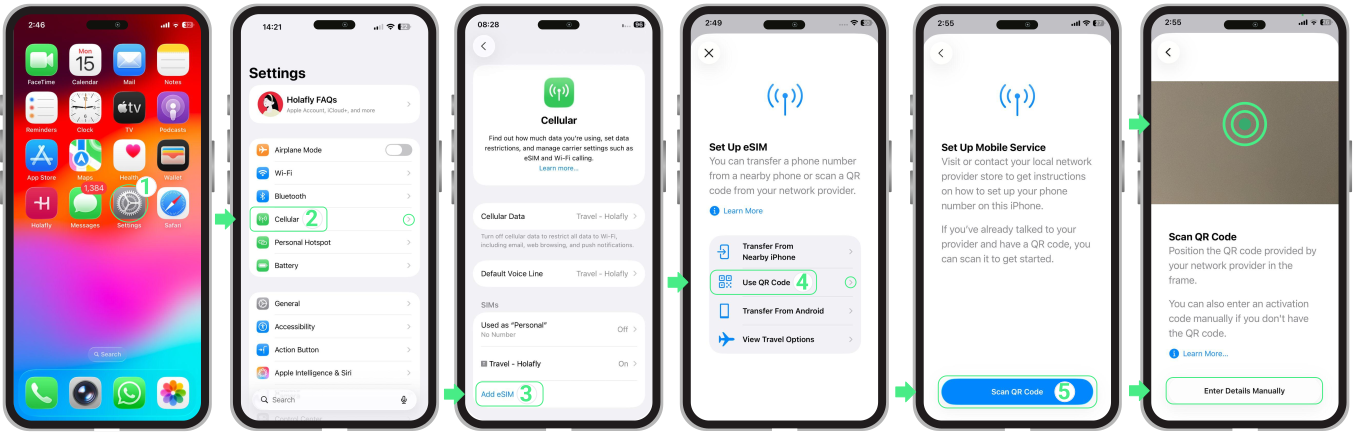
To install an eSIM on iPhone

  • Go to Settings → Tap Cellular or Mobile Data → Tap Add eSIM → Select Use QR Code → Tap Scan QR Code (from here, you can either scan the QR code or choose Enter Details Manually) → Tap Next → Continue with activation.

To install an eSIM on iPhone:
Go to Settings → Tap Cellular (Mobile Service) → Select Add eSIM → Choose Use QR Code → Scan the QR code or select Enter Details Manually → Tap Next → Tap Continue. Once the eSIM is installed, keep the line turned off or leave data roaming disabled until you arrive at your destination.

To install an eSIM on Android

  • Go to Settings → Connections → SIM Manager → Add eSIM → Tap Scan QR Code (from here, you can either scan the QR code or choose Enter activation code) → Tap Add → Continue with activation.

To install an eSIM on Android: 
Go to Settings → Tap Connections → Select SIM Manager → Tap Add eSIM → Choose Scan QR Code or Enter activation code → Paste the complete code (including LPA and colons) → Tap Add → Continue. After installation, make sure the eSIM is added correctly and avoid turning on data roaming until you reach your destination.

How to Activate an eSIM

Activation is the step where your eSIM connects to the local mobile network. This happens when you turn the eSIM line ON and enable data roaming after arrival.
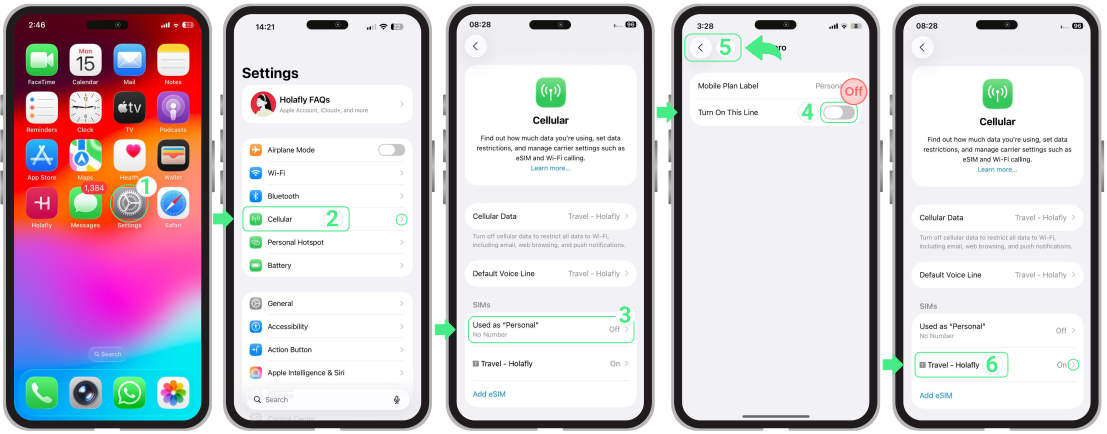
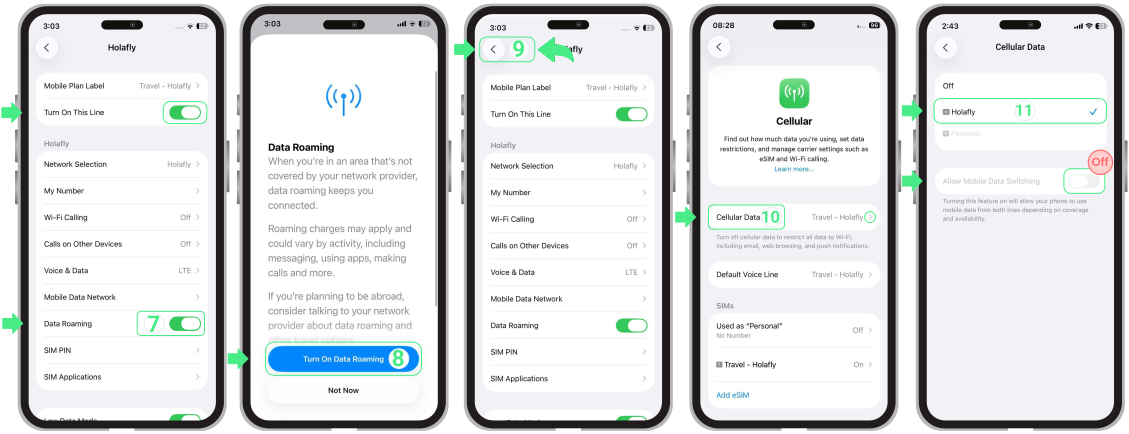
To activate an eSIM on iPhone

  1. Go to Settings → Cellular or Mobile Service → Turn off your personal SIMs or other eSIMs by switching off Turn On This Line → Go back to Cellular or Mobile Service → Select the eSIM you want to activate (your new Travel eSIM, which may appear with a custom name).

  1. Make sure the Turn On This Line button is enabled → Turn on Data Roaming → If prompted, tap Turn On Data Roaming to confirm → Return to Cellular or Mobile Service → Tap Cellular Data or Mobile Data and select the Travel eSIM as your data line → Check that Allow Mobile Data Switching is turned off to prevent the iPhone from switching between lines automatically.

o activate your travel eSIM on iPhone:
Go to Settings → Cellular or Mobile Service → Turn off your personal SIMs or other eSIMs by switching off Turn On This Line → Go back to Cellular or Mobile Service → Select the eSIM you want to activate (your new Travel eSIM, which may appear with a custom name).
Make sure the Turn On This Line button is enabled → Turn on Data Roaming → If prompted, tap Turn On Data Roaming to confirm → Return to Cellular or Mobile Service → Tap Cellular Data or Mobile Data and select the Travel eSIM as your data line → Check that Allow Mobile Data Switching is turned off to prevent the iPhone from switching between lines automatically.

If you’re using dual SIM:


  • Use your personal line for calls and SMS only if needed, keeping in mind that your home carrier may charge for usage.
  • Set the eSIM as the default line for mobile data and turn off Cellular Data Switching to prevent your phone from using your home line for data and avoid roaming charges.

To activate an eSIM on Android

  • Go to Settings → Tap Connections → Select SIM Manager → Turn OFF any other active SIMs → Turn ON the newly installed eSIM → Tap Mobile Data and select the Travel eSIM → Go back to Connections → Tap Mobile Networks → Turn ON Data Roaming for the eSIM to start using mobile data.

To activate a travel eSIM on Android:
Go to Settings → Tap Connections → Select SIM Manager → Turn OFF any other active SIMs → Turn ON the newly installed eSIM → Tap Mobile Data and select the Travel eSIM → Go back to Connections → Tap Mobile Networks → Turn ON Data Roaming for the eSIM to start using mobile data.

On some devices, menu names may vary slightly. If data doesn’t work right away, temporarily turn off other active SIMs and confirm the travel eSIM is selected for mobile data.

If you need more detailed steps on how to set up and activate an eSIM on Android, check our device-specific guides. You’ll find step-by-step instructions for Samsung, Google Pixel, Huawei, Xiaomi, Honor, Vivo, Motorola, Nokia, Sony, OnePlus, and Oppo devices.

Troubleshooting Tips

If you followed the steps to set up and activate an eSIM, but data isn’t working yet, review the points below. In most cases, it’s just a setting that needs a quick adjustment.

  • Make sure you’ve already arrived at your destination. Data only works after you activate the eSIM at the destination.
  • Confirm the new eSIM is turned on and selected as the mobile data line.
  • Turn data roaming ON for the travel eSIM. This is the most common reason activation fails. You must enable this setting within your iPhone cellular options or Android network settings to connect correctly.
  • If you’re using a dual SIM, temporarily turn off other active SIMs to prevent them from blocking data usage.
  • Avoid deleting the eSIM. Once removed, it can’t be reinstalled and usually requires a new eSIM.

How to install and activate an eSIM on a Google Pixel?

To activate an eSIM on a Google Pixel and start using your mobile data, you just need to complete two main steps. First, add your new line to your device through the app linked to your eSIM, a QR code, or manual setup. Then, turn the line on from your phone settings to connect to the network. 


In this guide, we’ll show you how to activate an eSIM on a Google Pixel step by step. We’ll cover all installation methods and the settings to review so you can get connected in less than 5 minutes.

What you need before installing an eSIM on a Google Pixel

Before installing the eSIM, make sure your Google Pixel meets these requirements.

  • Make sure your phone has at least 20% battery to complete the setup without interruptions.
  • Your Google Pixel must support eSIM and be unlocked, as carrier restrictions can prevent activation.
  • You need a stable internet connection, such as Wi-Fi, to download the eSIM profile.
  • Have your QR code or activation details ready in case manual installation is needed.


Note: Installing your eSIM does not activate your plan or use your mobile data. However, if your regional (Europe, South America, Asia, etc.) or global eSIM includes the country you are currently in, it may start being used once it connects to a local network. We recommend installing it only one day before your trip to avoid using your plan days before you need them.

How to install the eSIM on the Google Pixel 

There are three ways to install an eSIM on a Google Pixel. Review the options below and choose the one that works best for you.

1. Installation through the app

The easiest way to install your eSIM is using the roAmigo website. Download or open it here and follow these steps: 
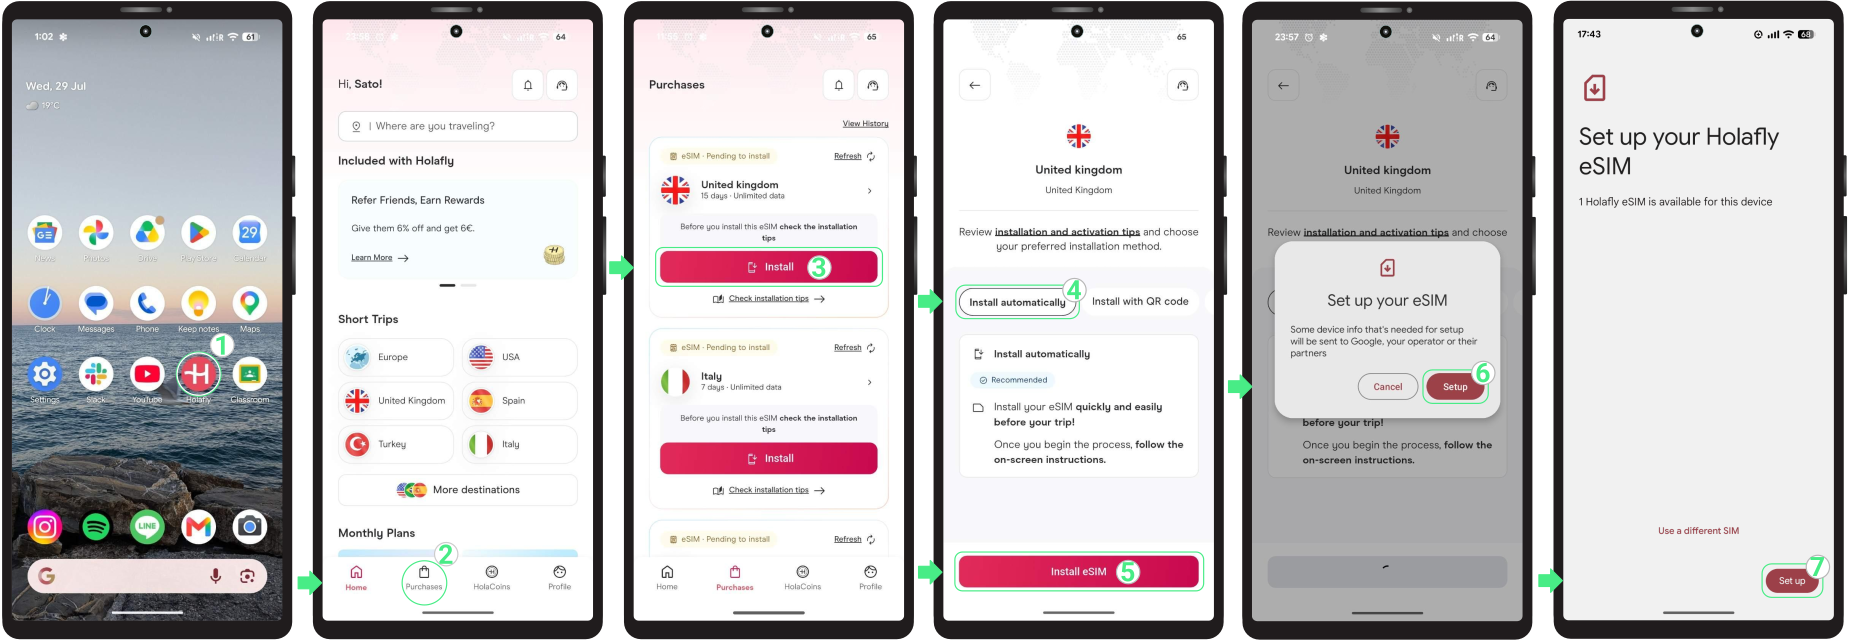
  • Go to the app on your phone → Log in with the email associated with your purchase → Go to Purchases → Tap Install on the eSIM you want to add → Choose Install Automatically → Tap Install eSIM → Tap Set up twice → Follow the final on-screen prompts and wait a few minutes until the process is complete.eSIM Installation through the Holafly app

2. Install eSIM on Google Pixel using a QR code

Use the QR code sent to your email to install the eSIM. Scan it from another screen, or use the “Scan from photo” option if you saved the QR code to your phone as a screenshot or photo.
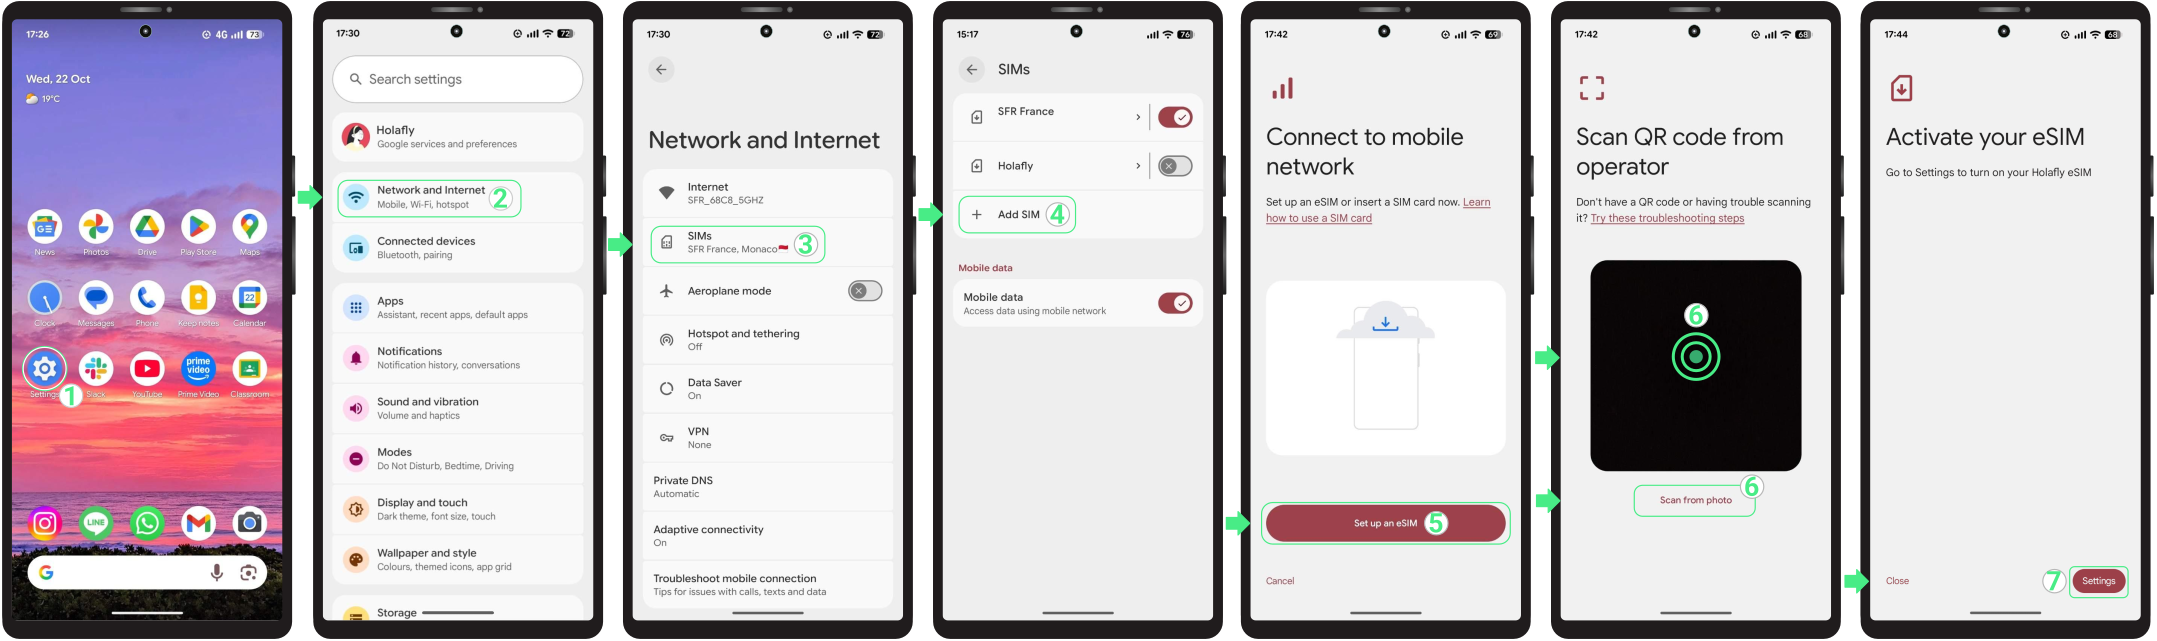
  • Go to Settings → Select Network & Internet → Tap SIMs → Tap + Add SIM → Choose “Set up an eSIM” → Scan your QR code, or tap the “Scan from photo” text link below to choose it from your gallery → Select Set up → Once installed, tap Settings if you want to continue with the activation.


3. Install eSIM on Google Pixel using manual codes

If you can’t scan the QR code, you can install the eSIM manually instead. You’ll just need the manual details included in your confirmation email.


Keep in mind that these are just text codes to enter yourself, and they won’t work as clickable links.
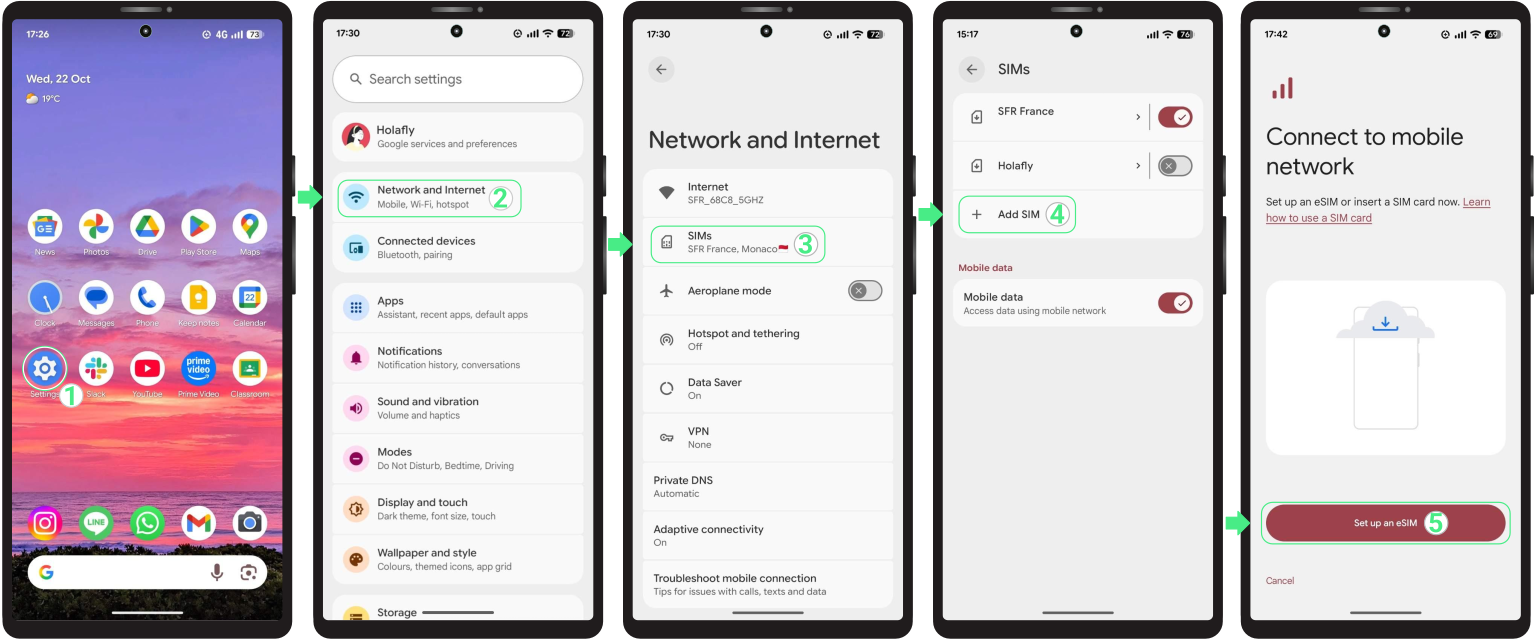
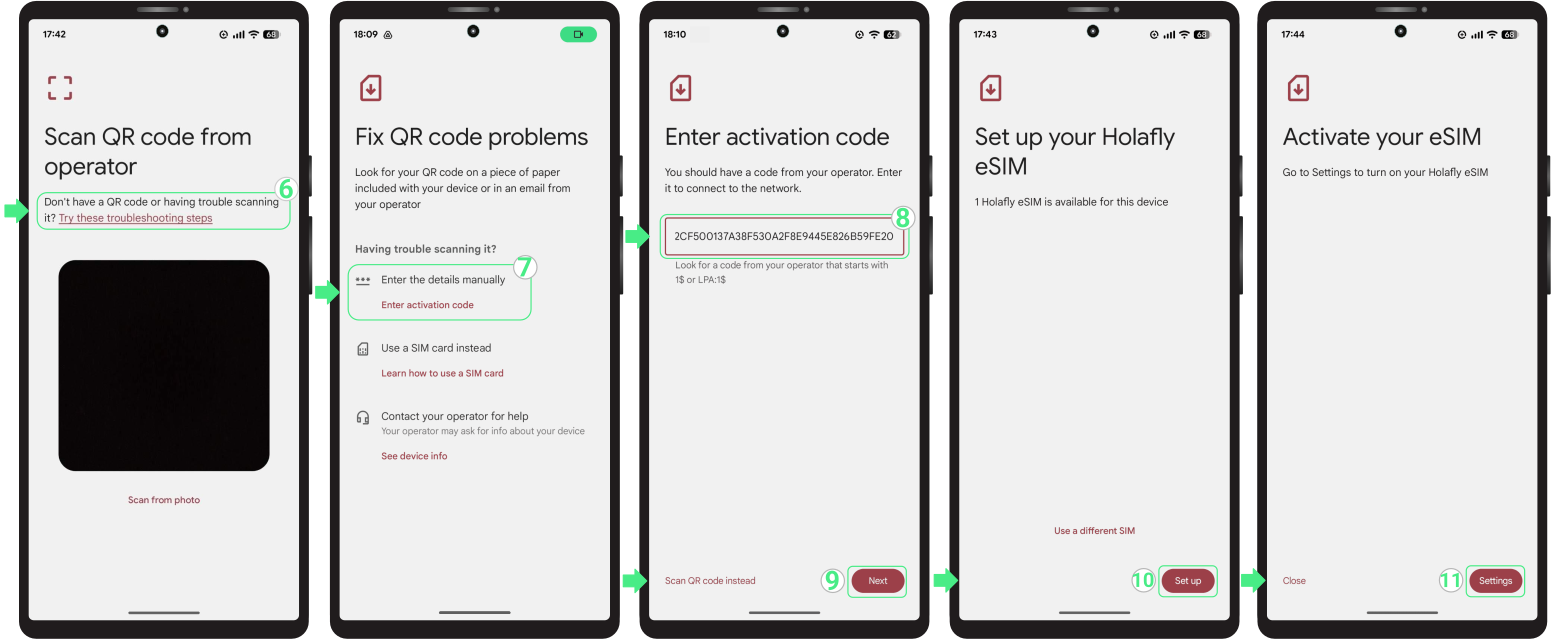
  • Go to Settings → Select Network & Internet → Tap SIMs → Tap the + Add eSIM → Choose “Set up an eSIM”

Install eSIM on Google Pixel using manual codes

  • Press “Try these troubleshooting steps” → Select Enter the details manually → Paste your provider’s activation code (including LPA and the colon ‘:’) → Make sure there are no extra spaces at the beginning or end of the code → Tap Next → Select Set up → Finally, tap Settings to continue with the activation. 

Install eSIM on Google Pixel using manual codes

Activate the eSIM on Google Pixel

Once you’re ready to start using mobile data, enable the eSIM so your Google Pixel can connect to a supported network. This is the step that starts your data service.

If you’re using a travel eSIM, it’s recommended to enable the line only after you arrive at your destination to avoid activating it too early.
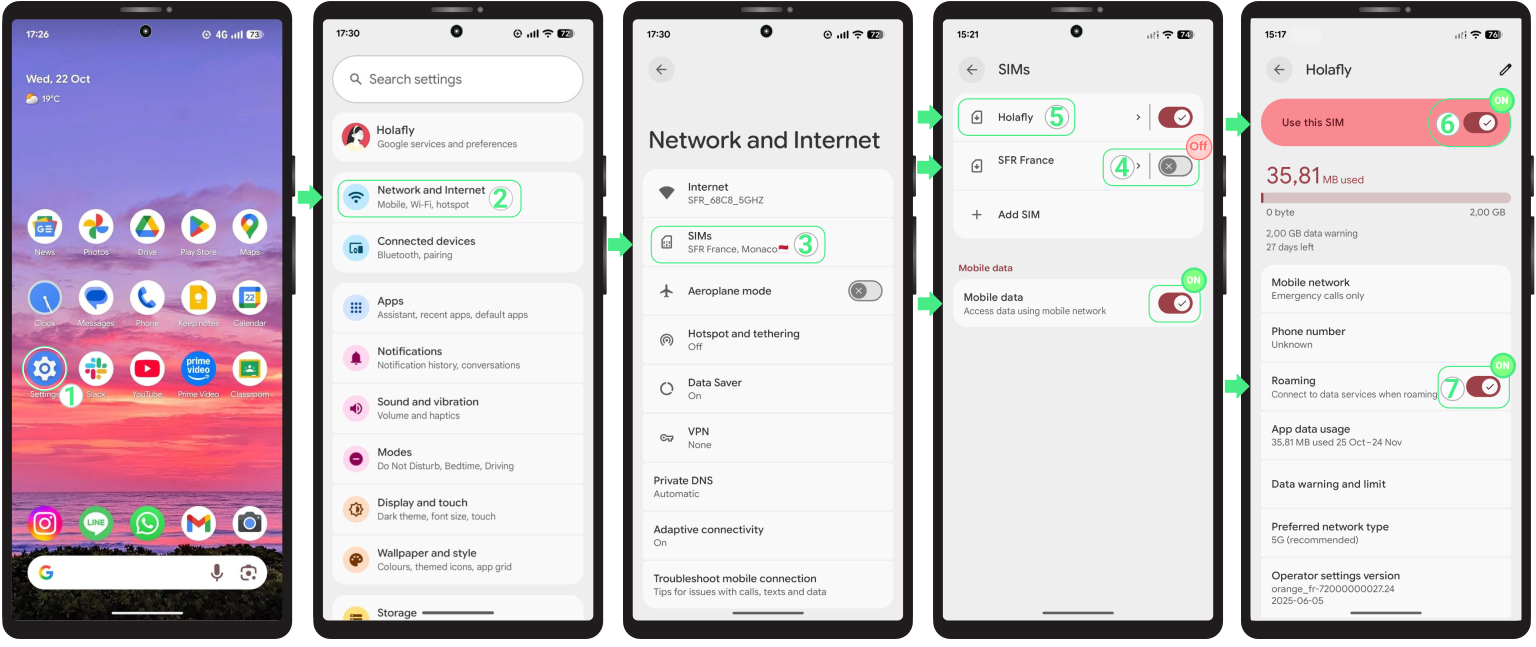
  • Go to Settings → Tap Network & Internet → Select SIMs → Turn OFF your personal eSIM → Select your New Data-only eSIM → Turn Mobile data ON → Enable Use this SIM → Turn Data roaming ON (only if you are using an international travel eSIM).Activate the eSIM on Google Pixel

Troubleshooting tips

During Installation

If your Google Pixel shows an error while installing the eSIM, don’t worry. Sometimes the phone displays a false error even when the eSIM has been successfully installed in the background. Before trying to install it again, check if it’s already on your phone:


  • On your phone: Go to Settings → Network & Internet → SIMs. Your new eSIM should appear in the SIM list, usually with the name you gave it during setup.
  • In the App: Check your eSIM status. If it says “eSIM Installed – Ready to use,” you’re all set.

Using your mobile data

If your eSIM is already fully activated following the steps mentioned above but your device is still not connecting to the internet, wait a few minutes while your phone connects to the network. If you are still offline, try selecting a network manually or restarting your phone.


⚠️ Important: Never delete your eSIM to fix a connection error.

How to Set up Mobile Network APN Settings on Sony?

Configuring the mobile network APN settings (Access Point Name) on your Sony device is crucial for ensuring a stable internet connection, especially when switching mobile data providers or troubleshooting mobile data issues. While the process of APN setup is similar across all Android devices, the steps may vary depending on the model and operating system version. In this guide, we’ll walk you through how to set up the APN on your Android Sony, step by step, so you can enjoy seamless browsing and avoid interruptions. Keep reading to learn how to improve your connection!

APN Settings for roAmigo on Android

To use the roAmigo eSIM on your Sony device, it’s essential to configure the APN correctly. If you’re unable to access the network after activating your eSIM, simply adjust the APN settings by entering “Global” in the corresponding fields. 


Make sure you’ve activated the roAmigo eSIM for Mobile Data, as it is required to configure the APN on your Sony Android. Here’s a step-by-step guide to help you set it up:
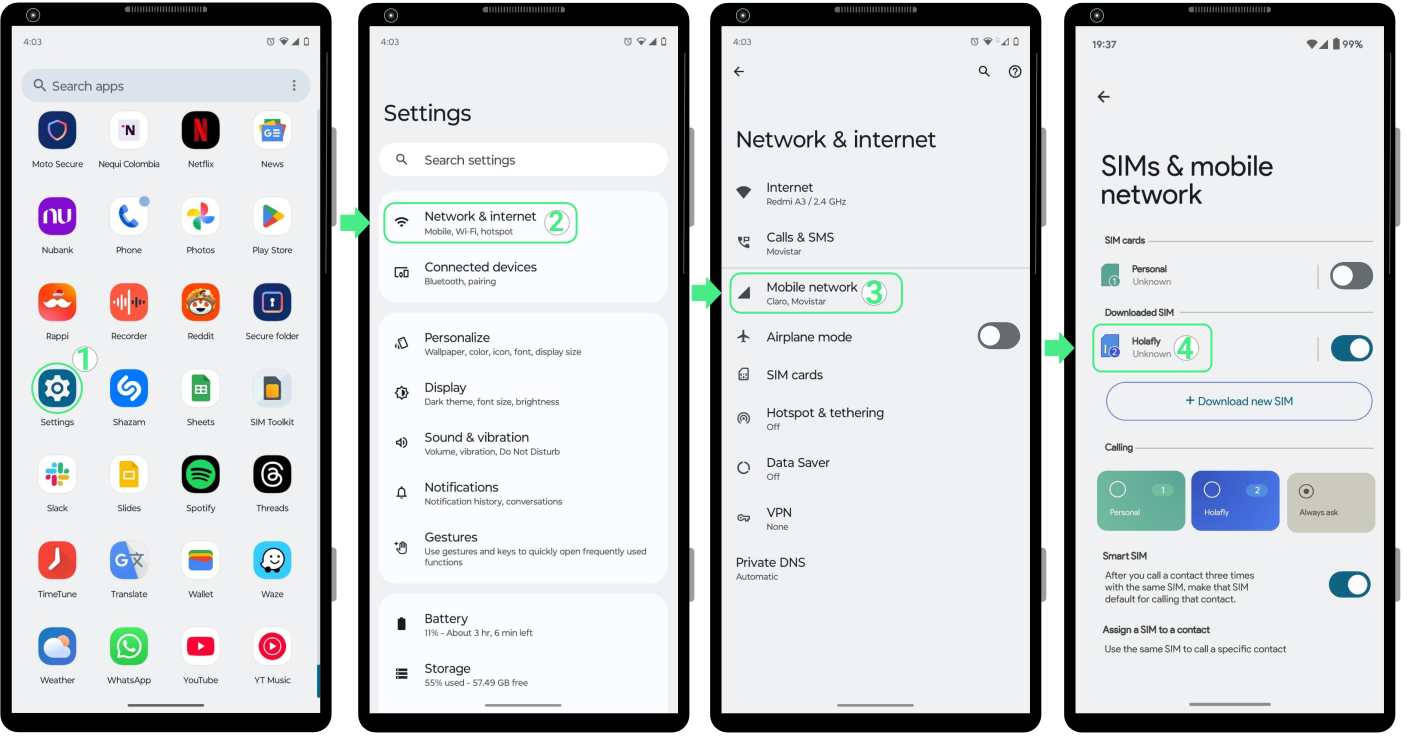
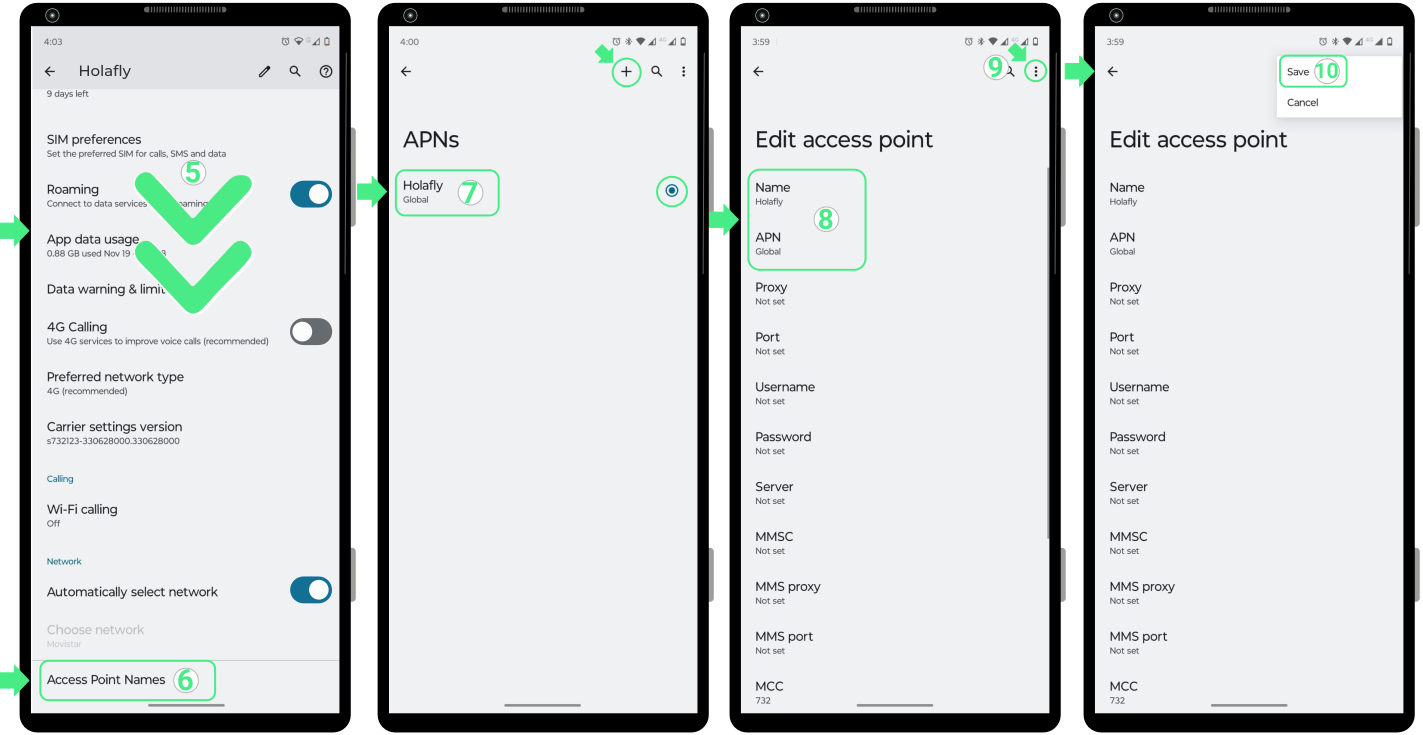
Steps to set up the APN on your Android Sony:

  • Go to Settings → Network and Internet → Select Mobile network → Select your roAmigo eSIM.

Steps to set up the APN on your Android Sony:
  • Scroll down and select Access Point Names or Advanced and then Access Point Names → Check if there is an APN labeled Global and select it. If it doesn’t appear, you’ll need to create it. To do so, tap the + at the top right → In the Name field, type roAmigo to easily recognize it → Then, in the APN field, enter the word Global → Leave the other fields empty → Tap the three dots in the top right corner → Select Save → Finally, make sure to select the newly created APN (Global) as the default for your Sony, otherwise, it won’t activate correctly.

Steps to set up the APN on your Android Sony:

Troubleshooting Tips:


1.
If you’ve mistakenly entered the wrong APN or if, after configuring the correct APN on your Android, there is still no connection or data signal, resetting the network settings may be necessary. This step helps resolve any network errors and restores the default connection settings.


Please note that resetting network settings will only erase Wi-Fi, mobile network, and Bluetooth connections. Make sure to back up your passwords in advance. Next, we’ll walk you through the steps:
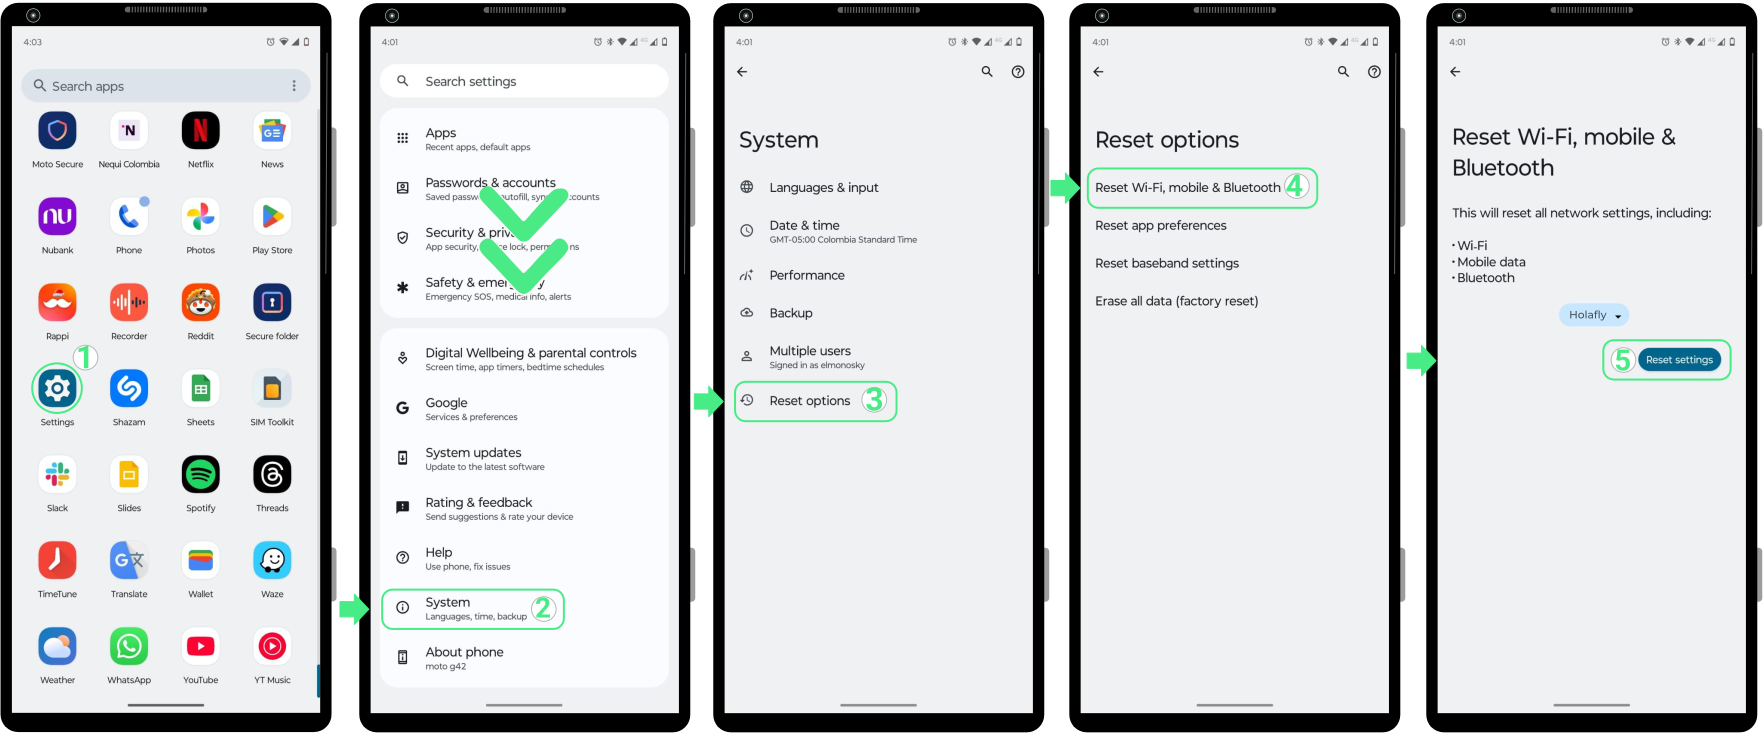
To reset network settings on Sony phones:

  • Go to Settings → Scroll down and tap on System → Select Reset options → Tap on Reset Wi-Fi, mobile & Bluetooth → Tap on Reset settings (If prompted, enter the PIN you use to unlock your screen).

To reset network settings on Sony phones:

2. If your device is in an area covered by the eSIM plan and the APN is correctly configured, but you still can’t connect to the internet after resetting the network settings, try switching the operator manually.


3. If your phone is from another brand like Pixel, Samsung, Xiaomi, Motorola, Vivo, Huawei, Oppo, Nokia, or OnePlus, you’ll get easy-to-follow steps for setting up your Android APN settings without any hassle.

How to Edit APN Settings on iPhone and Samsung?

The Access Point Name (APN) acts as a bridge, linking your mobile device to data services through your carrier’s network. roAmigo eSIMs come with preconfigured APN settings for iPhone and Samsung devices, so in most cases, no adjustments are needed. However, there are scenarios where manual changes may improve your experience on iOS and Android devices. In this guide, we’ll show you how to change and update APN settings, to ensure a smooth and hassle-free use of your data. Keep reading to learn more!

Steps to Set up APN Settings on iPhone and Samsung Devices

If you need to change your APN settings for your roAmigo eSIM, the correct APN is “Global.” We’ll walk you through the steps to easily view and adjust your APN on both iPhone and Samsung devices, making sure you stay connected.
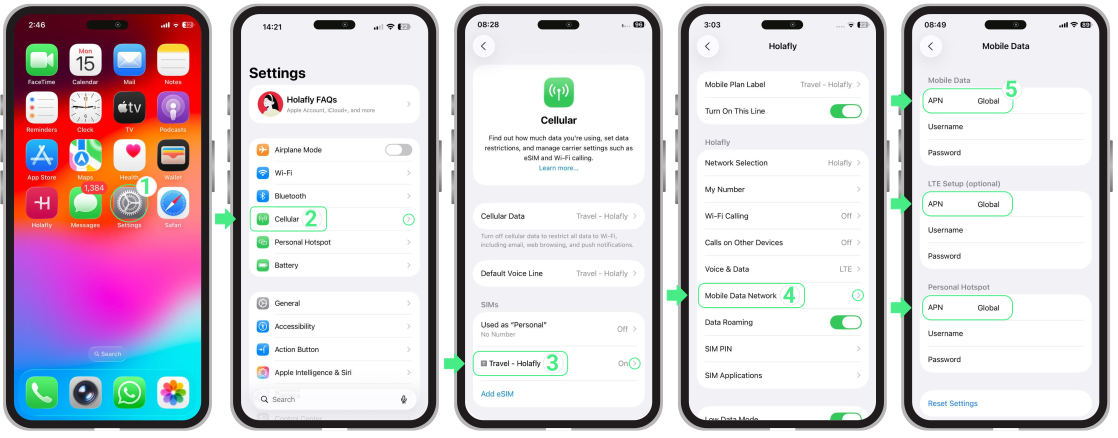
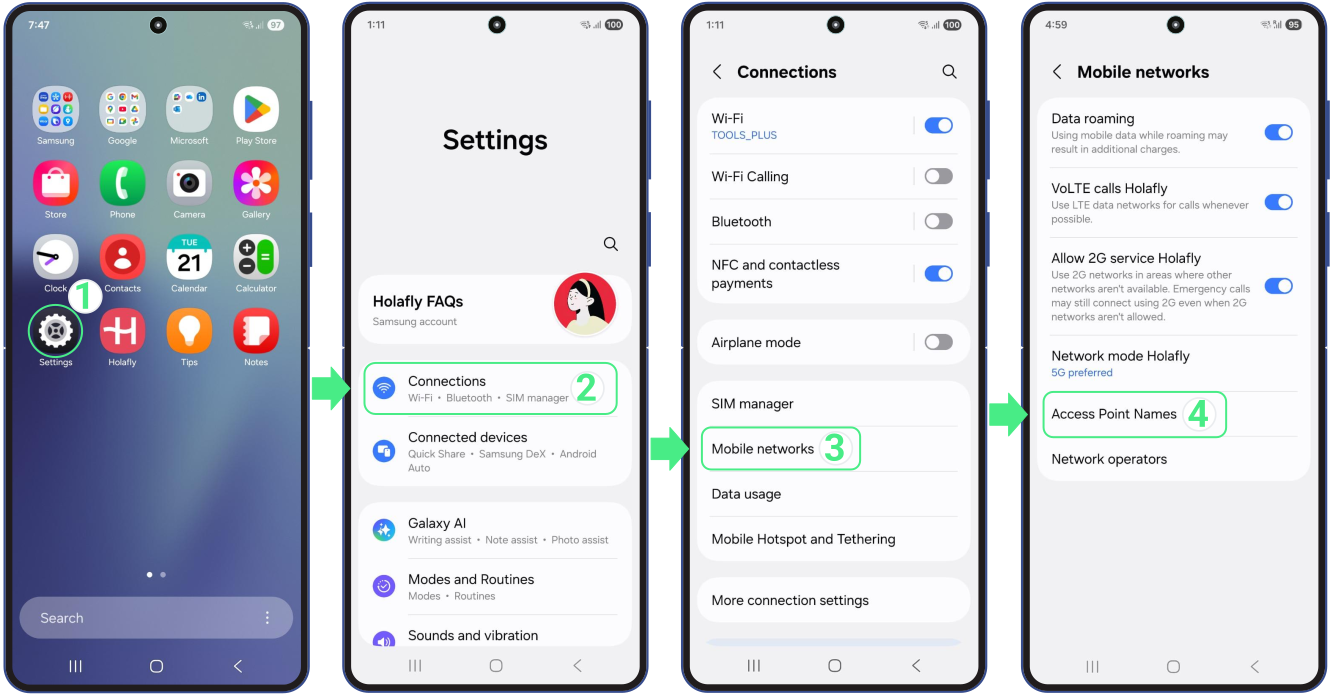
To edit APN settings on iPhone:

  • Go to Settings → Cellular or Mobile Data → Select your roAmigo eSIM → Tap on Cellular Data Network or Mobile Data Network → Complete only the fields where it says APN (Access Point Name) → Type Global → Save the settings and make sure mobile data is turned on.

To Edit APN Settings on iPhone:

To edit APN settings on Samsung:

  • Go to Settings → Go to Connections → Tap Mobile networks  → Select Access Point Names or APN.
  • Check if there is an APN with the word ‘Global‘ and select it, if it doesn’t appear, you need to create it → To create it, press the Add (+) icon → In the Name option, type roAmigo to recognize it → Then, in APN, enter the word ‘Global‘ → Tap on the Menu icon (three dots) in the top-right corner → Select Save → Once the changes are saved, select the newly created APN (Global).
To edit APN settings on Android:

Troubleshooting Tips

If you’re unable to access data or have entered an incorrect APN, resetting your network settings will restore defaults and fix errors. Below are the steps to reset network settings on iPhone and Samsung devices. Please note that resetting networks on iPhones will erase all saved Wi-Fi passwords.
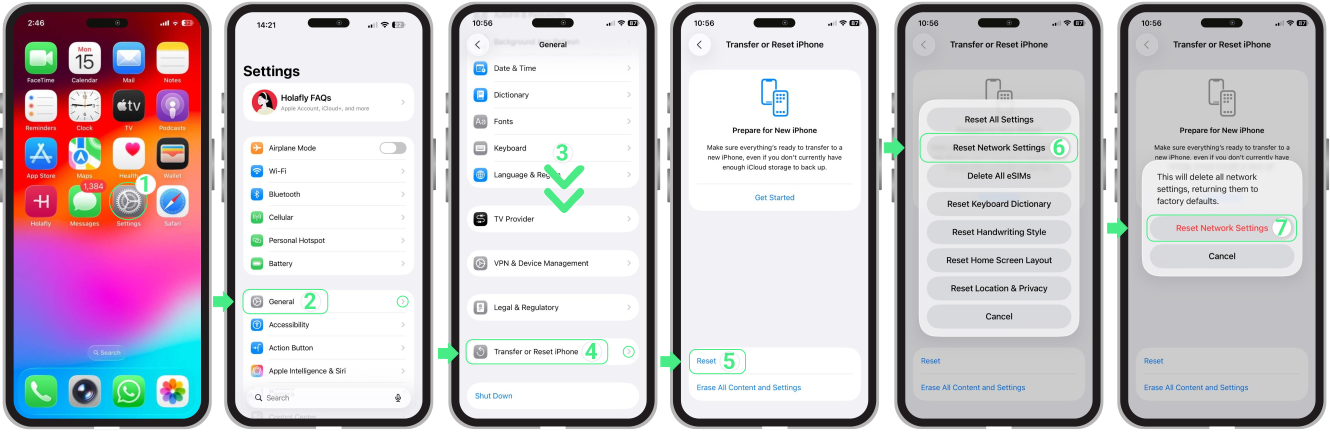
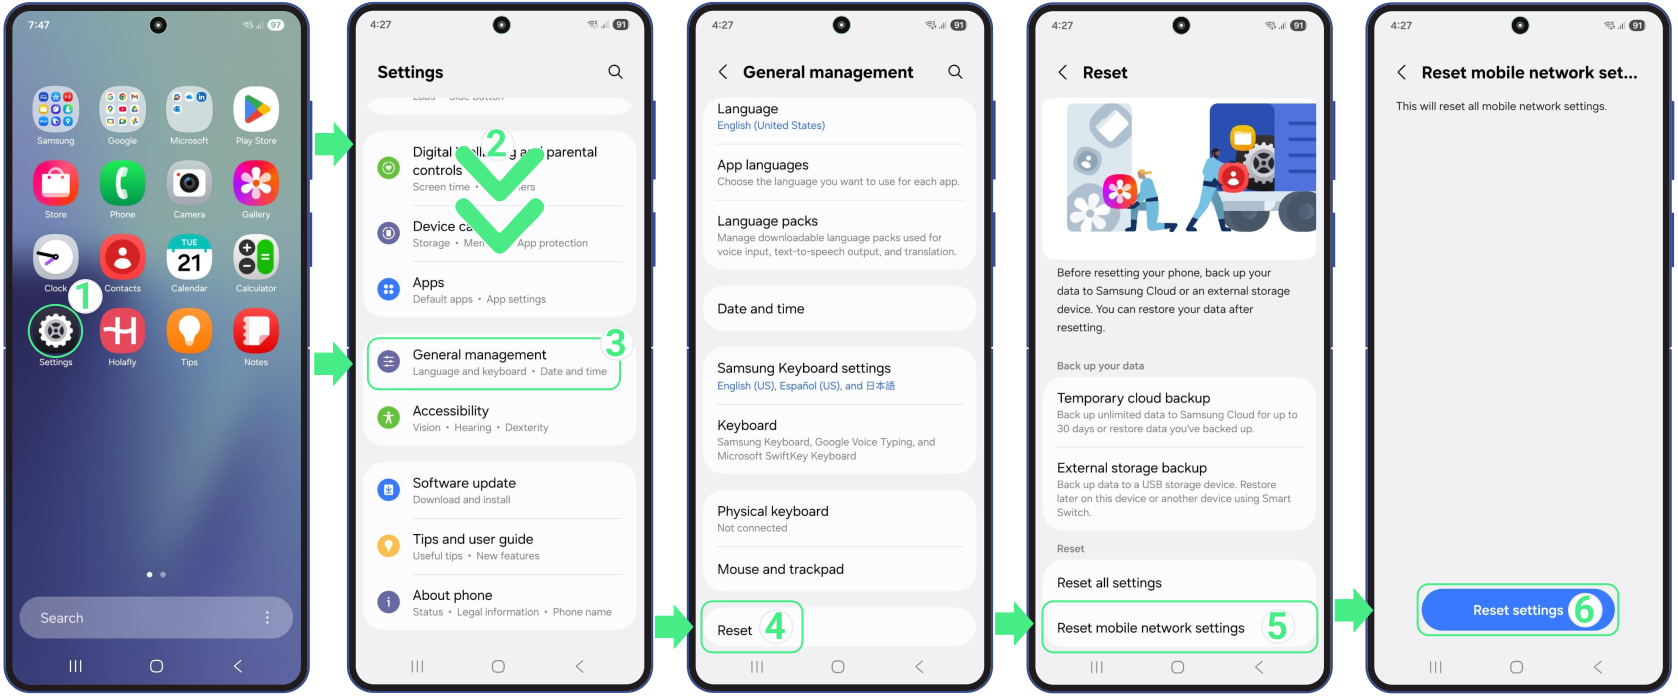
To Reset Network Settings on iPhone:

  • Go to Settings → Tap on General → Scroll down → Select Transfer or Reset iPhone → Then on Reset → Choose Reset Network Settings and confirm your selection with the Reset Network Settings option.

To Reset Network Settings on iPhone:

To Reset Network Settings on Samsung:

  • Go to Settings → Scroll down → Select General management → Then on Reset → Choose Reset mobile network settings (If you’re prompted to enter a PIN, enter the code you use to unlock the screen and tap Next) → Confirm your selection with the Reset settings option.

To Reset Network Settings on Android:

If your Android is from another brand, such as Xiaomi, Huawei, Motorola, Vivo, Pixel, Nokia, Sony, One Plus, Oppo, or Honor, you can check out our specific guides for each model to easily configure the APN settings on Android.

How to Transfer eSIM to Another Phone?

Transferring your eSIM to a new phone is easy with most providers, whether you’re upgrading, switching devices temporarily, or changing phones for any other reasons. If you have an eSIM from roAmigo, please note that it can’t be transferred to another device.

To transfer your eSIM, you’ll just need to remove it from your old phone, restart it, and install it on your new one. After that, activate eSIM and you’re ready to go. Keep reading to learn how to transfer your eSIM to another phone, whether it’s from an iPhone or Android!

To Keep in Mind

Before transferring your eSIM to a new phone, remember that roAmigo doesn’t support eSIM transfers, meaning the steps in this article won’t apply. However, if you’re using a different eSIM carrier, make sure to keep these key points to ensure a smooth process:


  • Verify that the target phone supports eSIM and is carrier-unlocked. Compatibility varies by region. Many phones from mainland China, for instance, do not support eSIM.
  • Connect to a strong and stable Wi-Fi network during the transfer to avoid installation errors.
  • Finish the transfer process completely, as leaving it midway can cause errors or issues with your data connection.
  • If you experience installation errors on your new iOS or Android device, try the other installation method (QR code or manual entry).

How to Transfer eSIM to Another Phone?

Steps to Transfer eSIM to Another Device

1. Delete or remove eSIM from the current phone

The process to remove your eSIM is generally the same across devices, though it may vary slightly depending on the model. Just follow these steps to get started.
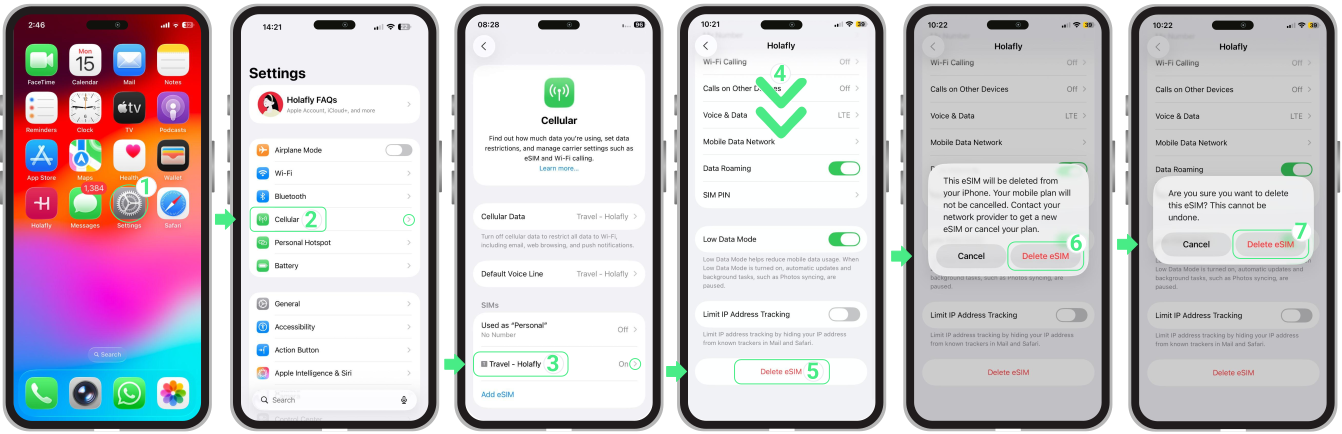
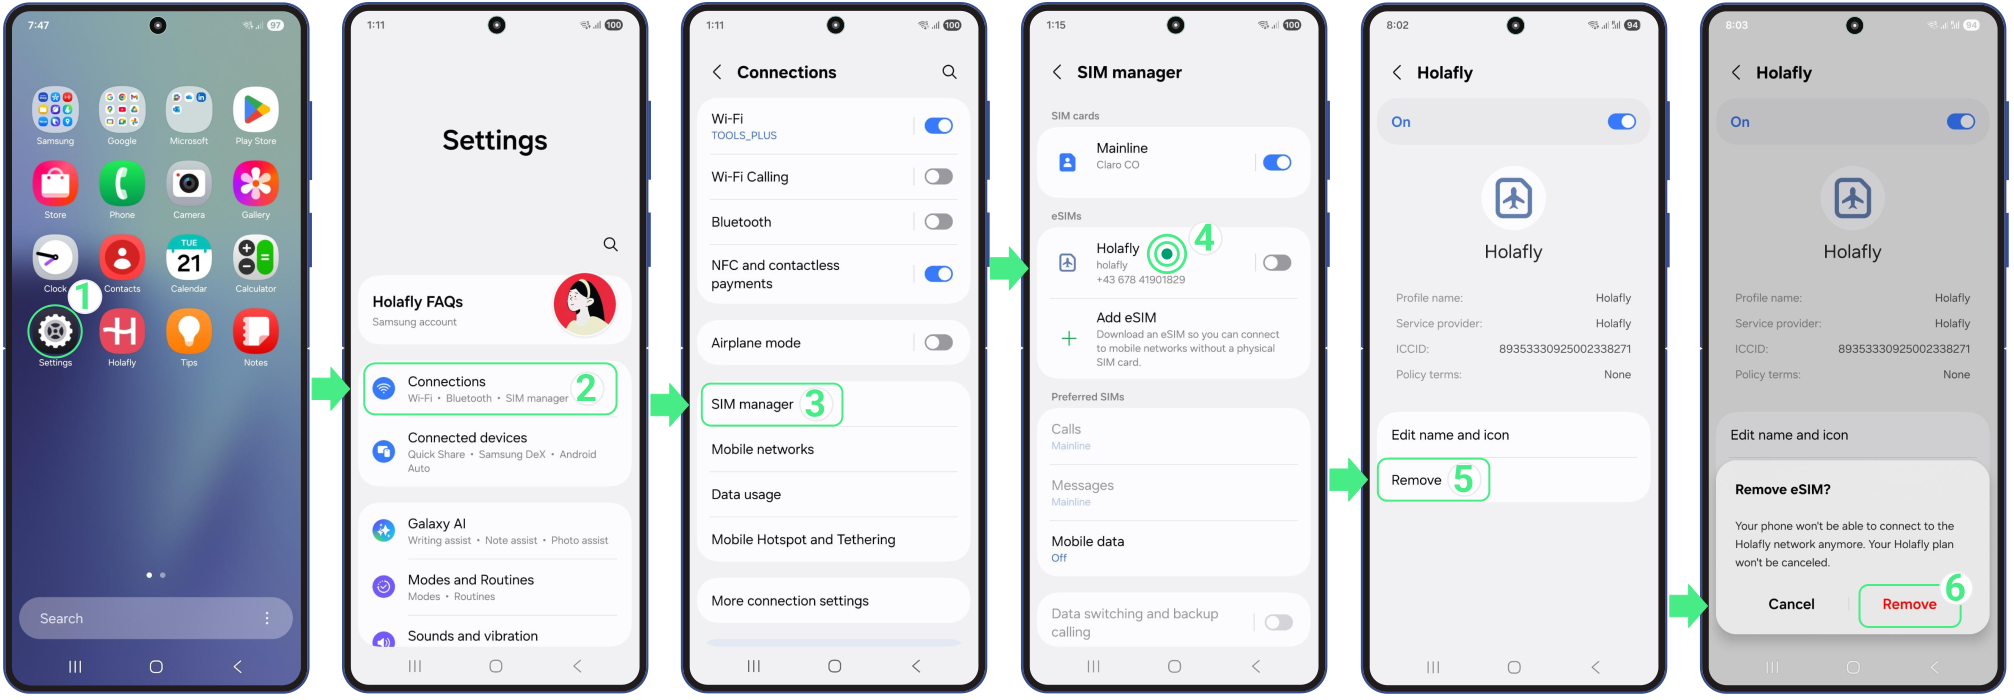
To delete an eSIM on your iPhone:

  • Go to Settings → Mobile Data or Cellular → Select the eSIM to delete → Scroll to the bottom → Tap Delete eSIM → Confirm Delete eSIM → Confirm Delete eSIM again.To delete an eSIM on your iPhone:

To delete an eSIM on your Android:

  • Go to Settings → Connections → SIM Manager → Choose the eSIM you want to delete → Then tap on Remove → Confirm Remove.To delete an eSIM on your Android:

2. Restart or reboot the phone:

Restarting your phone ensures the eSIM is fully removed and ready for transfer. Sometimes, the eSIM may still show up in the list after removal, but this is normal. As long as it was deleted properly, the transfer will go smoothly.

3. Install and activate eSIM on your new phone:

The final step to transfer your eSIM is installing it on your new device. You can do this either by scanning a QR code or manually entering the details. Here’s how to transfer eSIM to your new phone and activate it successfully.
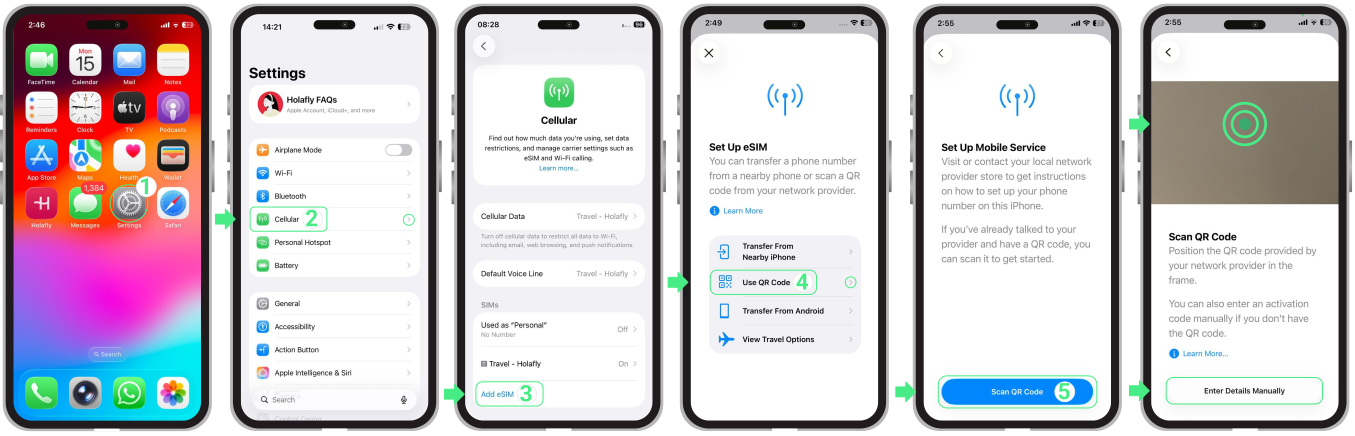
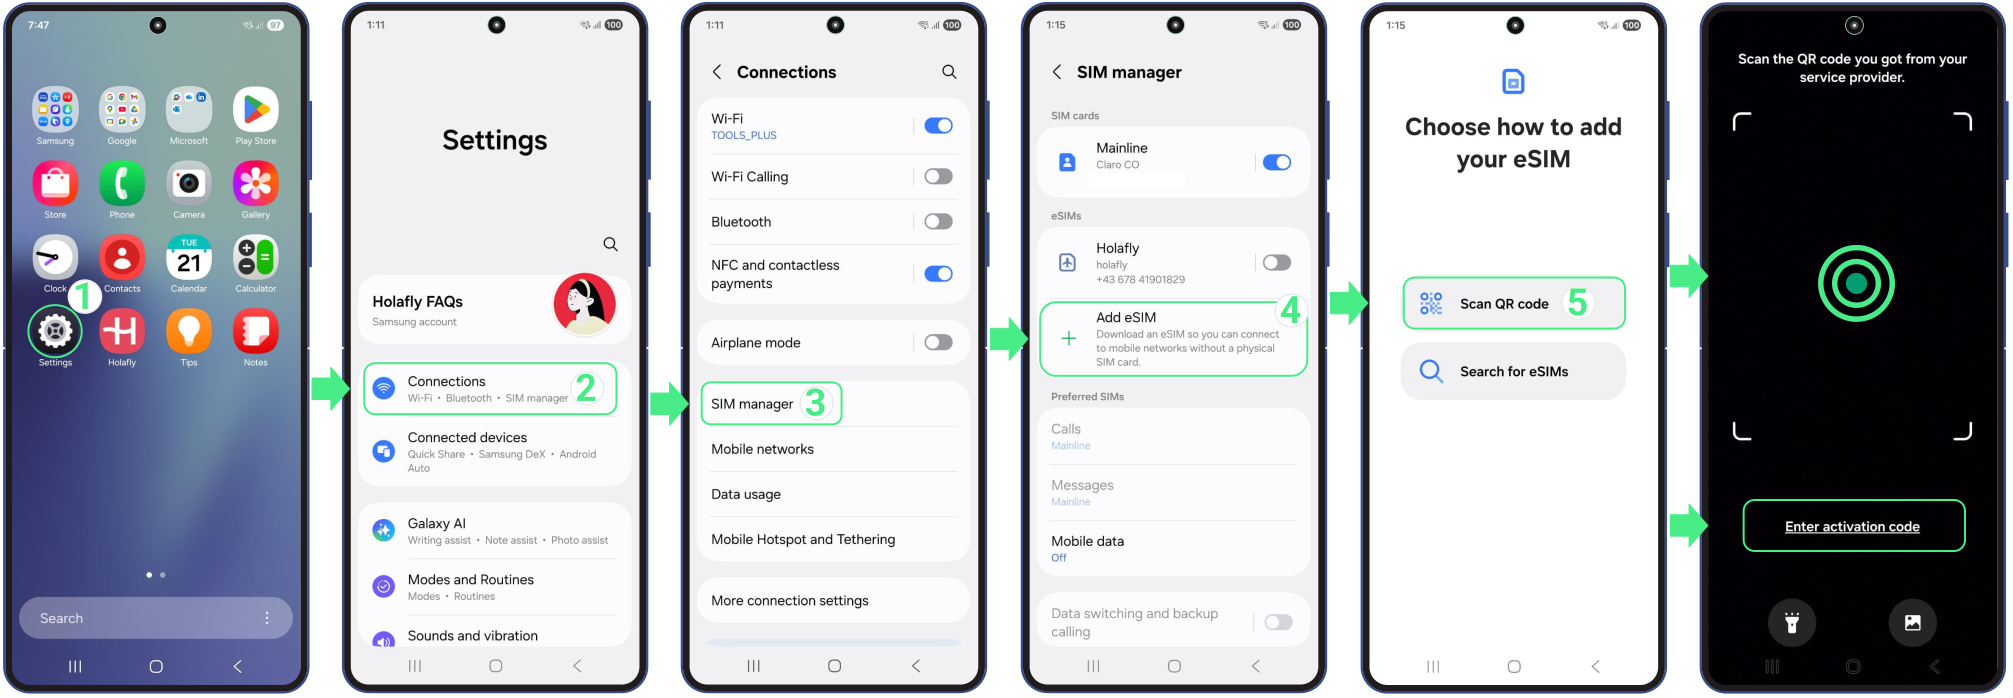
To transfer the eSIM to an iPhone:

  • Go to Settings → Select Connections → Then, tap SIM Manager → Add eSIM → Tap Scan QR Code (from here, you can either scan the QR code or choose Enter activation code) → Tap Add → Continue with Activation. (Enable Data roaming to start using it on your new device).

To transfer the eSIM to an Android:

  • Go to Settings → Select Connections → Then, tap SIM Manager → Add eSIM → Tap Scan QR Code (from here, you can either scan the QR code or choose Enter activation code) → Tap Add → Continue with Activation. (enable Data roaming to start using it on your new device).

Troubleshooting Tips:

  • If your eSIM device is lost or stolen, contact us 24/7 at roamigo@roamigoesim.com, WhatsApp +82 10 5634 2768, or through chat on Instagram, Facebook, website.

eSIM Xiaomi: How to install and activate it

Setting up an eSIM on your Xiaomi is a fast, fully digital process that can be completed in just a couple of minutes. Depending on your eSIM provider, you can install it automatically through their official app, or do it in your phone’s settings using a QR code or by entering the activation details manually.  eSIM compatibility is available on many recent Xiaomi models worldwide, including devices like the Xiaomi 15, Xiaomi 14T Pro, and Redmi Note 14 Pro+, although compatibility may vary by region.


Below, you’ll find the steps to install and activate an eSIM on your Xiaomi, so you can enjoy a smooth and reliable mobile connection right away.

What you need before installing an eSIM on Xiaomi

Before starting the setup, make sure your device meets the basic requirements:


  • Confirm your Xiaomi model supports eSIM, as availability can vary by region. Also, make sure your phone is unlocked so it can work with SIMs and eSIMs from different carriers.
  • Connect to a stable Wi-Fi network for a smooth setup process.
  • For Global or Regional (Europe, South America, Africa, etc.) eSIM plans, install it no earlier than 1 day before your trip to ensure your data starts when you need it. For single-country plans, install it at any time.

How to install an eSIM on Xiaomi

Installing your eSIM means adding your new line to your phone. You can complete this step using any of the 3 methods below. The roAmigo website is usually the quickest and easiest option, but the other universal methods will also get your eSIM installed and ready for activation. Choose the one that works best for you.

1. Install your eSIM using the App

This is the fastest way to do it. If your eSIM provider has an official app, you can use it to install your line automatically with just a few taps.

To use the roAmigo, just download or open it here and follow these steps:


  • Go to the app on your phone → Log in with the email associated with your purchase → Go to Purchases → TapInstall on the eSIM you want to add → Read the Installation tips and tapGot it to continue → Choose Install Automatically → Tap Install eSIM  → Then, tap Add to save your new line to your phone’s Mobile networks settings.

Install your eSIM using the App

2. Install an eSIM on Xiaomi using a QR code

The QR code is the traditional method to install an eSIM on Xiaomi. This is the best option if your phone’s memory is full or if you don’t want to download anything extra right now.


To use it, you will open a special scanner inside your phone’s Settings. If you don’t have a second screen to scan the code, don’t worry! You can save the QR code as a photo and upload it directly from your gallery inside that same menu.


Follow these simple steps to start:
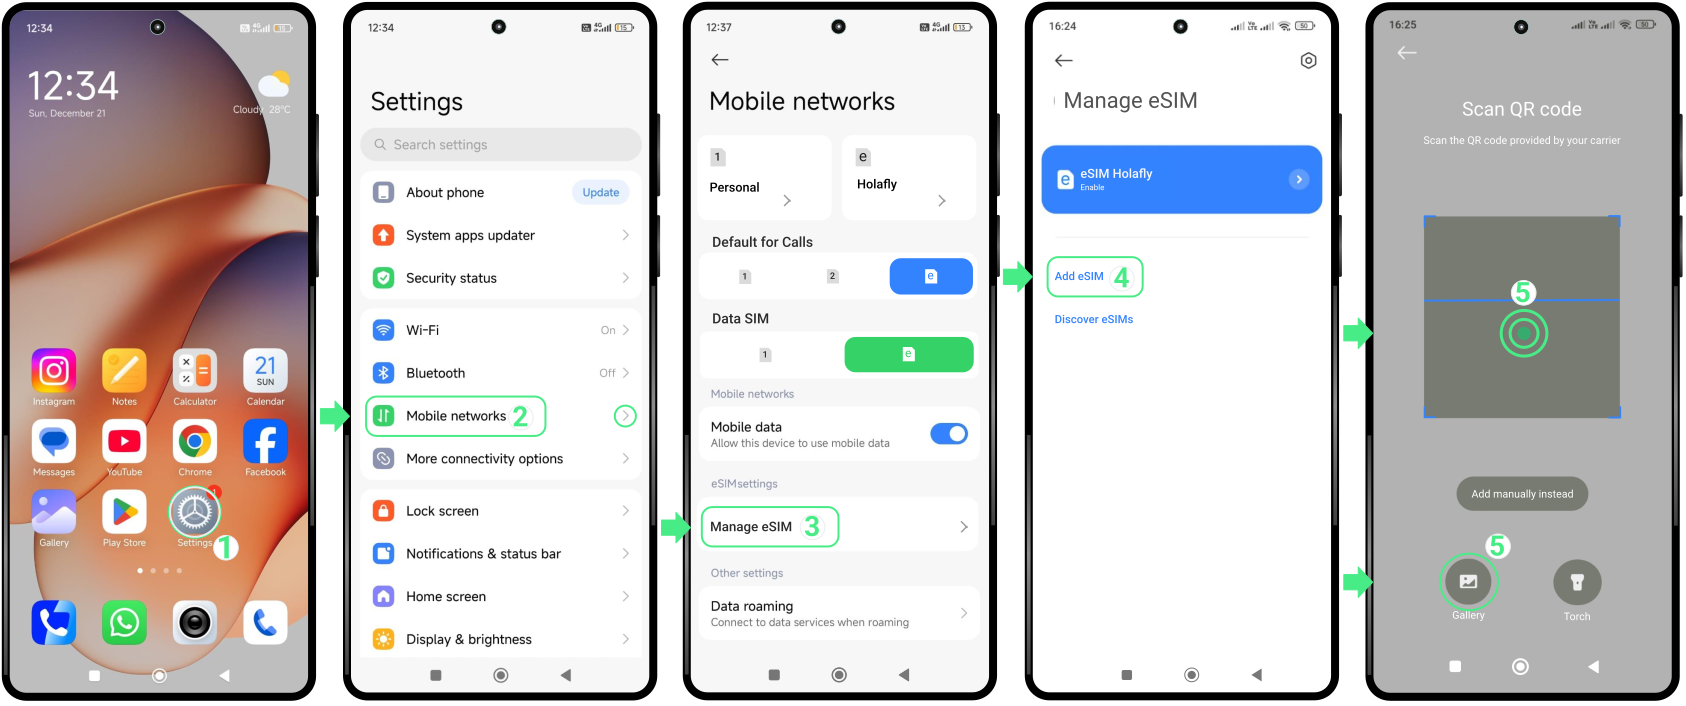

  • Go to Settings → Select Mobile Networks → Tap Manage eSIM (if you don’t see it, turn on the “Use eSIM” switch first) → Then, tap Add eSIM → Scan the QR code (or tap the Gallery icon and select the QR image if you saved it as a photo)  → Then, tap Add to allow the system to complete the download.

Install an eSIM on Xiaomi using a QR code

3. Install an eSIM on Xiaomi using manual codes

If the previous installation methods don’t work as expected, you can also install your eSIM on Xiaomi using the manual activation details received. Follow the steps below to complete the installation.


  • Go to Settings → Select Mobile networks →  Tap Manage eSIM (if you don’t see it, turn on the “Use eSIM” switch first) → Then, tap Add eSIM → Select Add manually instead → Tap on Use activation code → Copy and paste the full activation code exactly as provided (Including “LPA” and the colon “:”) → Tap OK → Tap Add to complete the installation process → Continue with the activation.

Note: Please keep in mind that this is a manual text code, not a clickable link.
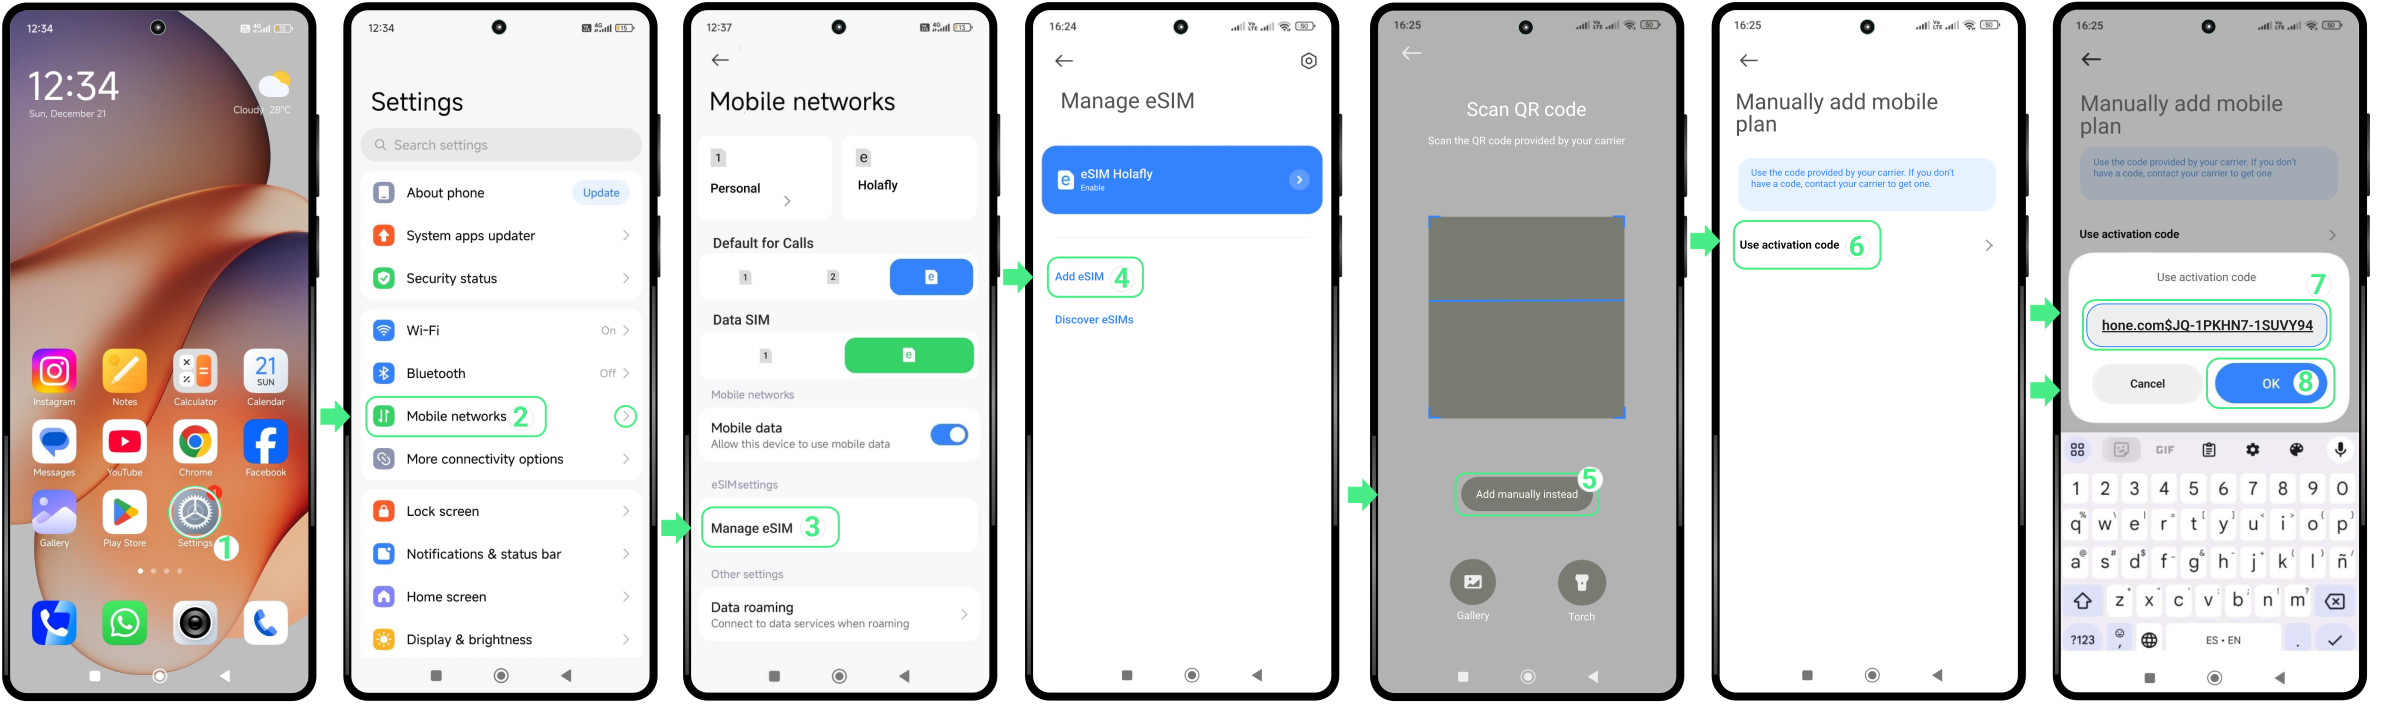

Install an eSIM on Xiaomi using manual codes

How to activate an eSIM on Xiaomi

Activating an eSIM on Xiaomi is done directly from your phone settings and doesn’t require an internet connection. This step simply turns the eSIM on and sets it as the line used for mobile data. 


For travel eSIMs, full activation may occur only once you reach your destination and enable Data Roaming. Follow these steps to activate your eSIM on Xiaomi:
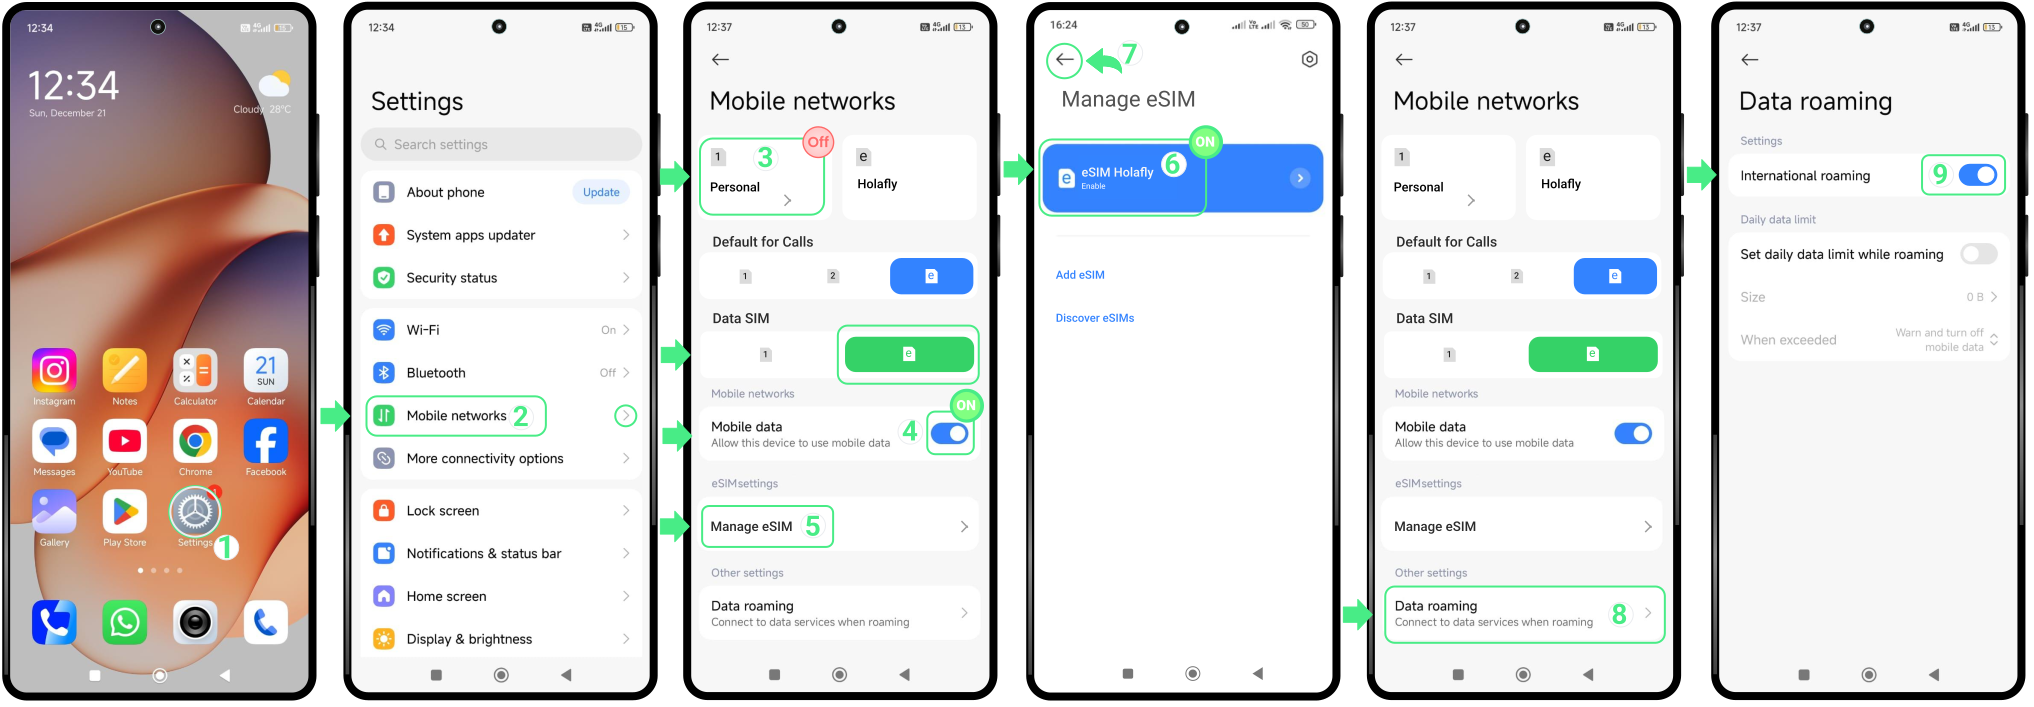

  • Go to Settings → Select Mobile networks → Turn OFF your Personal SIM → Verify that Mobile data is turned on and that the new eSIM is selected for Data SIM → Tap Manage eSIM → Turn ON your eSIM → Go back to Mobile networks → Tap Data roaming → Select International roaming.

How to Activate an eSIM on Your Xiaomi?

To keep in mind

  • Most modern Xiaomi phones support eSIM, but devices bought in China, Hong Kong, or Macao only work with physical SIMs.
  • Depending on your software version, the menu path might slightly change. If you don’t see Mobile networks, look for SIM cards & mobile networks.
  • You can use one physical SIM and one eSIM on your Xiaomi at the same time, but activating an eSIM may disable your second physical SIM slot.
  • You can store multiple eSIM profiles on your phone, but only one can be active at a time for mobile data.

Troubleshooting tips

During installation

If your Xiaomi shows an error or gets stuck when starting or finishing the setup, don’t worry! This doesn’t mean it failed. Before trying again, check if the line was already successfully added:


  • On your phone: Go to Settings → Mobile Networks. If a new card with your provider’s name, a generic label, or a custom name appears in this menu, your eSIM is already installed.

  • In the App: Check your eSIM status. If it says “eSIM Installed – Ready to use,” you are all set!


Using mobile data

If your eSIM appears as Enabled but mobile data isn’t working, your phone is just completing a quick connection handshake with the local network. Simply restart your Xiaomi to fix this. If it still doesn’t work, go to your network settings and select the best local operator manually.


⚠️ Important: Never delete your eSIM to fix a connection issue. Removing the profile will permanently invalidate your plan, and it cannot be reinstalled.

Motorola eSIM: How to install and activate it

A Motorola eSIM allows you to connect to a cellular network digitally without using a physical SIM card. This technology is available only on certain newer models within the Razr, Edge, and Moto G series.


You can install an eSIM automatically using the app linked to your data plan, scan a QR code, or enter the details manually, and then activate it by simply turning on the line. Below, you’ll find the step-by-step instructions to get your data up and running in just a few minutes.

Before you install your Motorola eSIM

  • Check the full list of Motorola-compatible devices to confirm that your model supports eSIM. You can also dial *#06# on your phone; if an EID number appears, your device is eSIM-compatible. 
  • Make sure your phone is unlocked so it can connect to plans from different mobile networks.
  • Make sure you are connected to a stable WiFi network.

Important:  For Global or Regional plans (Europe, South America, Asia, etc.), install your eSIM at most 1 day before your trip. For single-country plans, you can install it days or weeks ahead, as it only activates at your destination.


How to Install an eSIM on a Motorola

There are three ways to install an eSIM on a Motorola device. The quickest option is through the app included with your eSIM, which automates most of the setup process.


You can also install your eSIM using the universal methods with the QR code or manual activation details received. The sections below will guide you through each installation method step by step.

 1. Automatic installation via the app

This is the easiest and most modern way to set up your eSIM. If you are using roAmigo, download or open the app here and follow these steps:


  • Go to the app on your phone → Log in with the email associated with your purchase → Go to Purchases → Tap Install on the eSIM you want to add → Read the Installation tips and tapGot it to continue → Choose Install Automatically → Tap Install eSIM  → Then, select Add and Set up to save your new line inside your Motorola’s Mobile Network menu → Once installed, tap Settings if you want to continue with the activation.

Automatic installation via the app

2. Install eSIM on Motorola using a QR code

If you received a QR code with your purchase, open it on another device before you begin. If you only have one phone, you can save the QR code to your gallery and select it during setup. Then, follow these steps from your phone’s settings (not through the Camera app):
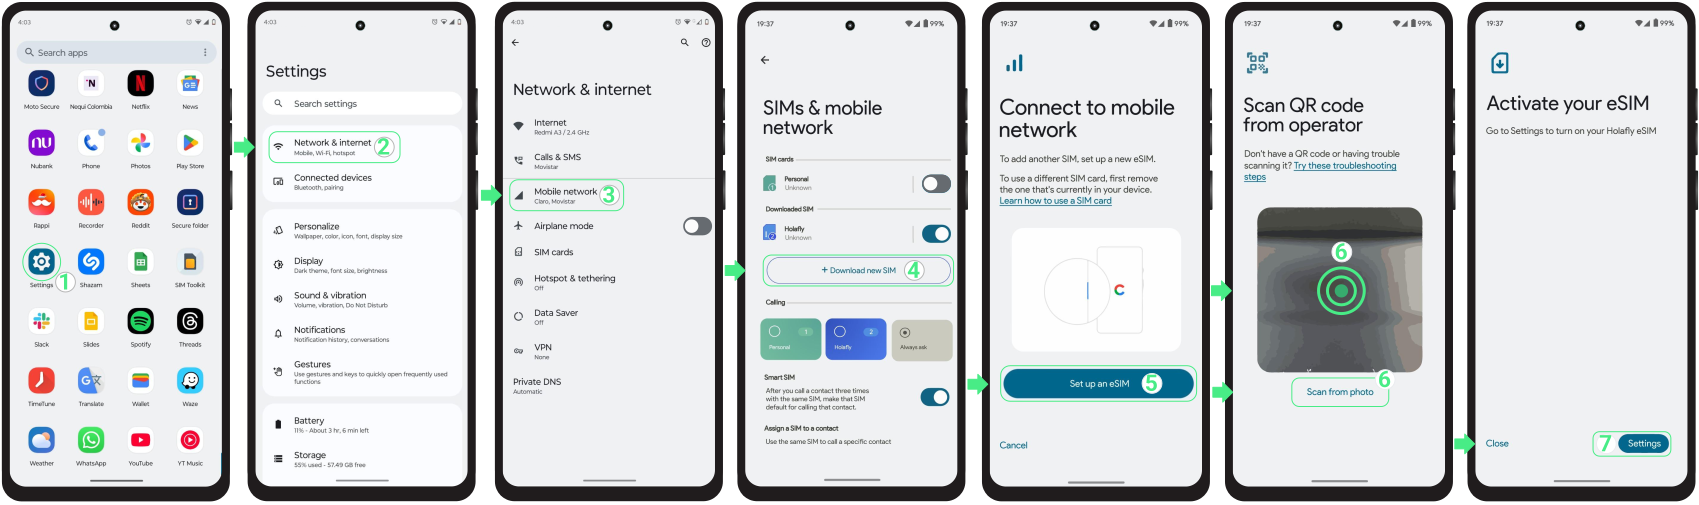

  • Go to Settings → Access Network & Internet → Choose Mobile network → Tap Download new SIM → Choose Set up an eSIM → Scan your QR code or tap the Scan from photo text link below to choose it from your gallery → Then, tap on the Set up Button → Once added, tap Settings to turn on the toggle to activate your new eSIM line.

Install eSIM on Motorola using a QR code

3. Install eSIM on Motorola using manual codes:

If your QR code won’t scan, you can copy the activation code from your confirmation email and paste it directly into your phone’s settings by following the steps below:

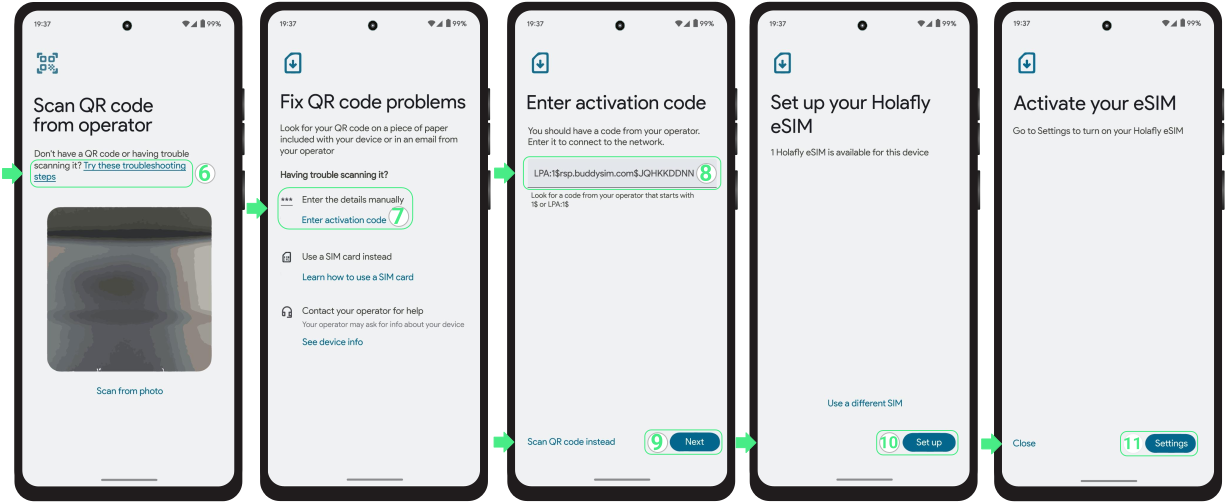
  • Go to Settings → Access Network & Internet → Choose Mobile network →  Tap Download new SIM → Choose Set up an eSIM.

To install an eSIM on Motorola using manual codes:
  • Tap on“Try these troubleshooting steps” → Select “Enter activation code” → Paste the manual code you received (including LPA and the colons “:”) → Tap Next → Then, select the Set up Button →  And finally, tap Settings if you want to continue with the activation.

To install an eSIM on Motorola using manual codes:

How to activate an eSIM on Motorola

Once your eSIM is installed, you can activate it from your Motorola’s settings by turning on the line and selecting it for mobile data. If you’re using a travel eSIM, wait until you arrive at your destination before turning it on to avoid activating your plan too early.


Follow the steps below to complete the activation.
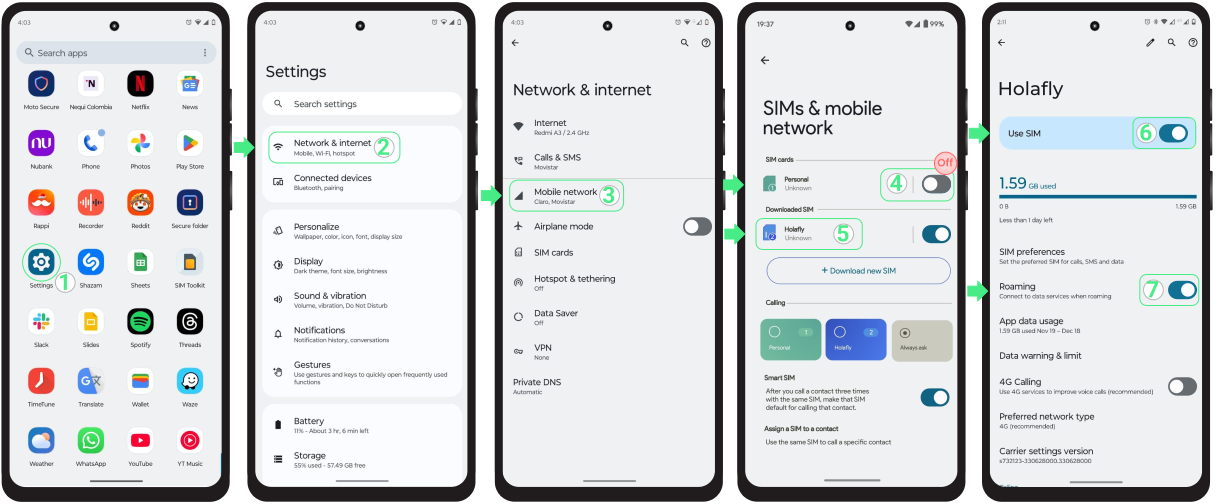

  • Go to Settings → Select Network & internet → Tap on Mobile network → Disable the other SIMs to avoid charges from your carrier (Your personal SIMs/eSIMs) → Select your newly installed eSIM → Then, turn on the Use SIM switch and also enable Roaming if you are using a travel eSIM.

How to Activate an eSIM on Your Motorola?

Troubleshooting Tips:

During Installation

If your Motorola shows an error while installing the eSIM, don’t worry. Sometimes the eSIM is successfully added even if the setup process doesn’t finish as expected. Before trying again, check whether it’s already installed:


  • On your phone: Go to Settings → Network & internet → Mobile network. Your new eSIM should appear in the Downloaded SIMs section, usually with the name assigned during setup.
  • In the App: Check your eSIM status. If it says “eSIM Installed – Ready to use,” you’re ready to move on to activation.


Using your mobile data

If your connection doesn’t start immediately, wait a few minutes while your Motorola connects to a local network. If you’re still offline, try selecting a network manually.


Important: Don’t remove your eSIM. Once deleted, it can’t be installed again, and you won’t be able to use that data plan.

Oppo eSIM: how to install and activate it

Setting up an Oppo eSIM is a quick and simple process you can complete in just a few minutes. If your device supports eSIM, you’ll be connected in just a few steps.


To get started, you’ll go through two quick stages: first, installing the eSIM on your phone using the app linked to your eSIM, a QR code, or manual activation details, and second, activating it for mobile data. Below, you’ll find everything you need to start browsing in no time.


What you need to install an eSIM on Oppo devices

Before setting up your new Oppo eSIM, it’s important to check the basic requirements.


  • An unlocked and eSIM-compatible Oppo phone, though you should verify compatibility since not all models support eSIM by region, and your device must be unlocked to use another provider.
  • A stable Wi-Fi connection. This is required to download and add the eSIM to your device.
  • For Global or Regional (Europe, South America, Africa, etc.) eSIM plans, install it no earlier than 1 day before your trip to ensure your data starts when you need it. For single-country plans, install it at any time.

How to install an eSIM on Oppo

The fastest way to set up an eSIM is directly through your provider’s app. However, you can also use two universal methods: a QR code or a manual code. Both methods follow a similar path in your phone’s settings and work across all compatible Oppo models.

1. Automated eSIM installation via App

Installing your eSIM through the app is simple and only takes a few minutes. Just download or open the app here and follow these steps:


  • Go to the app on your phone → Log in with the email associated with your purchase → Go to Purchases → Tap Install on the eSIM you want to add → Read the Installation tips and tapGot it to continue → Choose Install Automatically → Tap Install eSIM → Then, tapAdd  and Download to save your new line inside the Mobile Network menu in settings.

Automated eSIM installation via App

2. Install an eSIM on Oppo using a QR code

The QR code method is another easy way to install an eSIM on Oppo. Since you’ll need to scan the QR code with your phone’s camera through settings phone, open the QR code received on another device before you begin. Then, follow the steps below.
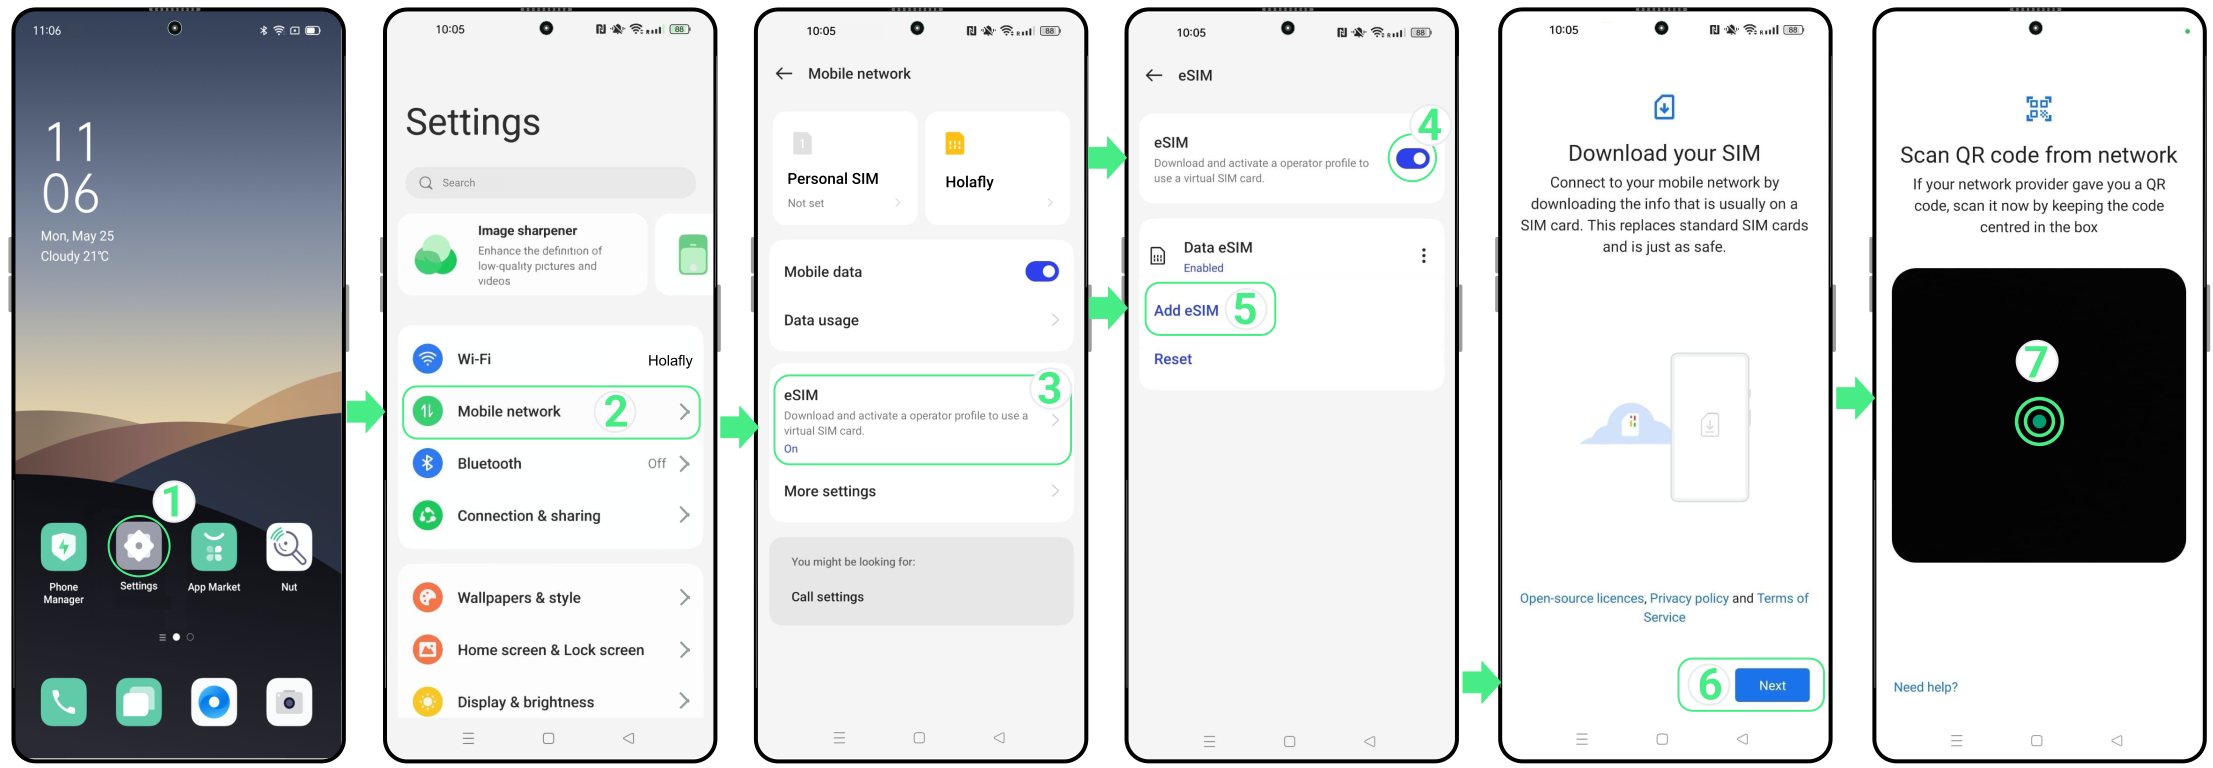

  • Go to Settings → Mobile network → Tap on eSIM → Toggle on the eSIM switch  → Tap Add eSIM → Select Next → Scan the QR code you received → Tap Download and wait for the installation to complete (keep this screen open until the process finishes) → Confirm that the eSIM has been added to your device.

Install an eSIM on Oppo using a QR code:

3. Install an eSIM on Oppo using manual installation details

If your QR code won’t scan, you can copy the activation code from your confirmation email and paste it directly into your phone’s settings by following the steps below:


Note: These are text codes that you need to type or copy manually because they are not clickable links.
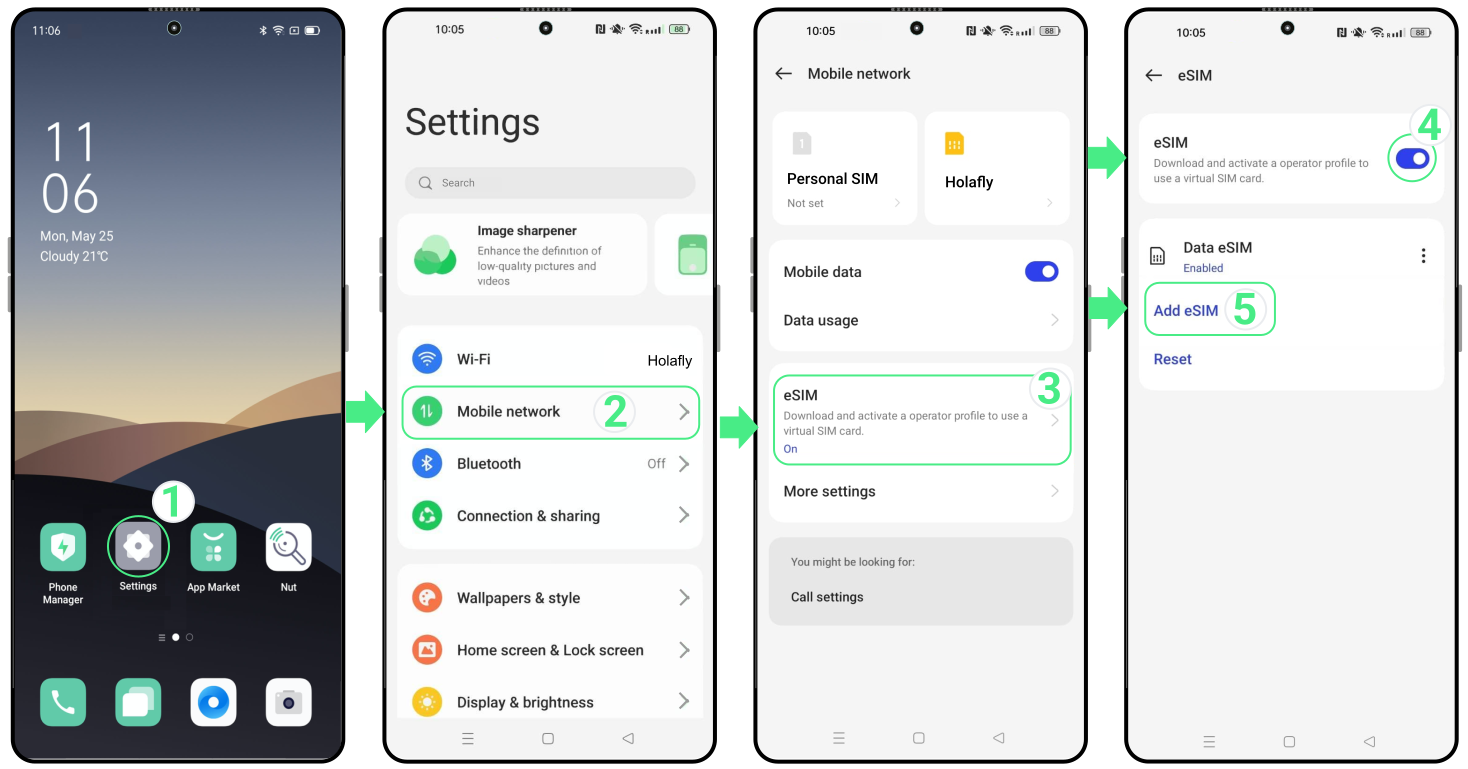
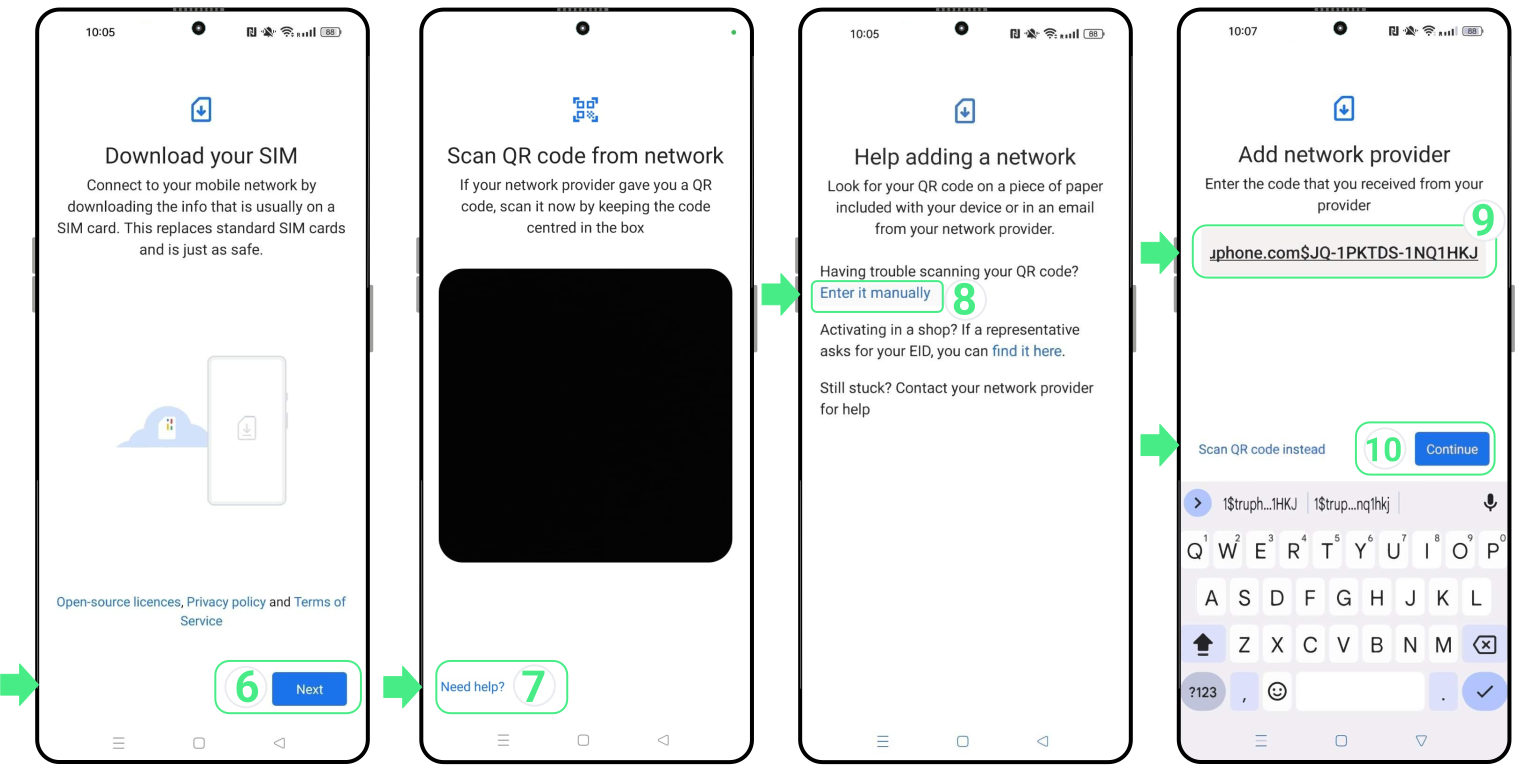
  • Go to Settings → Select Mobile Network → Tap on eSIM → Toggle on the eSIM switch → Tap Add eSIM.

  • Tap on Next → Select Need help? → Choose Enter it manually → Copy and paste the full installation details exactly as provided (Including “LPA” and the colon “:”) → Tap Continue → Select Download and wait for the installation to finish (keep this screen open) → Confirm that the eSIM appears on your device.

Install an eSIM on Oppo using manual installation details

How to activate an eSIM on Oppo

Once the eSIM is installed, activating it only requires turning on the new line and selecting it for mobile data. This step can be done directly from your phone settings and does not require an internet connection.

If you’re using a travel eSIM, it’s recommended to enable the line only after you arrive at your destination to avoid activating it too early.

Follow these steps to activate your new eSIM:
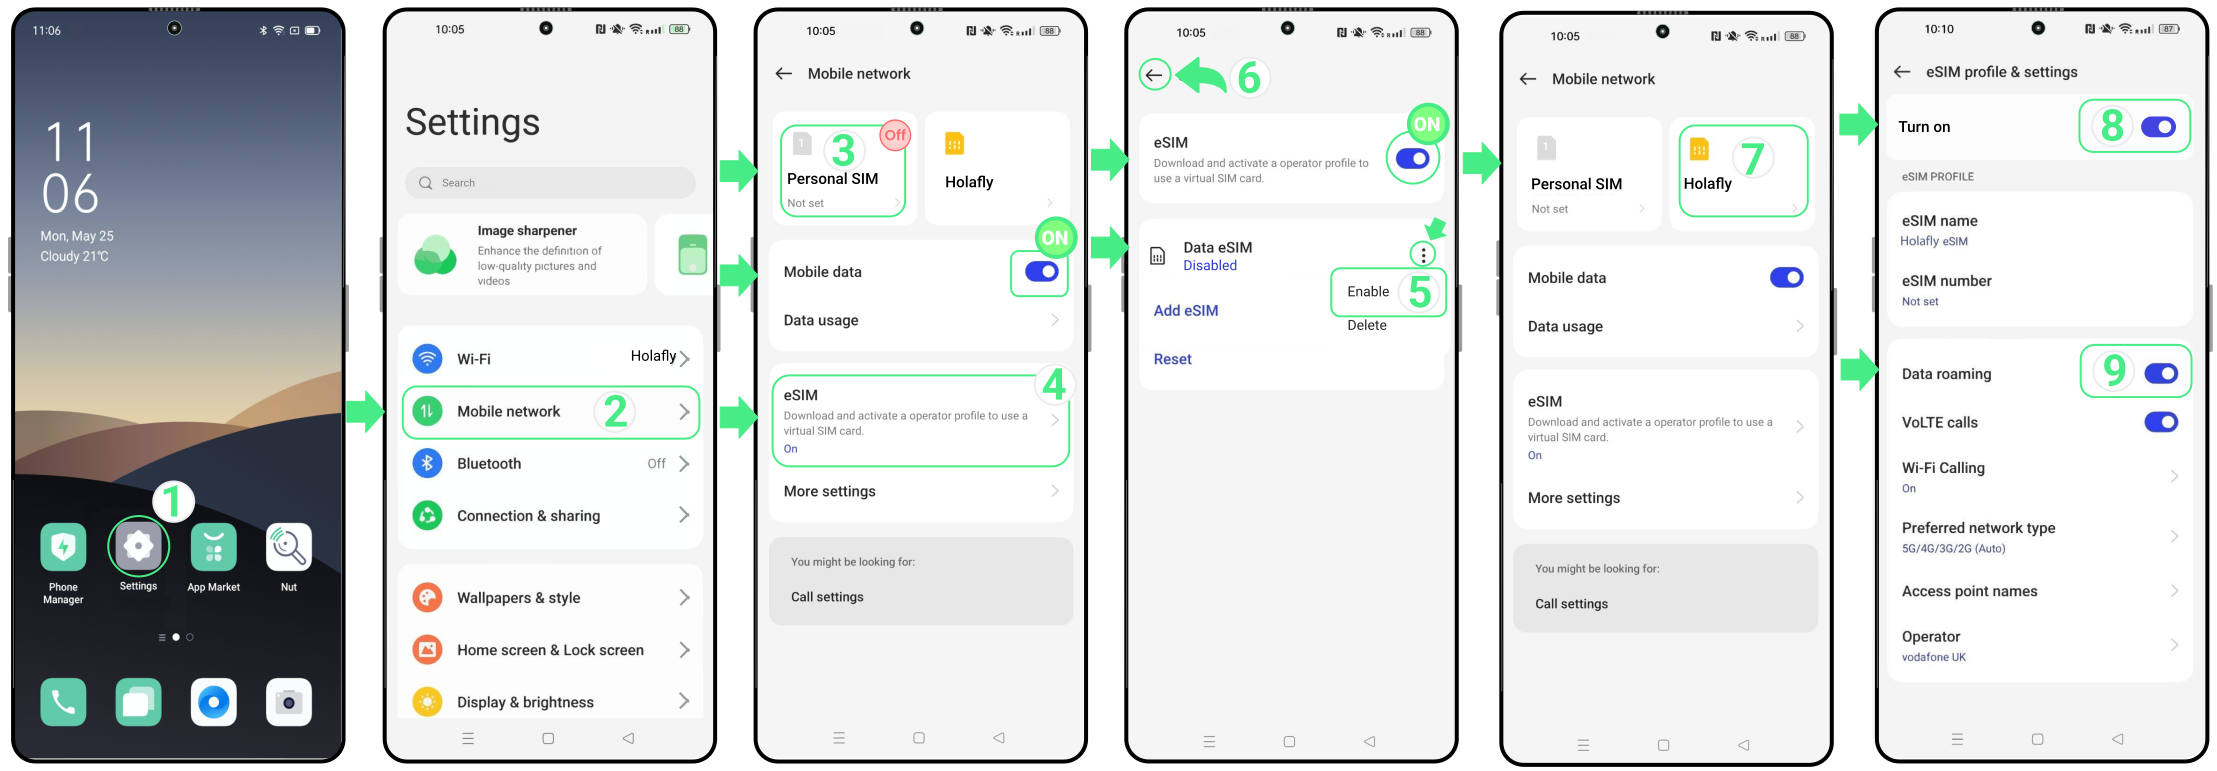

  • Go to Settings → Select Mobile network → Disable your main SIM card/eSIM (optional, if you want to avoid extra charges with your home carrier) → Tap eSIM and make sure it’s enabled by turning on the switch → Tap the three dots next to the Data eSIM of the new installed eSIM and select Enable to confirm activation →  Go back to Mobile network and select the New eSIM → Turn on the Enable switch → Toggle Data roaming switch (only if you are using an international travel eSIM).

How to activate an eSIM on Oppo

Troubleshooting tips

During Installation

If Oppo displays a message during installation, there’s no need to start over right away. In many cases, the eSIM has already been added to your phone. Before trying again, take a quick look:


  • On your phone: Go to Settings → Mobile network. Your new eSIM should appear there as a new card, either with the provider name or the custom name you chose during setup.

  • In the App: Check your eSIM status. If it says “eSIM Installed – Ready to use,” everything is ready for activation.


Using your mobile data

If you’re not connected right away after following the activation steps, give your Oppo a few minutes to register on a local network. If you still don’t have a connection, try selecting a network manually.


⚠️ Important: Don’t remove your eSIM. Once deleted, it couldn’t be installed again, and you won’t be able to use that data plan.

How to install and activate an eSIM on a Sony phone?

To install and activate an eSIM on a Sony device, you can use the app associated with your eSIM or universal methods like scanning a QR code or entering the installation details manually. Either option will add the line to your device in just a few minutes. Once installed, the final step is activation, which is when you turn it on to connect to the network.


eSIM technology is available across many Sony Xperia models, from popular devices like the Xperia 1 IV, Xperia 5 IV, and Xperia 1 V to newer releases such as the Xperia 1 VII and Xperia 10 VII. Follow the step-by-step instructions below to complete your eSIM setup in just a few minutes.

What you need to know before setting up 

  • Make sure your Sony device supports eSIM technology and is unlocked (this means it can be used with any mobile company, not just the one where you bought it).
  • Ensure you’re connected to a stable, secure Wi-Fi network instead of a public one.
  • For Global or Regional (Europe, South America, Africa, etc.) plans, install it no earlier than 1 day before your trip to ensure your data starts when you need it. For single-country plans, install it at any time.

How to install an eSIM on your Sony device

There are three ways to install an eSIM on your Sony device. Choose the installation method that best matches your setup. If eSIM app installation is available, we recommend using it for the quickest setup experience.

1. Automatic installation via the app

This is the easiest and most modern way to set up your eSIM line. If you are using roAmigo, download or open the app here and follow these steps:


  • Go to the app on your phone → Log in with the email associated with your purchase → Go to Purchases → Tap Install on the eSIM you want to add →  Read the Installation tips and tapGot it to continue → Choose Install Automatically → Tap Install eSIM → Then, tapAdd and Set up to save the new line inside your Sony’s Mobile network menu → Once installed, tap Settings if you want to continue with the activation.

2. Install an eSIM on Sony by using a QR code

You can add your eSIM directly from your phone’s settings, either by scanning the QR code or by selecting its image from your photo gallery. Before you begin, make sure you have the QR code displayed on another screen or saved as an image on your device.


It is highly important to complete this setup directly through your Sony’s settings menu instead of using your default camera app, as the standard camera will not recognize the mobile configuration. Follow these steps:
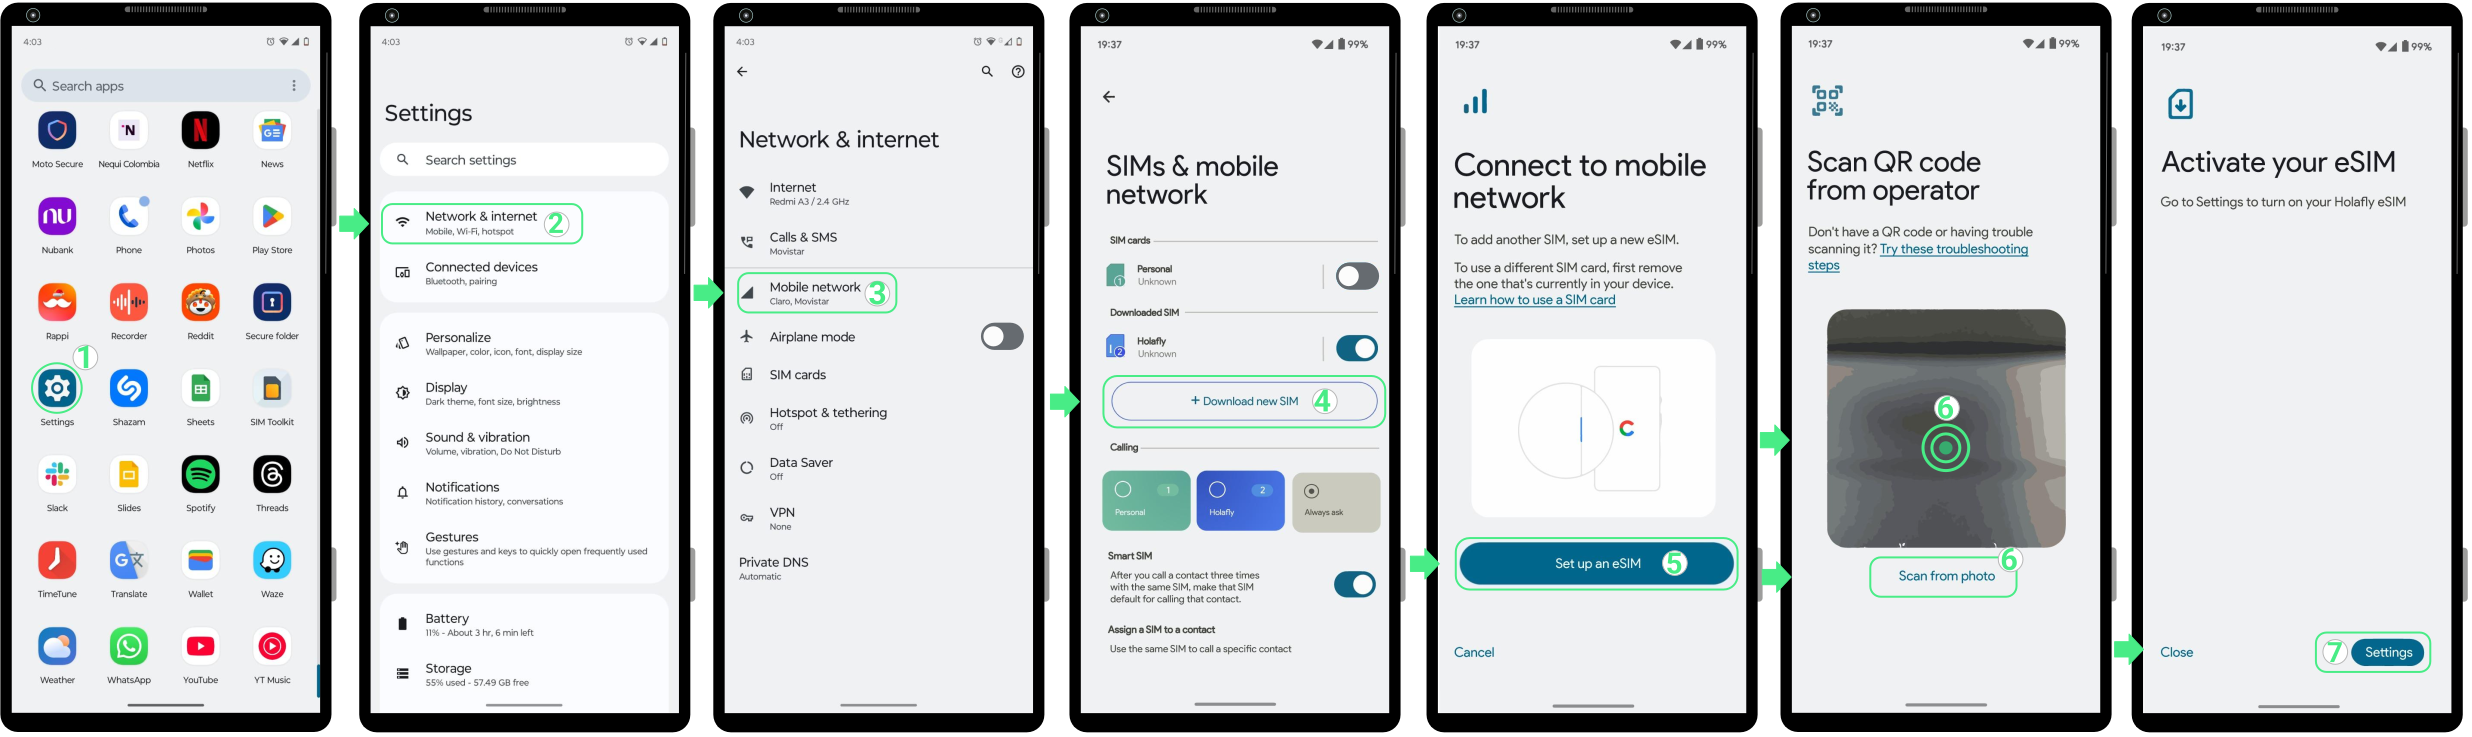

  • Go to Settings → Access Network & Internet → Tap on Mobile network  → Tap on Download new SIM → Select Set up an eSIM → Scan your QR code or tap the “Scan from photo” text link at the bottom to choose it from your gallery → Then, tap on the Set up button to successfully add your eSIM → Once added, tap Settings to turn on the toggle to activate your new eSIM line.

Install an eSIM on Sony by using a QR code

3. Install an eSIM on Sony by entering details manually

Alternatively, you can complete the installation by entering the manual activation code you received directly into your Sony settings.
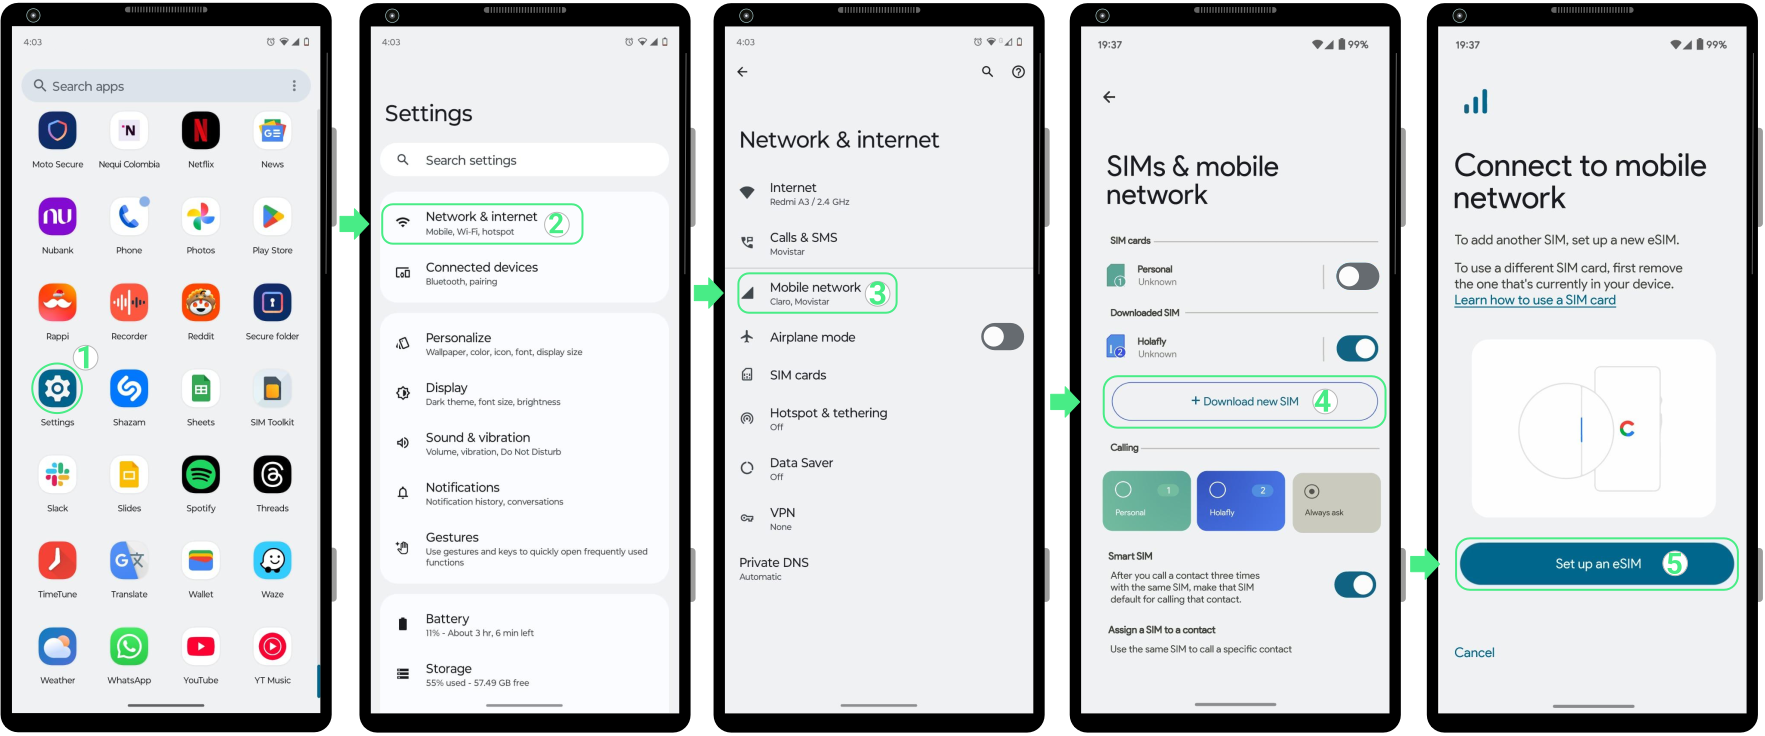

  • Go to Settings → Access Network & Internet → Tap on Mobile network  → Click on Download new SIM → Choose Set up an eSIM.
  • Tap on Try following these troubleshooting steps → Select Enter activation code → Copy and Paste the manual code for Android that you received (including LPA and the colons “:”) → Tap on Next → Select Set up to successfully add your eSIM → And finally, select Settings if you want to continue with the activation.

Note: Please keep in mind that this is a manual text code, not a clickable link.
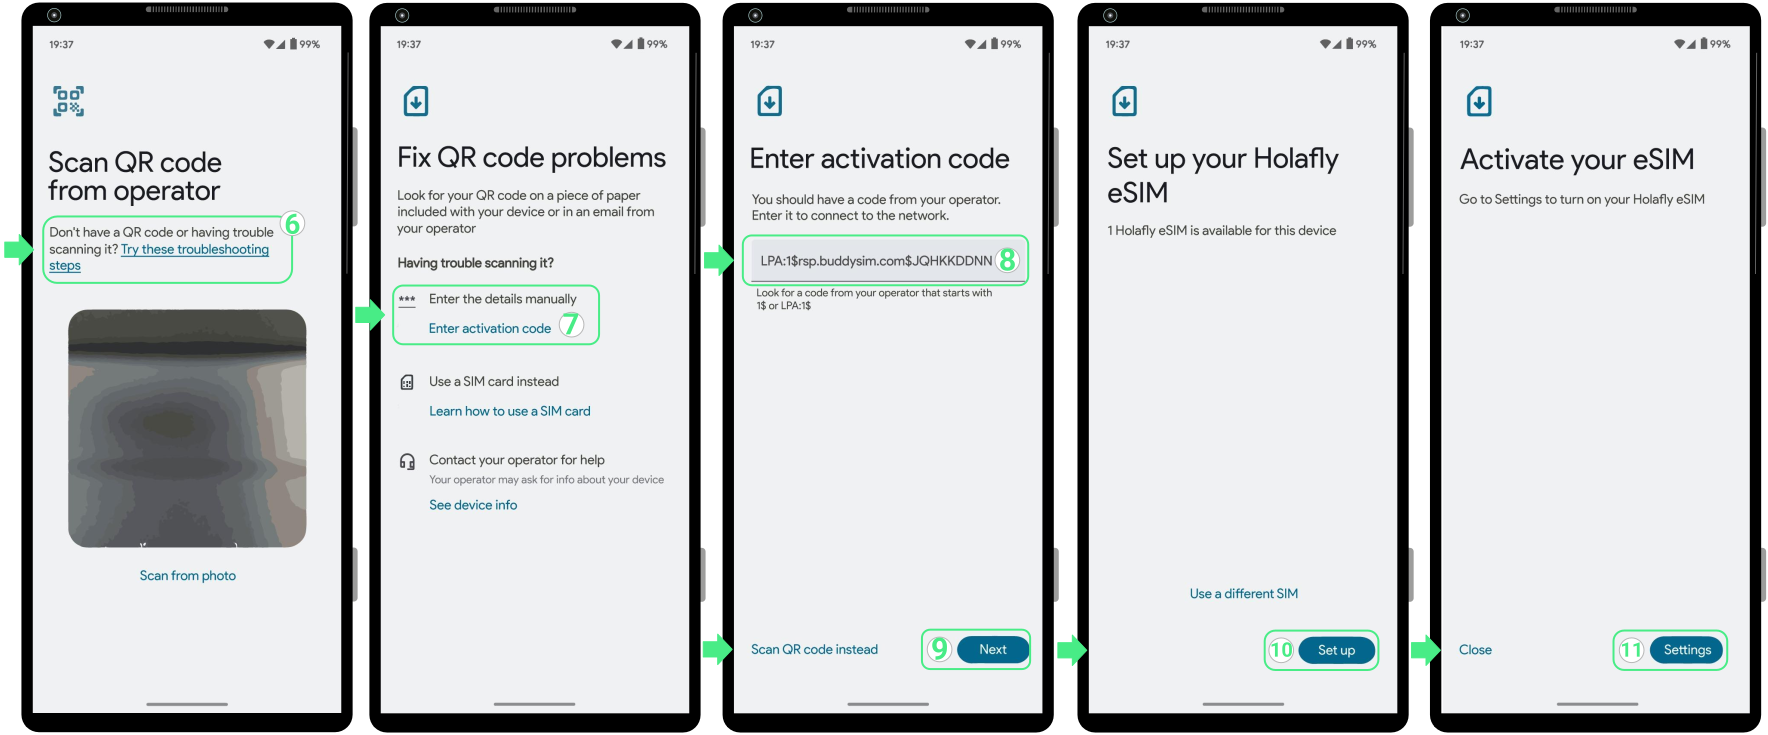
 

How to activate an eSIM on Sony

Once your eSIM is installed, you can activate it by turning on the new line and selecting it for mobile data. For travel eSIMs, wait until you arrive at your destination before turning it on to avoid activating your plan too early.


Follow the steps below to complete the activation once you’re ready:
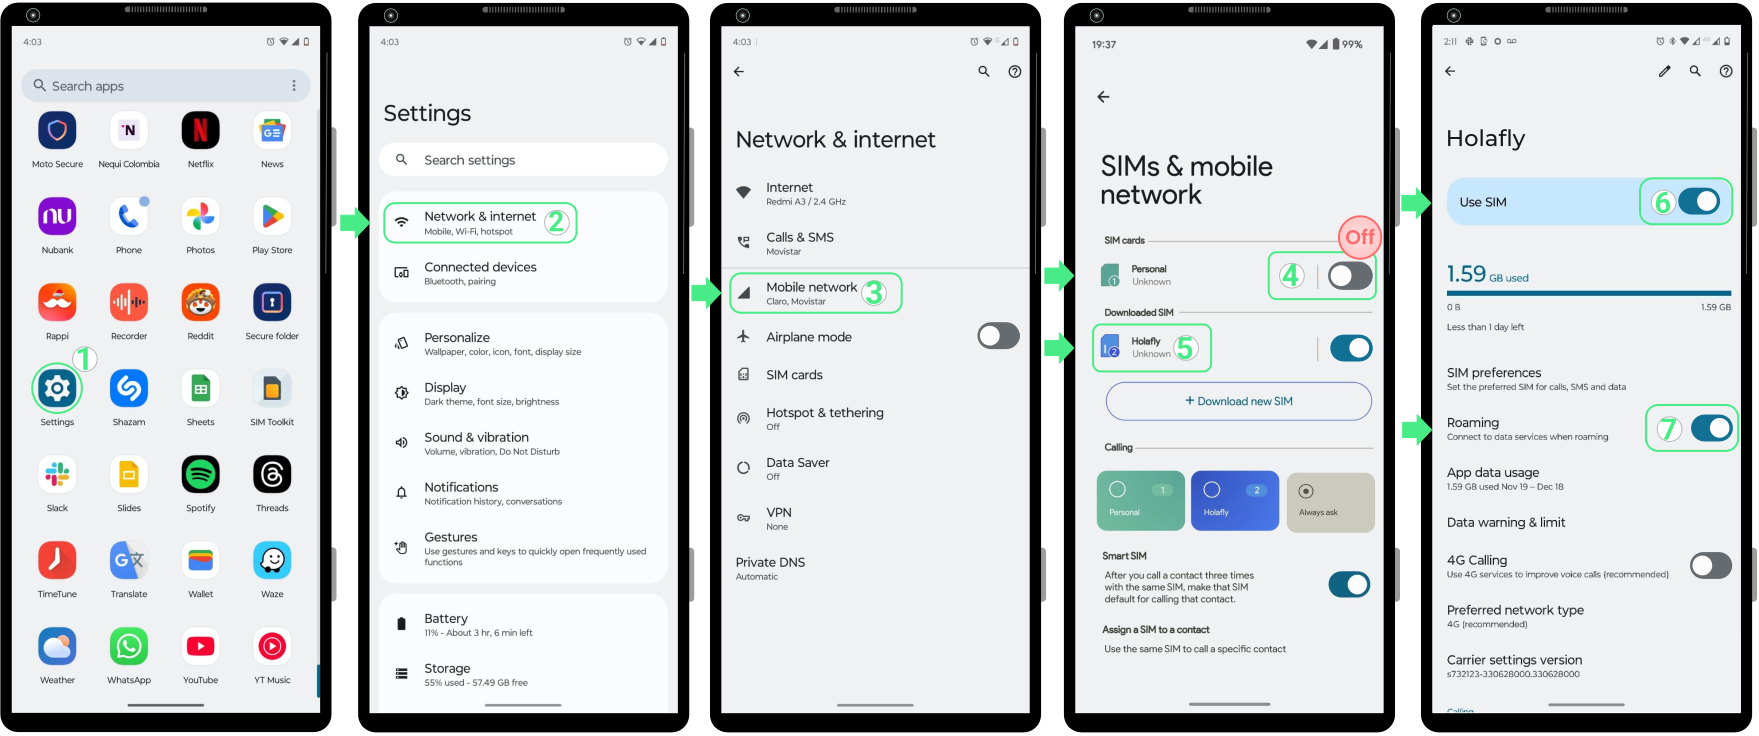

  • Go to Settings → Select Network & Internet → Tap on Mobile network → Disable the other SIMs to avoid charges from your home carrier (Your personal SIMs/eSIMs) → Select your newly installed eSIM → Then, turn on the Use SIM switch and also always enable Roaming when you are using a travel eSIM.
How to activate an eSIM on Sony

To keep in mind

  • eSIM support on Sony devices may vary depending on the carrier and the country of manufacture. 
  • Xperia models in the U.S. generally do not support eSIM, while some versions in Europe do.
  • For Sony devices with eSIM and Dual SIM support, you can use both a physical SIM and the eSIM simultaneously, but only one can be active for mobile data at a time.
Sony eSIM

Troubleshooting tips

During Installation

If your Sony device shows a message during installation, there’s no need to restart the process immediately. In some cases, the eSIM is installed successfully even if the setup doesn’t finish as expected. Before trying again, check whether it’s already available on your device:


  • On your Sony device: Go to Settings → Network & internet → Mobile network. If you see a new eSIM listed there under your downloaded SIMs (showing your provider’s name or a custom label), your line has already been successfully installed.
  • In the App: Check your eSIM status. If it says “eSIM Installed – Ready to use,” you can proceed with activation.

Using your mobile data

Once you arrive at your destination and have turned on your eSIM following the activation steps above, your Sony device should register on a local network within a few minutes. If you still don’t have internet after waiting a moment, simply select a network operator manually from your eSIM’s network settings.


⚠️ Important: Don’t delete your eSIM. If you remove it, you most likely won’t be able to reinstall it.

How to install and activate an eSIM on a Nokia phone?

To install an eSIM on your Nokia, you have three options, use your provider’s app, scan the QR code they sent you, or enter the details manually. In any case, the final step after installation is to activate the line from your phone’s settings to get connected.


This eSIM technology is available on select Nokia models, including the Nokia X30 5G, Nokia G60 5G, and Nokia XR21. In this guide, you’ll learn how to set up your eSIM in just a few minutes.

Before you start setting up your Nokia with eSIM:

  • Make sure your specific model is fully compatible with this technology and unlocked by your carrier, which means your phone must be contract-free to use a line from any other provider.
  • Connect to a stable Wi-Fi network to avoid interruptions.
  • For Global or Regional plans (Europe, South America, Asia, etc.), install your eSIM at most 1 day before your trip. For single-country plans, you can install it days or weeks ahead, as it only activates at your destination.

How to install an eSIM on Nokia

To begin the installation, choose which of the three methods you prefer to use to set up the line on your phone. Below, we explain each alternative step-by-step so you can choose the most convenient one for you.

Install your eSIM using the app

This method is the ideal choice for a quick and automated setup. If you are using roAmigo, download or open the app here and follow these steps:


  • Go to the app on your phone → Log in with the email associated with your purchase → Go to Purchases → Tap Install on the eSIM you want to add → Read the Installation tips and tapGot it to continue → Choose Install Automatically → Tap Install eSIM → Then, tap Add and Set up to save your new line inside your Nokia’s Mobile Network menu → Once installed, tap Settings if you want to continue with the activation.

Install your eSIM using the app

Install an eSIM on Nokia with a QR code

A QR code is a simple way to add an eSIM to your Nokia phone. You can scan it from another device or upload it directly if it’s saved as a photo or screenshot.
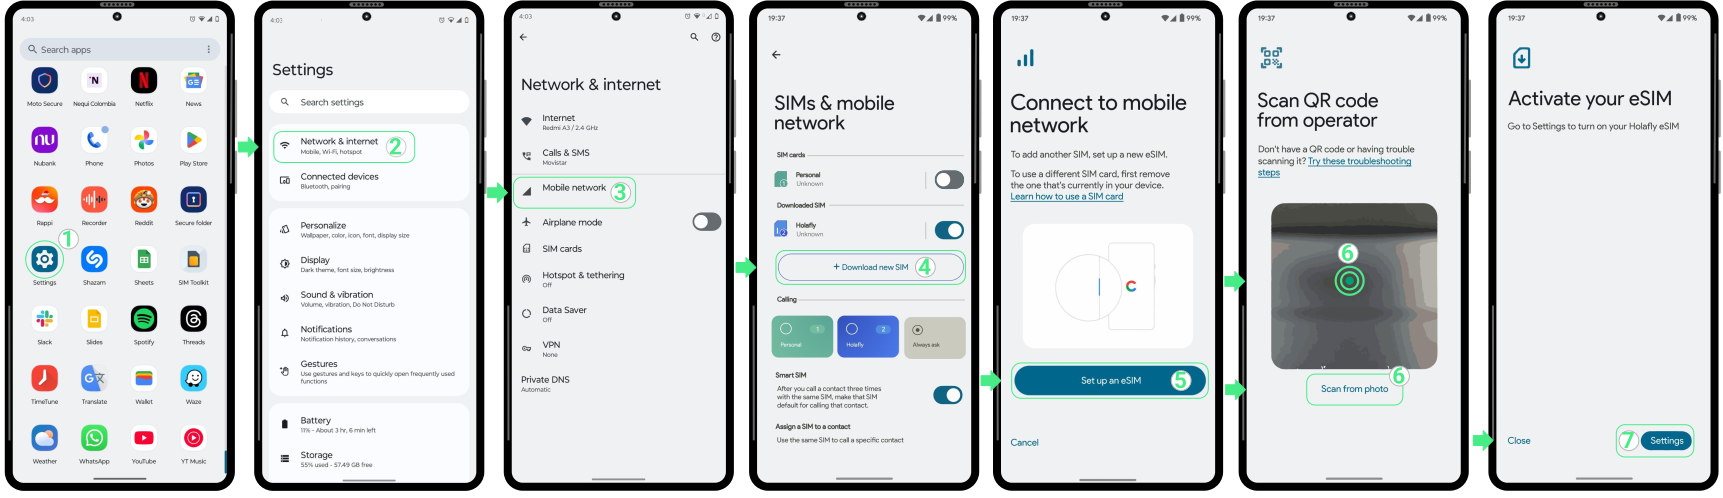

  • Go to Settings → Access Network & Internet → Choose Mobile Network → Tap Download new SIM → Choose Set up an eSIM → Scan your QR code or tap the “Scan from photo” text link below to choose it from your gallery → Then, tap on the Set up Button → Once added, tap Settings to turn on the toggle to activate your new eSIM line.

Install an eSIM on Nokia with a QR code

Install an eSIM on Nokia using manual codes

Manual installation is a useful alternative if you can’t scan a QR code. This method allows you to add the eSIM by entering the activation details directly into your Nokia settings.
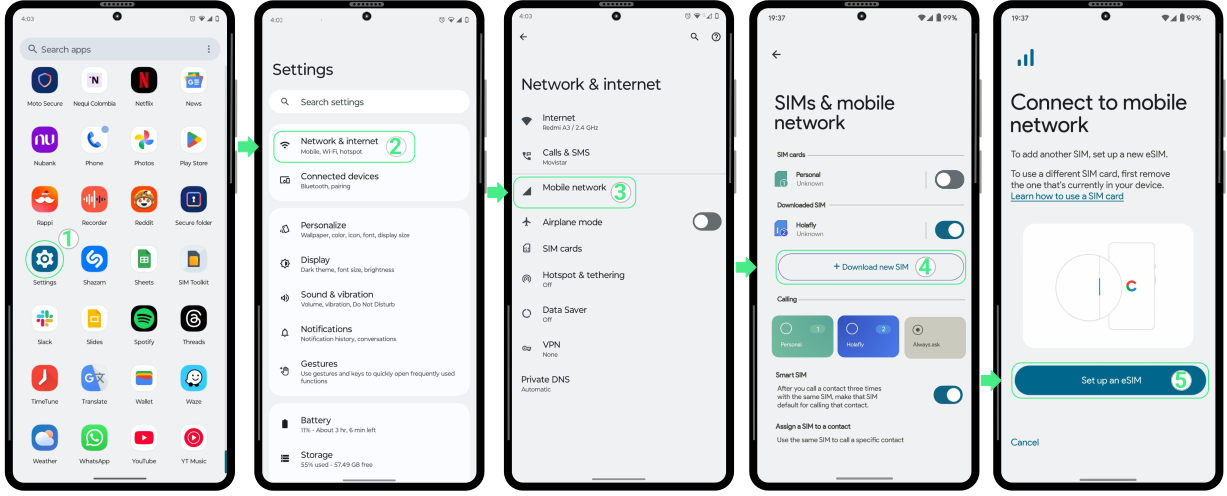
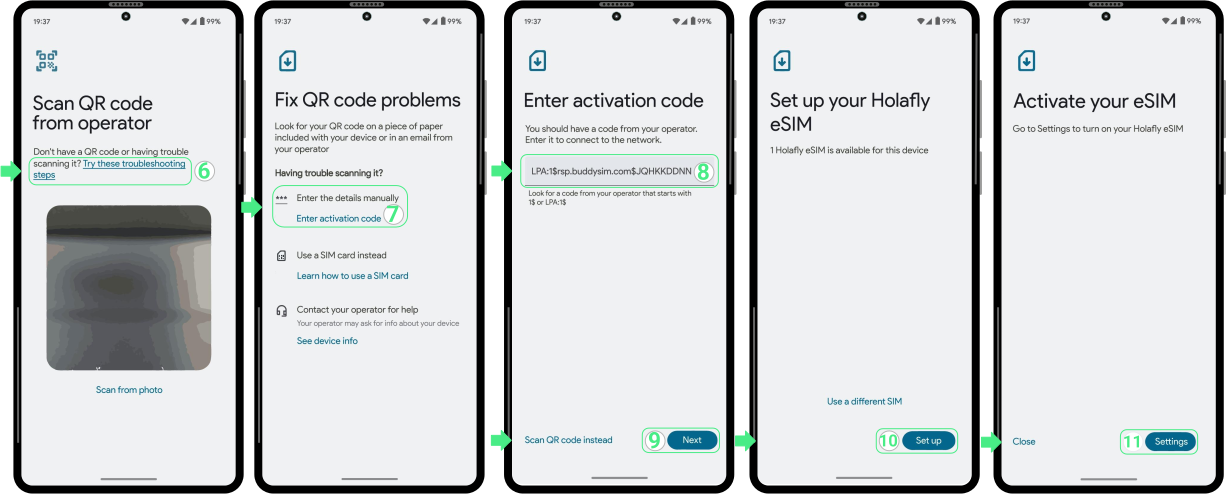
  • Go to Settings → Access Network & Internet → Choose Mobile Network →  Tap Download new SIM → Choose Set up an eSIM.Install an eSIM on Nokia using manual codes
  • Tap on“Try these troubleshooting steps” → Select “Enter activation code” → Paste the manual code you received (including LPA and the colons “:“) → Tap on Next → Then, select the Set up button →  And finally, tap Settings if you want to continue with the activation.


How to activate an eSIM on Nokia

Once your eSIM is installed, you can activate it by turning on the new line and selecting it for mobile data. If you’re using a travel eSIM, wait until you arrive at your destination before turning it on to avoid starting your plan too early.


Follow the steps below to complete the activation when you’re ready:
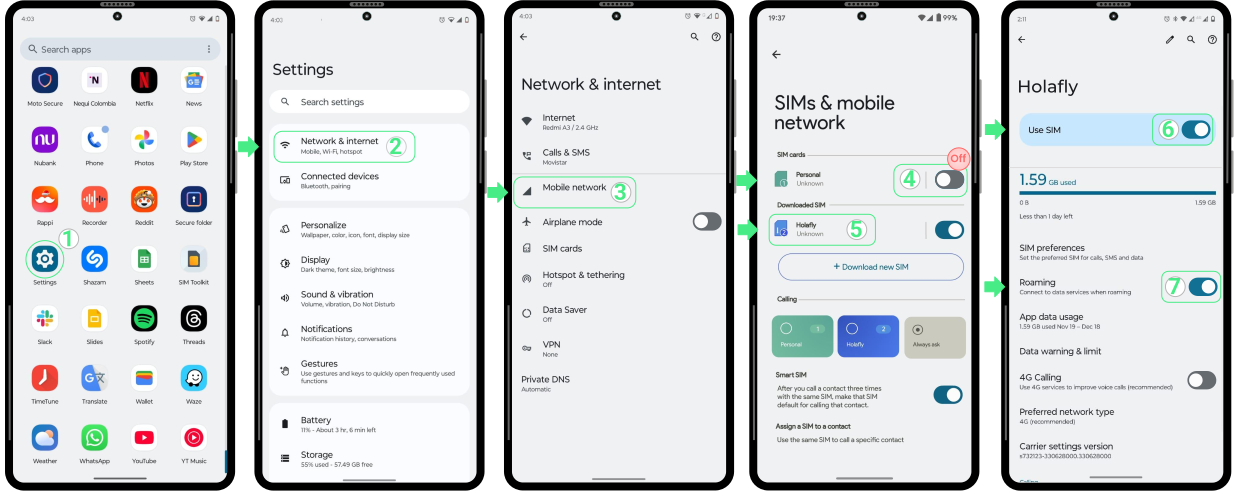

  • Go to Settings → Select Network & Internet → Tap on Mobile Network → Disable the other SIMs to avoid charges from your home carrier (Your personal SIMs/eSIMs) → Select your newly installed eSIM → Then, turn on the Use SIM switch and also always enable Roaming when you are using a travel eSIM.

How to Activate an eSIM on Nokia?

To keep in mind

  • eSIM compatibility on Nokia devices may vary depending on the carrier and country of manufacture.
  • Nokia devices can store up to 10 eSIMs. If you run out of space, you can remove one you’re not using via Settings.
  • On Nokia phones that support both eSIM and Dual SIM, you can use a physical SIM and eSIM simultaneously, but only one can be active for mobile data at a time.

Troubleshooting tips

During installation

If your Nokia shows a message while installing the eSIM, don’t worry. In some cases, the eSIM may have been added successfully even if the installation didn’t appear to finish correctly. Before attempting a new installation, check the following:


  • On your phone: Go to Settings → Network & Internet → Mobile Network. Your eSIM should appear in the list of Downloaded SIM with your provider’s name or a custom label.
  • In the app: Open the Purchases section and check the status of your eSIM. If it shows “eSIM Installed – Ready to use,” the installation was completed successfully.

Using your mobile data

If your eSIM is successfully activated, but you still don’t have internet, try selecting a network manually. To do this, go to Settings → Network & internet → Mobile network and select your eSIM. From there, turn off the Automatically select network option. Once the list loads, test the available operators one by one until you find the one that gives you the best signal for browsing.


Important: Never delete your eSIM while trying to restore your connection. Once removed, it couldn’t be installed again.

Nokia 폰에서 eSIM을 설치하고 활성화하는 방법

To install an eSIM on your Nokia, you have three options, use your provider’s app, scan the QR code they sent you, or enter the details manually. In any case, the final step after installation is to activate the line from your phone’s settings to get connected.


This eSIM technology is available on select Nokia models, including the Nokia X30 5G, Nokia G60 5G, and Nokia XR21. In this guide, you’ll learn how to set up your eSIM in just a few minutes.

Before you start setting up your Nokia with eSIM:

  • Make sure your specific model is fully compatible with this technology and unlocked by your carrier, which means your phone must be contract-free to use a line from any other provider.
  • Connect to a stable Wi-Fi network to avoid interruptions.
  • For Global or Regional plans (Europe, South America, Asia, etc.), install your eSIM at most 1 day before your trip. For single-country plans, you can install it days or weeks ahead, as it only activates at your destination.

How to install an eSIM on Nokia

To begin the installation, choose which of the three methods you prefer to use to set up the line on your phone. Below, we explain each alternative step-by-step so you can choose the most convenient one for you.

Install your eSIM using the app

This method is the ideal choice for a quick and automated setup. If you are using roAmigo, download or open the website here and follow these steps:


  • Go to the app on your phone → Log in with the email associated with your purchase → Go to Purchases → Tap Install on the eSIM you want to add → Read the Installation tips and tapGot it to continue → Choose Install Automatically → Tap Install eSIM → Then, tap Add and Set up to save your new line inside your Nokia’s Mobile Network menu → Once installed, tap Settings if you want to continue with the activation.

Install your eSIM using the app

Install an eSIM on Nokia with a QR code

A QR code is a simple way to add an eSIM to your Nokia phone. You can scan it from another device or upload it directly if it’s saved as a photo or screenshot.


  • Go to Settings → Access Network & Internet → Choose Mobile Network → Tap Download new SIM → Choose Set up an eSIM → Scan your QR code or tap the “Scan from photo” text link below to choose it from your gallery → Then, tap on the Set up Button → Once added, tap Settings to turn on the toggle to activate your new eSIM line.

Install an eSIM on Nokia with a QR code

Install an eSIM on Nokia using manual codes

Manual installation is a useful alternative if you can’t scan a QR code. This method allows you to add the eSIM by entering the activation details directly into your Nokia settings.


  • Go to Settings → Access Network & Internet → Choose Mobile Network →  Tap Download new SIM → Choose Set up an eSIM.

  • Tap on“Try these troubleshooting steps” → Select “Enter activation code” → Paste the manual code you received (including LPA and the colons “:“) → Tap on Next → Then, select the Set up button →  And finally, tap Settings if you want to continue with the activation.


How to activate an eSIM on Nokia

Once your eSIM is installed, you can activate it by turning on the new line and selecting it for mobile data. If you’re using a travel eSIM, wait until you arrive at your destination before turning it on to avoid starting your plan too early.


Follow the steps below to complete the activation when you’re ready:


  • Go to Settings → Select Network & Internet → Tap on Mobile Network → Disable the other SIMs to avoid charges from your home carrier (Your personal SIMs/eSIMs) → Select your newly installed eSIM → Then, turn on the Use SIM switch and also always enable Roaming when you are using a travel eSIM.

How to Activate an eSIM on Nokia?

To keep in mind

  • eSIM compatibility on Nokia devices may vary depending on the carrier and country of manufacture.
  • Nokia devices can store up to 10 eSIMs. If you run out of space, you can remove one you’re not using via Settings.
  • On Nokia phones that support both eSIM and Dual SIM, you can use a physical SIM and eSIM simultaneously, but only one can be active for mobile data at a time.

Troubleshooting tips

During installation

If your Nokia shows a message while installing the eSIM, don’t worry. In some cases, the eSIM may have been added successfully even if the installation didn’t appear to finish correctly. Before attempting a new installation, check the following:


  • On your phone: Go to Settings → Network & Internet → Mobile Network. Your eSIM should appear in the list of Downloaded SIM with your provider’s name or a custom label.
  • In the website: Open the Purchases section and check the status of your eSIM. If it shows “eSIM Installed – Ready to use,” the installation was completed successfully.

Using your mobile data

If your eSIM is successfully activated, but you still don’t have internet, try selecting a network manually. To do this, go to Settings → Network & internet → Mobile network and select your eSIM. From there, turn off the Automatically select network option. Once the list loads, test the available operators one by one until you find the one that gives you the best signal for browsing.


Important: Never delete your eSIM while trying to restore your connection. Once removed, it couldn’t be installed again.

iPad에서 eSIM을 활성화하는 방법

To activate an eSIM on iPad,  first you need to install the eSIM and then turn it on from your device settings. The full process takes about five minutes and is done directly on the iPad, either by scanning a QR code or by entering the activation details manually.


This setup is especially important on the newer iPad models like the iPad Pro (M4 and M5) and iPad Air (M2 and M3), which no longer include a physical SIM tray and rely entirely on eSIM for cellular data. Below, you’ll find the exact steps to install and activate your eSIM and get connected.

Before adding an eSIM to your iPad

These quick checks help prepare your iPad for eSIM setup and only take a moment to review.


  • Make sure your iPad is a Wi-Fi + Cellular model.
  • Confirm that your iPad is eSIM compatible and carrier-unlocked.
  • Connect to a stable Wi-Fi network to download the eSIM profile.
  • Have your QR code or activation details ready.
  • Keep your iPad charged or connected to power during setup.

iPad eSIM compatibility (Updated List – 2026)

To use an eSIM on an iPad, you must have a Wi-Fi + Cellular model. Wi-Fi–only iPads don’t include the hardware needed for mobile data, even if the software is up to date.


Important: iPad models released in 2024 and 2025, such as the iPad Pro (M4/M5) and iPad Air (M2/M3), are eSIM-only. They don’t have a physical SIM tray, so activating an eSIM is the only way to use mobile data.


iPad Pro

  • iPad Pro 13-inch (M4)
  • iPad Pro 11-inch (M4)
  • Pad Pro 13‑inch (M5)
  • iPad Pro 11‑inch (M5)
  • iPad Pro 12.9-inch (3rd to 6th generation)
  • iPad Pro 11-inch (1st to 4th generation)

iPad Air

  • iPad Air 13-inch (M3)
  • iPad Air 11-inch (M3)
  • iPad Air 13-inch (M2)
  • iPad Air 11-inch (M2)
  • iPad Air (3rd to 5th generation)

iPad (standard models)

  • iPad (A16)
  • iPad (7th to 10th generation)

iPad mini

  • iPad mini (A17 Pro)
  • iPad mini (5th and 6th generation)

How to install an eSIM on iPad

There are three universal ways to install an eSIM on an iPad, depending on how your carrier provides it. You only need to follow one of these methods.


After completing any installation method, iPadOS will guide you through a short configuration flow. At this point, the eSIM is already installed, but it’s important to finish all on-screen steps so the line is correctly set for cellular data and preferences. 

1.  Install an eSIM for iPad using a carrier app

Most carrier apps (such as Holafly) allow you to install an eSIM directly from the app on iPads running iOS 17.5 or later. If your device meets this requirement, you can install the eSIM by following the steps below.
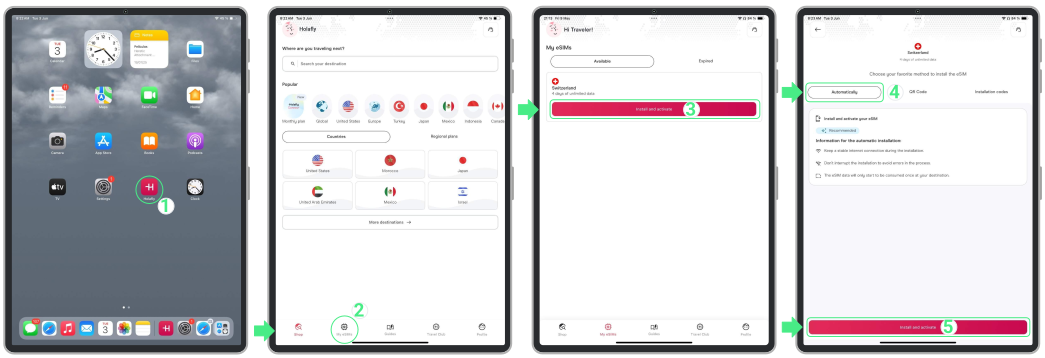
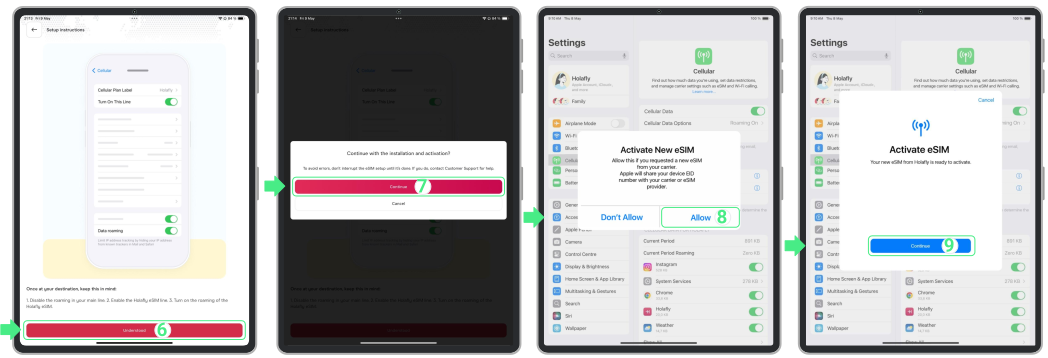
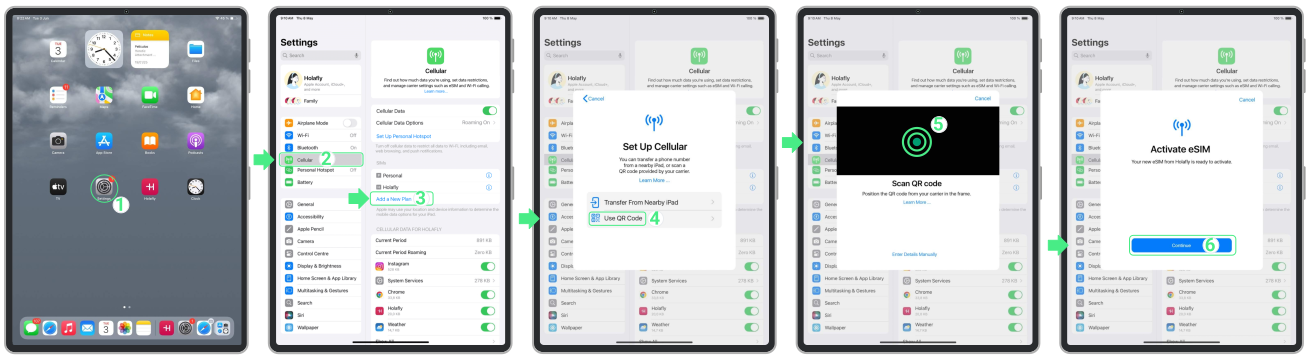
  • Open your carrier’s app on your iPad (for example, Holafly) → Sign in with the email associated with your purchase → Go to My eSIMs → Select the eSIM you want to install → Tap Install and Activate → Choose Automatically → Tap Install and Activate again.


  • Review the setup instructions and tap Understood → Tap Continue and Allow when prompted → Tap Continue when the Activate eSIM screen appears (this step continues the setup but does not activate the eSIM yet) → Follow the on-screen steps to complete the setup.

2. Install an eSIM on iPad by scanning a QR code

  • Go to Settings → Open Cellular or Mobile Data → Tap Add a New Plan → Select Use QR Code → Scan the QR code → Tap Continue when the Activate eSIM screen appears (this step only advances the setup; the eSIM won’t activate yet) → Continue following the on-screen setup.

Install an eSIM on iPad by scanning a QR code

3. Install an eSIM on iPad by entering details manually

  • Go to Settings → Open Cellular or Mobile Data → Tap Add a New Plan → Select Use QR Code

Install an eSIM on iPad by entering details manually
  • Then select Enter Details Manually → Copy and paste the SM-DP Address and Activation Code from your purchase confirmation email → Tap Next → Tap Continue when the Activate eSIM screen appears (this step only moves the setup forward; the eSIM won’t activate yet) → Continue with the setup.

Install an eSIM on iPad by entering details manually

To complete the eSIM setup on your iPad

  • Tap Done when the Cellular Setup Complete screen appears → Assign a name to your new line (for example, your provider name plus the destination) → Choose your default line for Messages and Calls → Select Personal to keep using your regular number for iMessage and FaceTime → Select the Travel eSIM as your line for Cellular Data.

To complete the eSIM setup on your iPad

How to activate an eSIM on iPad

To start using cellular data, the line must be turned on and selected for mobile data. For local plans, activation happens as soon as the line is enabled. For travel plans, the connection completes only after you arrive at your destination and turn Data Roaming ON. To activate it on your iPad:
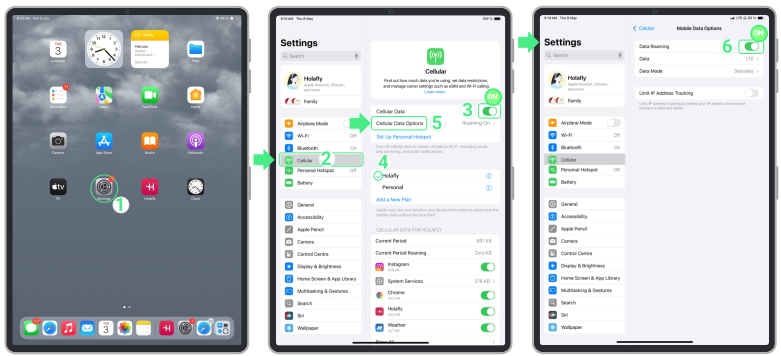

  • Go to Settings → Tap on Cellular or Mobile Data → Turn Cellular Data ON → Select the newly added line and make sure it is checked (blue checkmark) as the active line for Cellular Data → Tap Cellular Data Options → Turn Data Roaming ON (travel plans only).

How to activate an eSIM on iPad:
Go to Settings → Tap on Cellular or Mobile Data → Turn Cellular Data ON → Select the newly added line and make sure it is checked (blue checkmark) as the active line for Cellular Data → Tap Cellular Data Options → Turn Data Roaming ON (travel plans only).

Troubleshooting tips

If your iPad shows the line as Active, but iPad cellular data isn’t working, this usually isn’t related to the installation. In most cases, the device is still completing a brief connection process to the local network. Restarting the iPad after activation often resolves this. If the connection still doesn’t come through, manually selecting a network can help the device connect to the correct carrier.

Important: Never delete your eSIM to fix a connection error. Removing the profile can permanently invalidate the plan and, in some cases, prevent reinstallation.
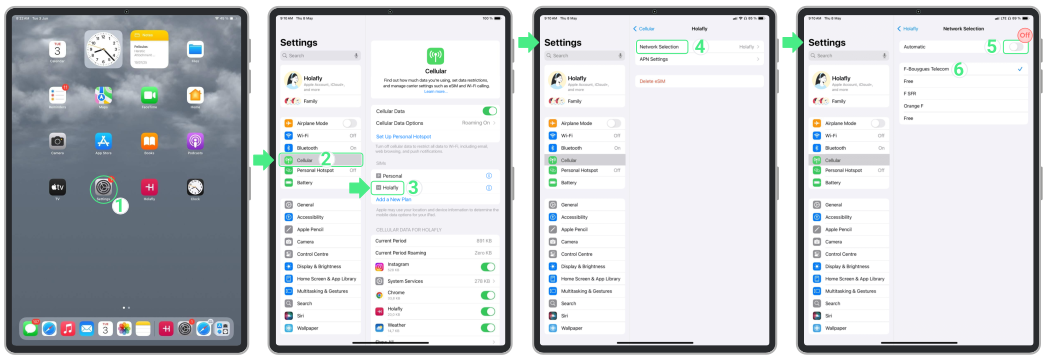

How to manually select a network on an iPad

  • Go to Settings → Open Cellular → Select the eSIM you just activated → Tap Network Selection → Turn Automatic network selection OFF and wait for available carriers to load → Test the carriers listed on your screen one by one → Choose the one with the strongest signal → Try browsing again.

How to manually select a network on an iPad

삼성 휴대폰에서 eSIM을 설치하고 활성화하는 방법

삼성 폰에서 eSIM을 설치하고 활성화하는 방법

삼성 폰에서 eSIM을 설치하고 활성화하려면 먼저 기기에 eSIM을 추가한 다음 사용할 준비가 되었을 때 회선을 켜야 합니다. 이 가이드를 따라 5분 이내에 삼성 폰에서 eSIM을 활성화하는 방법을 알아보세요.

시작하기 전: Samsung 사전 설치 체크리스트

삼성 휴대폰에 eSIM을 설치하기 전에:


  • 귀하의 삼성 휴대폰임을 확인하세요 eSIM 지원 그리고 입니다 잠금 해제됨 다른 통신사의 eSIM을 사용하려면.
  • 시작하기 전에 안정적인 Wi-Fi 연결에 접속하세요
  • 사용하시는 삼성 모델에 따라 일부 메뉴 이름이 약간 다르게 표시될 수 있지만, 진행 절차는 동일합니다.

참고: eSIM을 설치하는 것만으로는 요금제가 활성화되지 않습니다 혹은 모바일 데이터를 사용하세요. 단, 귀하의 지역별(유럽, 남미, 아시아 등) 또는 글로벌 eSIM에 현재 위치한 국가가 포함된 경우 현지 네트워크에 연결하는 즉시 해당 eSIM 플랜 사용이 시작될 수 있습니다. 필요한 시기보다 미리 플랜 사용 일수를 소모하지 않으려면 여행 하루 전에 설치하시는 것을 권장합니다.

삼성 폰에 eSIM을 설치하는 방법 (간편한 3가지 방법)

삼성 폰에 eSIM을 설치하는 방법은 총 세 가지입니다. 본인에게 가장 적합한 옵션을 선택하신 후 아래 단계를 따라 진행해 주세요.

1. 앱을 사용하여 eSIM을 설치하세요:

빠른 설정을 위한 가장 간편한 옵션입니다. 귀하는 다음과 같이 하실 수 있습니다 여기서 Holafly 앱을 다운로드하거나 열어주세요 다음 단계를 따르세요:


  • 이동하기해당 앱 휴대폰에서 → 구매 내역과 연결된 이메일로 로그인하세요 → 이동하기 구매 내역 → 탭 설치 추가하려는 eSIM에서 → 읽어 보세요 설치 팁 그리고 탭하세요 알겠습니다 계속하려면  → 선택하세요 자동 설치 → 탭 eSIM 설치  → 추가 → 기기가 eSIM 정보를 확인하는 동안 몇 분만 기다려 주세요. → 그 후 eSIM이 추가되었습니다, 화면에 표시되는 안내에 따라 설정을 완료하세요.

Install your eSIM using the Holafly App:

2. QR 코드를 사용하여 eSIM을 설치하세요

삼성 폰에서 eSIM을 추가하는 간편한 방법은 QR 코드를 사용하는 것입니다. QR 코드를 사진이나 스크린샷으로 저장해 두었다면 다른 기기에서 스캔할 필요 없이 갤러리에서 직접 업로드할 수 있습니다. 다음 단계를 따르세요:


  • 이동하기 설정 → 탭하세요 연결 → 선택 SIM 관리자 → 그런 다음 eSIM 추가하기 → 탭하세요 QR 코드를 스캔하세요 버튼 → 그런 다음 QR 코드를 스캔하거나 탭하세요 갤러리 아이콘 사진에서 QR 코드 이미지를 업로드하려면 오른쪽 하단 모서리를 사용하세요 → 마지막으로, 추가 eSIM → 모바일 요금제가 자동으로 다운로드됩니다.

Install an eSIM  using a QR Code

YouTube video


3. 수동 eSIM 설치

앱이나 QR 코드를 사용할 수 없을 때 유용한 백업 옵션입니다. 수신하신 eSIM 세부 정보를 휴대폰 설정에 직접 입력해 설정을 완료할 수 있습니다. 다음 단계를 따르세요:


  • 이동하기 설정 → 탭하세요 연결 → 선택 SIM 관리자 → 선택 eSIM 추가 → 탭하세요 QR 코드를 스캔하세요 → 선택 활성화 코드 입력 → 전체 활성화 코드(LPA와 콜론 ':'를 포함)를 입력하거나 붙여넣으세요 → 탭하세요 완료 → 마지막으로 탭하세요 추가 → eSIM이 다운로드되면 남은 단계를 계속 진행하여 설정을 완료하세요.

잊지 마세요 이것들은 직접 클릭 가능한 링크가 아니므로 수동으로 입력(복사 및 붙여넣기)해야 하는 텍스트 코드입니다.


Manual eSIM Installation on Samsung

YouTube video


eSIM 설정을 완료하세요

삼성 기기에 eSIM을 추가하면 기기에서 회선 사용 방식을 구성할 수 있도록 간단한 설정 과정을 안내해 드립니다. 이 단계에서 SIM/eSIM 카드에 이름을 할당하고 필요 시 통화, 메시지, 모바일 데이터에 사용할 회선을 선택할 수 있습니다.


  • 그 ~일 때 새 eSIM을 추가하시겠습니까? 화면이 나타나면 탭하세요 추가 → 편집하세요 SIM 이름 및 아이콘 (나중에 쉽게 알아볼 수 있는 제공자, 목적지 등과 같은 설명적인 이름을 사용하세요) → 탭 완료됨 → 새로운 SIM 이름을 확인한 다음 탭하세요 다음 → 주 회선을 기본 SIM으로 선택하세요 전화 통화 → 탭 다음 → 메시지를 전송할 주요 라인을 선택하고 해당 라인을 기본값으로 유지하세요 → 탭 다음 → 세트 새롭게 명명된 eSIM 를 위한 선호 SIM으로 모바일 데이터 → 탭 완료됨 설정을 완료하려면.

Complete the eSIM Setup on Samsung: After adding the eSIM to your Samsung, your device will guide you through a short setup process to configure how you want to use your lines. During these steps, you can assign names to your SIM/eSIM cards and choose which line to use for calls, messages, and mobile data when needed.
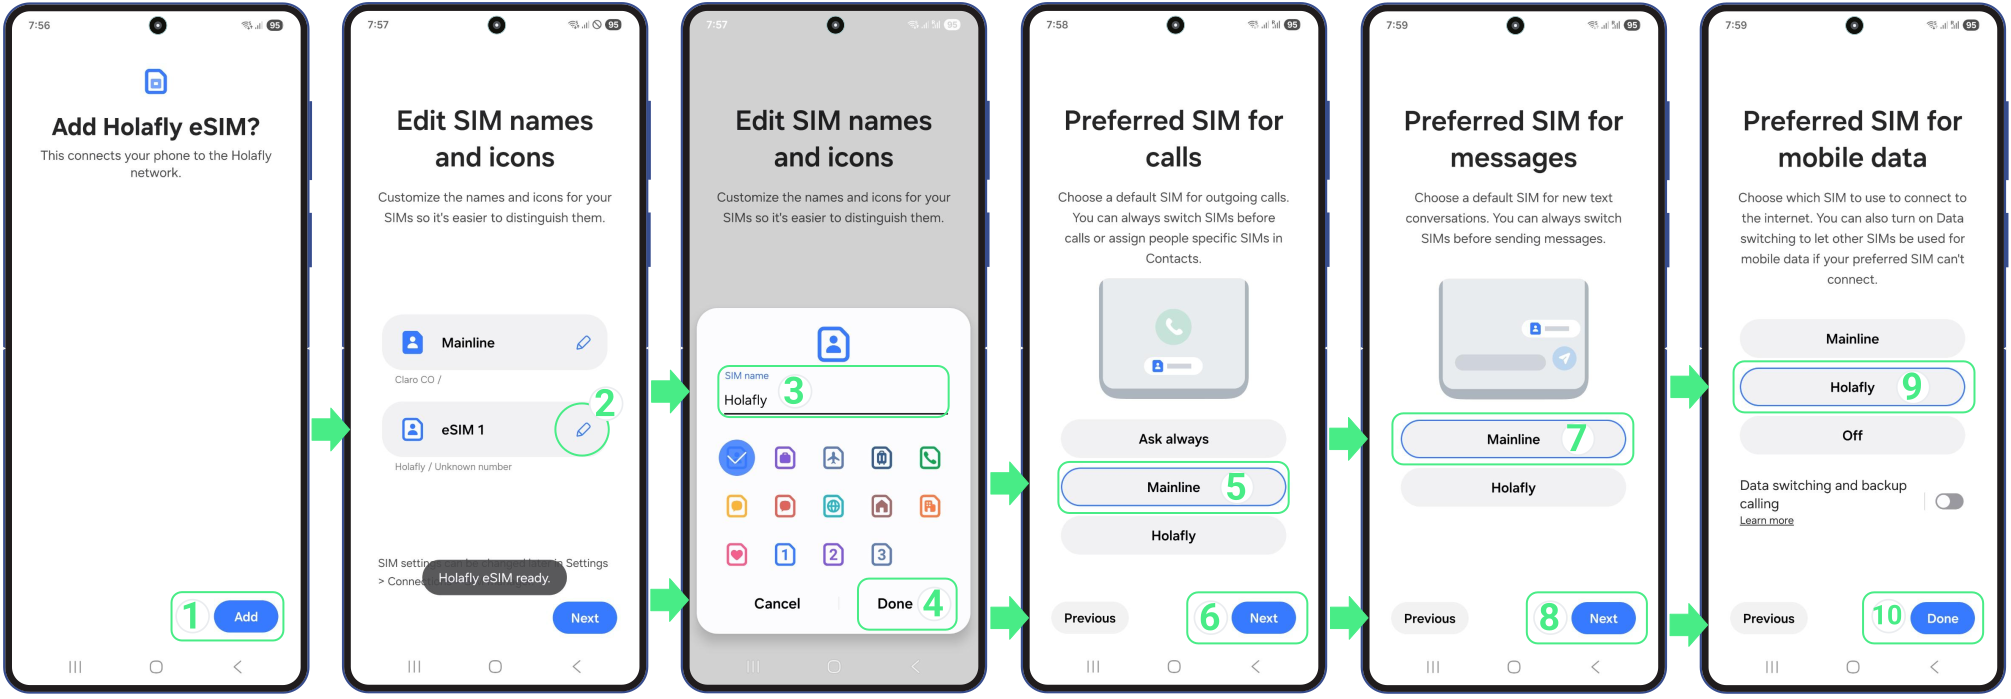
When the Add new eSIM? screen appears, tap Add → Edit the SIM name and icon (use a descriptive name you’ll easily recognize later, such as provider or destination) → Tap Done → Confirm the new SIM name and tap Next → Choose your main line as the preferred SIM for calls → Tap Next → Select your main line to send messages and keep it as default → Tap Next → Set the newly named eSIM as the preferred SIM for Mobile data → Tap Done to finish the setup.

삼성 폰에서 eSIM을 활성화하는 방법

삼성 기기에서 eSIM을 활성화하는 것은 통신 회선을 정상 사용하기 위한 마지막 단계입니다. 설정에서 eSIM 프로필을 활성화하고 모바일 데이터용으로 선택하기만 하면 됩니다. 여행용 eSIM을 사용 중이신 경우, 이 작업은 목적지에 도착한 후에만 진행해야 합니다. 기기가 올바르게 연결되고 요금제가 정확한 시점에 시작되도록 하기 위함입니다.


  • 바로가기 설정 → 탭하세요 연결 → 그 다음에 SIM 매니저 → 당신의 기기를 끄세요 개인용 SIM 자국 통신사로부터 요금이 청구되는 것을 피하려면 → 당신의 새로운 eSIM 켜짐 → 이것을 선택하세요 eSIM 모바일 데이터 아래에서 (사용자가 지정한 이름으로 표시되거나 가장 최근에 추가된 eSIM으로 나타납니다) → 로 돌아가기 연결 부품 → 탭 모바일 네트워크 → 켜기 데이터 로밍 여행용 eSIM을 시작하려면 모바일 데이터 사용 중.

How to Activate an eSIM on Samsung Phone:
Activating your eSIM on Samsung is the final step to get your line up and running. You only need to enable the eSIM profile and select it for mobile data in your settings. If you are using a travel eSIM, this should only be done once you arrive at your destination to ensure your device connects correctly and your plan starts at the right time.
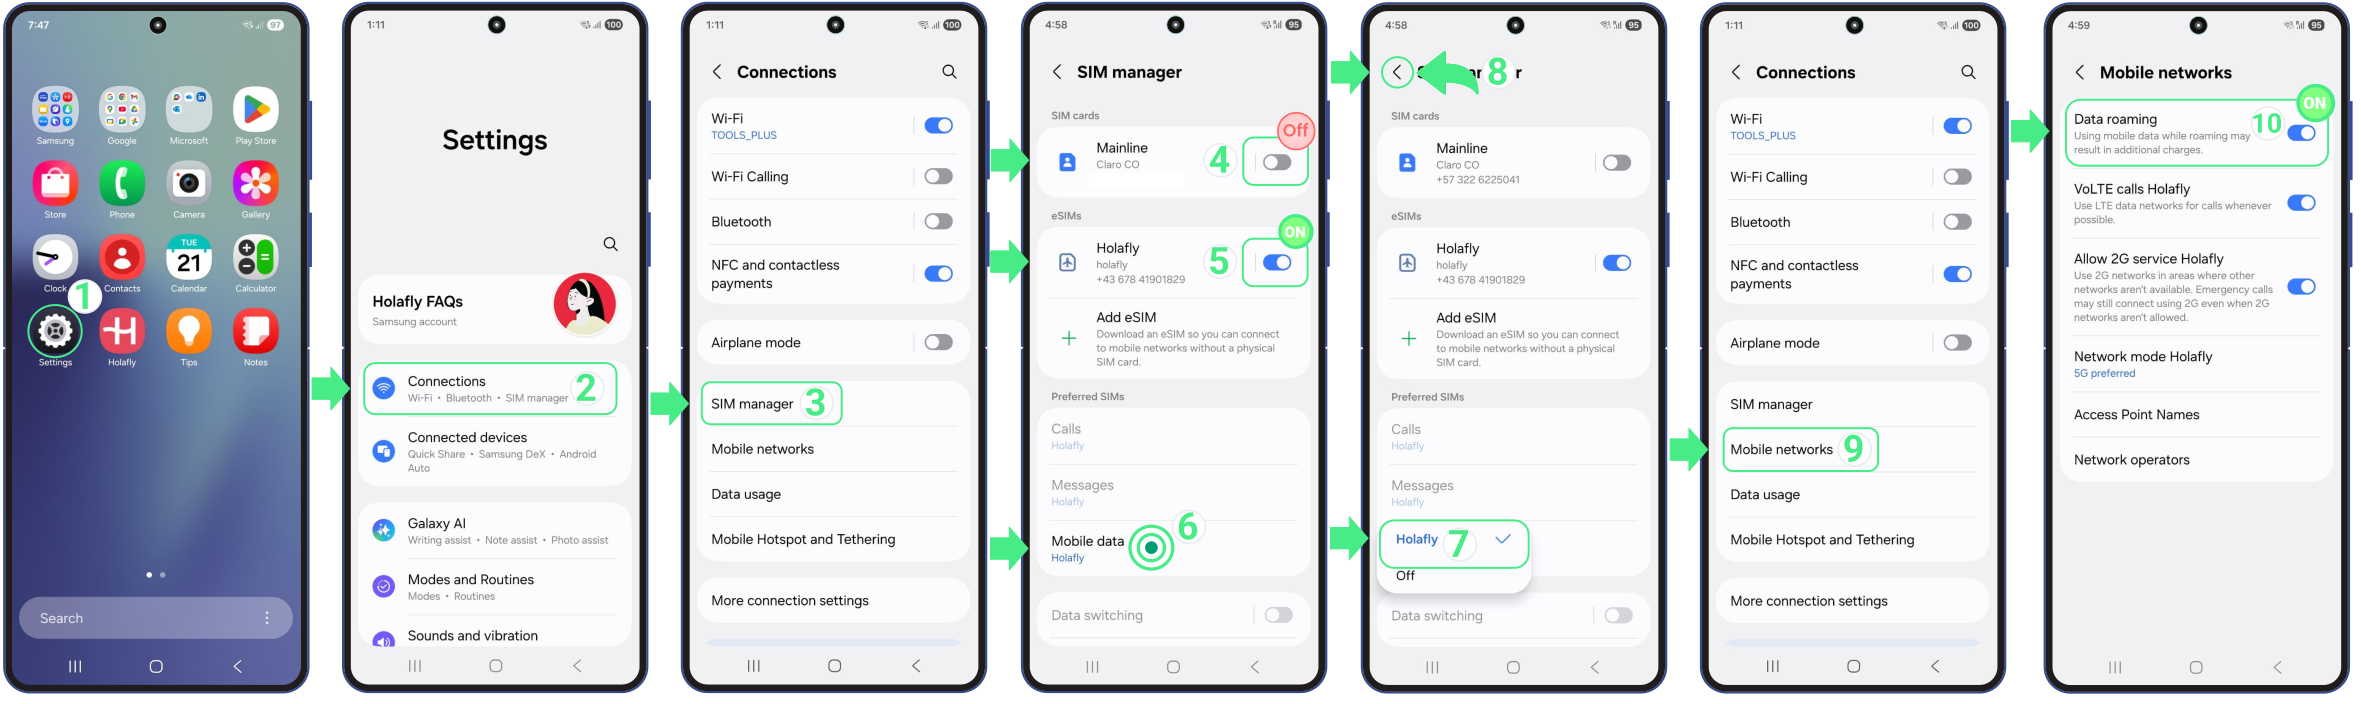
문제 해결 팁

설치 중

삼성 화면에 다음과 같은 내용이 표시되는 경우 "eSIM을 추가할 수 없습니다," 걱정하지 마세요! 보통 이런 경우 첫 시도에서 설치가 성공적으로 완료된 것입니다. 다시 시도하기 전에 이미 해당 항목이 존재하는지 확인해 주세요:


  • 휴대폰에서: 이동하기 설정 → 연결 → SIM 관리자. 새 회선은 eSIM 목록에 표시되며, 보통 eSIM 1, eSIM 2 혹은 사용자가 지정한 임의의 사용자 정의 이름으로 명명되어 있을 것입니다.

  • 앱 내에서: 귀하의 사항을 확인하세요 eSIM 상태. 만약 “라고 적혀 있다면eSIM이 설치되었습니다 – 사용 준비 완료”, 이제 모두 준비 완료입니다!

모바일 데이터를 사용하는 경우

eSIM 데이터 요금제가 활성화되면 Samsung 기기는 자동으로 인터넷에 연결됩니다. 다만 데이터가 바로 작동하지 않을 경우에는 (여행자만 해당) 데이터 로밍이 활성화되어 있는지 확인하시고 기기가 연결을 완료할 수 있도록 몇 분 정도 기다려 주세요. 여전히 문제가 발생한다면 간단히 다음으로 이동하세요 모바일 네트워크 → 네트워크 사업자 to 배송업체를 직접 선택하세요.


⚠️ 중요: eSIM을 절대 삭제하지 마세요 연결 오류를 수정하려면.

iPhone XR 이심: 설치 및 활성화 방법

iPhone XR eSIM: how to install and activate it

The iPhone XR supports eSIM technology, as it was among the first Apple devices to introduce digital SIM capabilities alongside the iPhone XS and XS Max. This feature allows you to use a digital cellular plan without needing a physical nano-SIM and can be set up in 5 minutes directly from your device settings.


The eSIM can be installed by scanning the QR code, directly through your eSIM app, or by entering the activation details manually. Once installed, it is activated by selecting the line for mobile data. Below are the steps to get started with an eSIM on your iPhone XR.

What you need to use eSIM on an iPhone XR

Before installing an eSIM on an iPhone XR, it’s helpful to confirm the basics to ensure the setup goes smoothly.


  • A compatible model. Most iPhone XR devices include eSIM, except for those manufactured for China, Hong Kong, or Macao.
  • Your iPhone must be unlocked. If your phone is tied to your current company, it won’t let you add any other SIM or eSIM.
  • Stable Wi-Fi and enough battery. Make sure you have a good internet connection and keep your phone plugged in during the eSIM setup.
  • For Global or Regional plans (Europe, South America, Asia, etc.), install your eSIM at most 1 day before your trip. For single-country plans, you can install it days or weeks ahead, as it only activates at your destination.

How to install an eSIM on iPhone XR

There are several ways to install an eSIM on iPhone XR. If your eSIM includes app installation (iOS 17.4 or later), that’s usually the quickest option. You can also install it using universal methods such as via a QR code or manual activation details.


Follow the instructions below for the method that works best for you.


Note: For travel eSIMs, we recommend completing the installation before your trip and activating it once you arrive at your destination.

eSIM Installation via the app

Perfect for a quicker setup on iOS 17.4 or later. You can add your eSIM directly from the Holafly app in just a few taps:


  • Open the app → Sign in with the email used for your purchase → Go to Purchases → Select the eSIM you want to install → Tap Install → Choose Install Automatically → Tap Install eSIM → Select Activate to begin the setup → When the Activate eSIM screen appears, tap Continue to move to the next step.

eSIM Installation via the app

Install an eSIM on iPhone XR using a QR code

This is another easy way to install an eSIM on iPhone XR. To scan it, open it on another device before you begin, then follow the steps below:
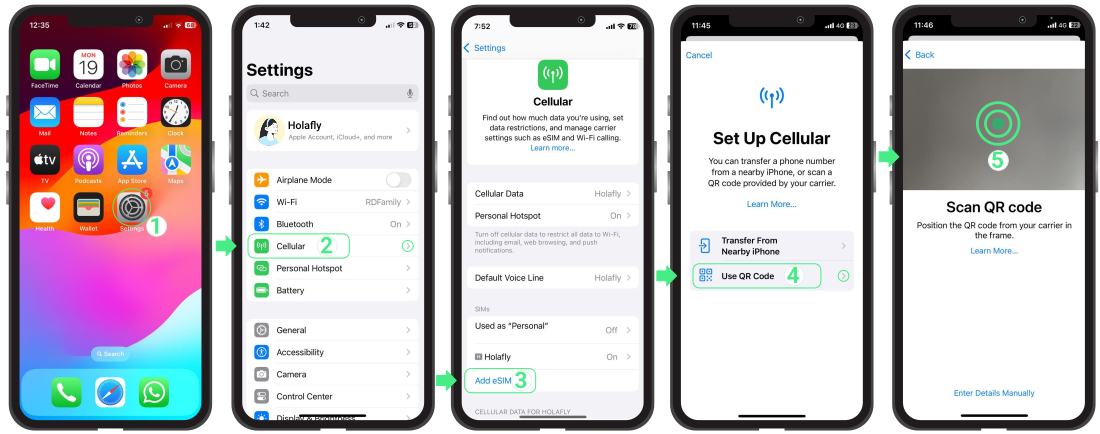

  • Go to Settings → Cellular or Mobile Data → Add eSIM → Use QR Code → Scan the QR code → Tap Continue when the “Activate eSIM” screen appears (this step moves the setup forward but does not activate the eSIM yet) → Continue with the on-screen setup until it finishes.

Install an eSIM on iPhone XR using a QR code

Manual eSIM installation for iPhone XR

A perfect alternative if you can’t scan the QR code right now. Just use the activation text details received with your purchase and follow these steps:


Note: Please keep in mind that these are manual text codes, not clickable links.
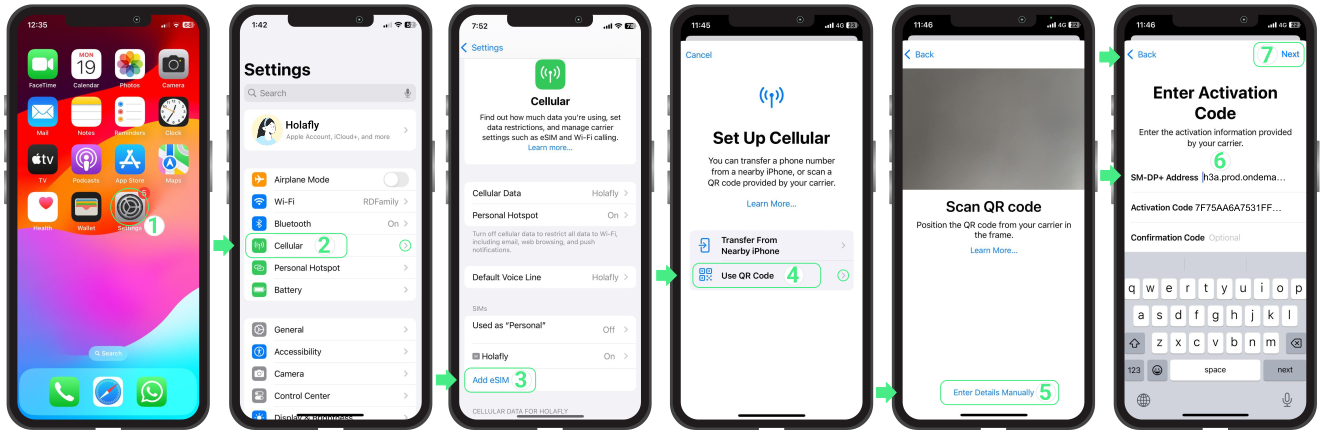

  • Go to Settings → Cellular or Mobile Data → Add eSIM → Use QR Code → Tap Enter Details Manually → Copy and paste the complete SM-DP+ address and activation code into the designated fields  → Tap Next → Tap Continue when the “Activate eSIM” screen appears → Complete the setup on screen.

Install an eSIM on iPhone XR by entering the details manually

Complete the eSIM setup on iPhone XR

Once the installation is complete, iPhone XR will guide you through a few final setup steps. If you already have another line on your device, you’ll be asked to label each one so you can easily tell them apart. If the new eSIM is for cellular data only, make sure to select it for Cellular Data while keeping your personal line for calls and messages.


Note: These configuration steps apply to iPhone XR, XS and models running iOS 18 or earlier.
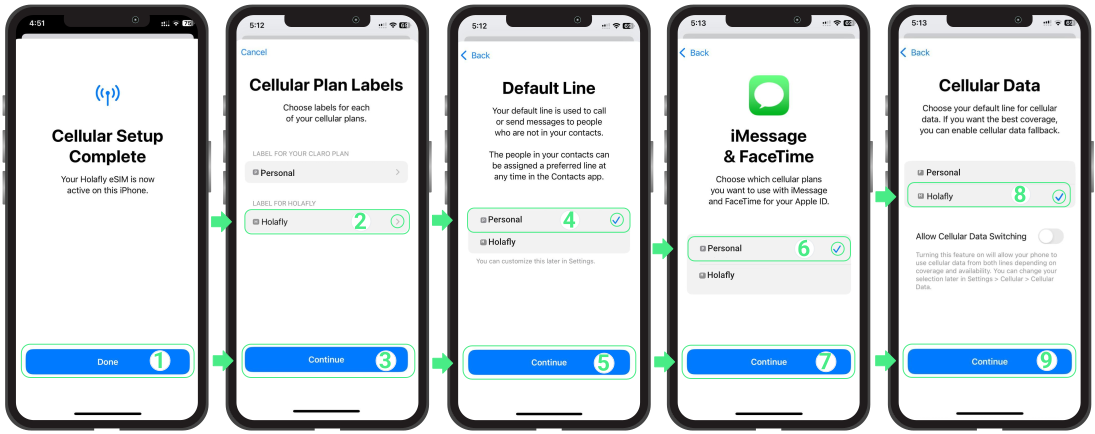

  • When the Cellular Setup Complete screen appears, tap Done → Assign a name to your new eSIM line and tap Continue → Choose your Default Line for calls and messages, Select Continue → Select Primary to keep using your main number for iMessage and FaceTime, tap Continue  → Set the new eSIM as your Cellular Data line.

Complete the eSIM setup on iPhone XR


How to activate an eSIM on iPhone XR

Once the eSIM is installed and configured, the final step is activation. Activating an eSIM on iPhone XR only requires turning the line on and selecting it for mobile data from your device settings.


For local plans, the eSIM activates immediately after you turn it on.
For travel eSIMs, activation is completed by enabling Data Roaming once you arrive at your destination.
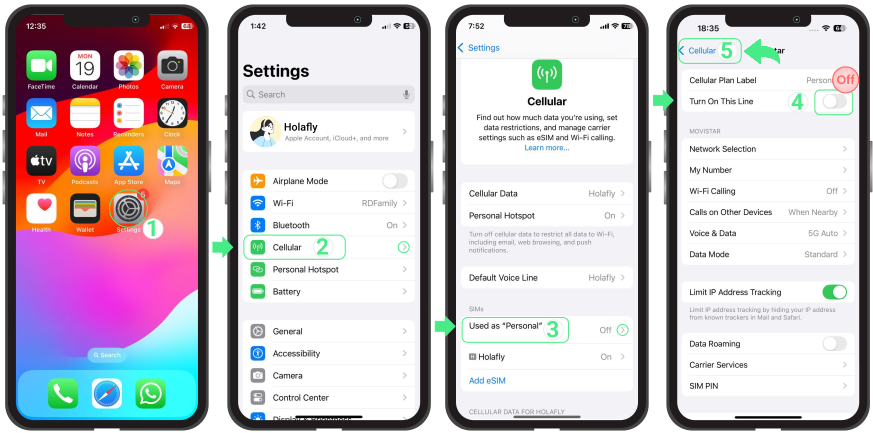
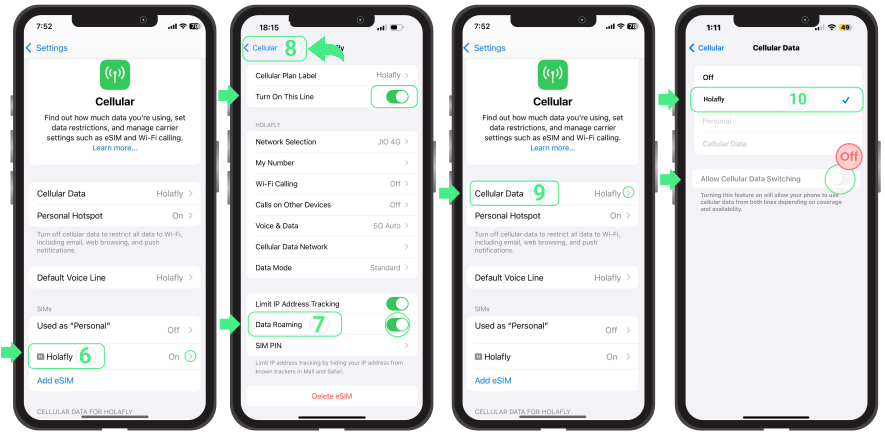
  • Go to Settings → Cellular or Mobile Data → Turn off your physical SIM or other lines to avoid conflicts with your home carrier →  Go back to Cellular.

  • Select your New installed eSIM → Make sure Turn On This Line is enabled → Turn on Data Roaming (only required for travel eSIMs) → Go back to Cellular menu → Tap Cellular Data and select the new eSIM as your data line → Confirm that Allow Cellular Data Switching is turned off.

How to activate an eSIM on iPhone XR

Troubleshooting tips

During Installation

If your iPhone XR shows a message during installation, don’t worry. In many cases, the eSIM has already been added successfully. Before starting over, check whether it’s already installed:


  • On your iPhone: Go to Settings → Cellular or Mobile Service. Your new eSIM should appear in the list of available lines, usually with the name assigned during setup.

  • In the App: Check your eSIM status. If it says “eSIM Installed – Ready to use,” you’re ready to continue with activation.

Using your mobile data

Once your eSIM is fully activated following the steps above, your iPhone XR should automatically connect to the network within a few minutes.


If you don’t see any signal after a short wait, you can resolve this by going to your cellular settings and selecting a network operator manually.


⚠️ Important: Don’t remove your eSIM. Once deleted, it can’t be installed again, and you won’t be able to use that data plan.

아이폰에서 eSIM을 설치하고 활성화하는 방법은 무엇인가요?

How to install and activate eSIM on iPhone?

To install an eSIM on iPhone, you can use the app linked to your eSIM, or choose one of the two universal methods, scanning a QR code or entering the details manually. This process only prepares the plan on your device, helping you safely save it on your phone ahead of time. Then, to activate it, you just turn it on like a switch and select it for mobile data when you are ready to use it. Follow our step-by-step guide below to learn how to activate eSIM on iphone.

What you need before you start


Note: Installing your eSIM does not activate your plan or use your mobile data. However, if your regional or global eSIM includes the country you are currently in, your plan may start counting once it connects to a local network. We recommend installing it only one day before your trip to avoid using your plan days before you need them.

How to install an eSIM on iPhone

First, add the eSIM to your iPhone settings to prepare for activation. Below, you’ll find different ways to install an eSIM on iPhone. For the easiest setup experience, we recommend using the Holafly app. You can download or open the app here.

1. Installation via the app

Ideal for a one-tap setup on iOS 17.4 or later. To install your eSIM through the app, follow these steps: 


  • Open theApp → Log in using the email associated with your purchase → Go to Purchases → Tap Install on the eSIM you want to add → Choose Install Automatically → Tap Install eSIM → Tap Activate to start the installation → Then, tap Continue when the Activate eSIM screen appears (this step only continues the setup; the eSIM will not activate yet).

eSIM Installation via the app

 2. Add an eSIM to iPhone using a QR code

You can install your eSIM using the QR code sent to your email in two ways. If you’re using iOS 17.4 or later, you can install it directly from the Mail app by pressing and holding the QR code. You can also use the standard method by scanning the QR code through your iPhone settings. You’ll find both options below.
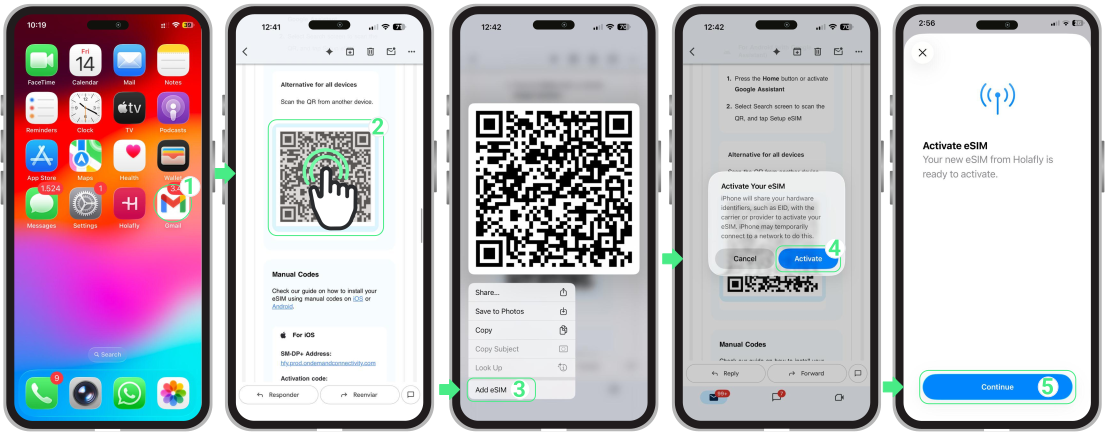
Install by long-pressing the QR code

  • Open the email with your eSIM installation details → Press and hold the QR code image → Tap Add eSIM → Tap Activate when the Activate Your eSIM message appears → Tap Continue (this step only continues the setup; the eSIM will not be activated yet).

Install by scanning the QR code

Important: To avoid errors, scan the code only via Settings → Cellular, not your phone’s camera app:
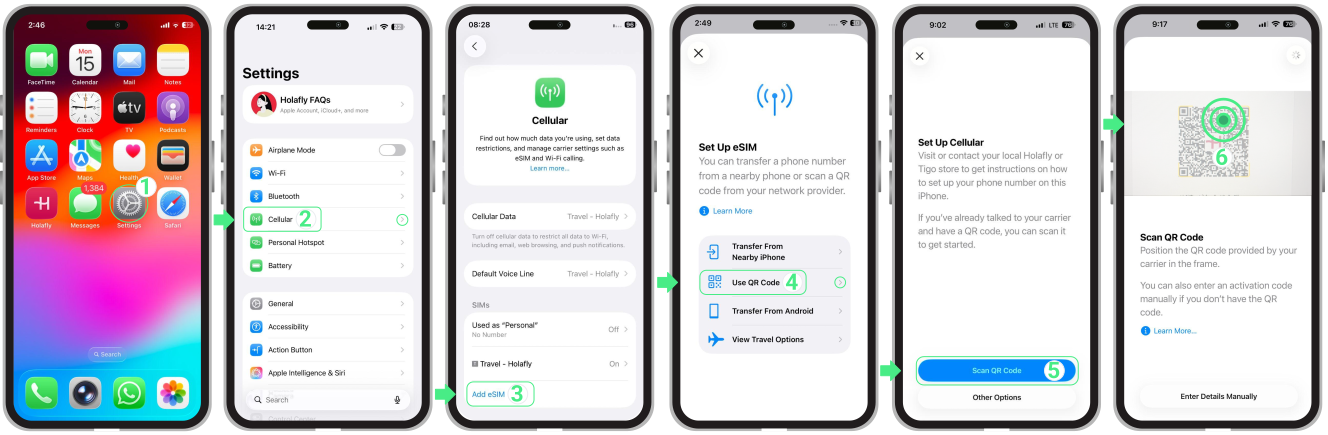

  • Go to Settings → Tap Cellular or Mobile Service → Select Add eSIM → Tap Scan QR code → Point your camera at the QR code to begin installation→ Tap Continue when the Activate eSIM screen appears (this moves the setup forward but doesn’t activate the eSIM yet) → Continue with the setup.

Add an eSIM to iPhone using a QR code

3. Manual Installation

This option is helpful if you can’t scan the QR code or if your camera isn’t working. Instead, you can manually enter the installation details sent to your email.


Please note that these are manual text codes instead of clickable links.
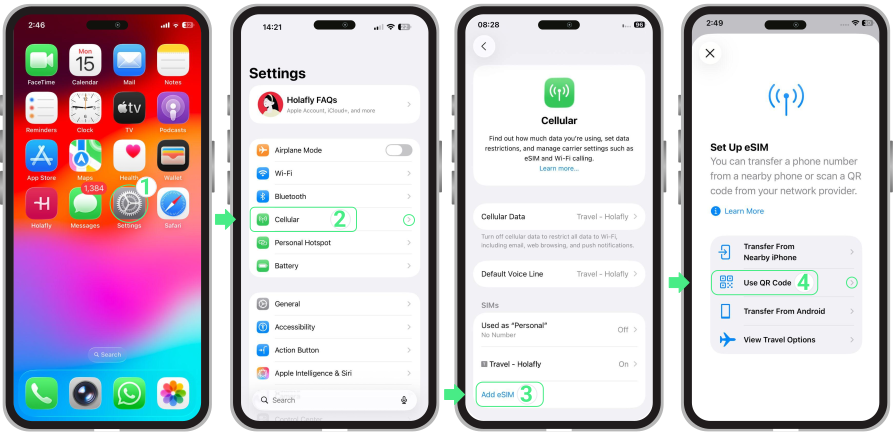

  • Go to Settings → Tap Cellular or Mobile Service → Select Add eSIM → Tap Scan QR code.

How to install an eSIM on iPhone: Manual Installation
  • Tap Enter Details Manually → Copy and paste the SM-DP+ address and Activation Code (these are codes, not links) → Next → Tap Continue → Follow the on-screen steps to complete the setup.

How to install an eSIM on iPhone: Manual Installation

Complete your iPhone eSIM setup

After installing your eSIM, follow the steps below to complete the setup on your iPhone and get it ready for your trip. The setup screens may look slightly different depending on your iOS version, so we’ve included instructions for both iOS 26 and iOS 18 below.


Note: iPhone XS, XS Max, and XR models don’t receive the latest iOS updates and will follow the classic manual labeling process instead (iOS 18).
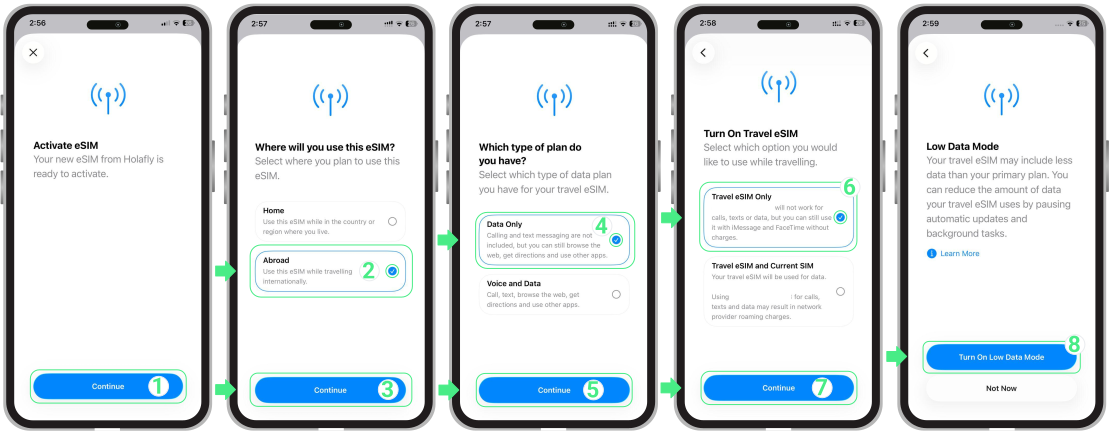
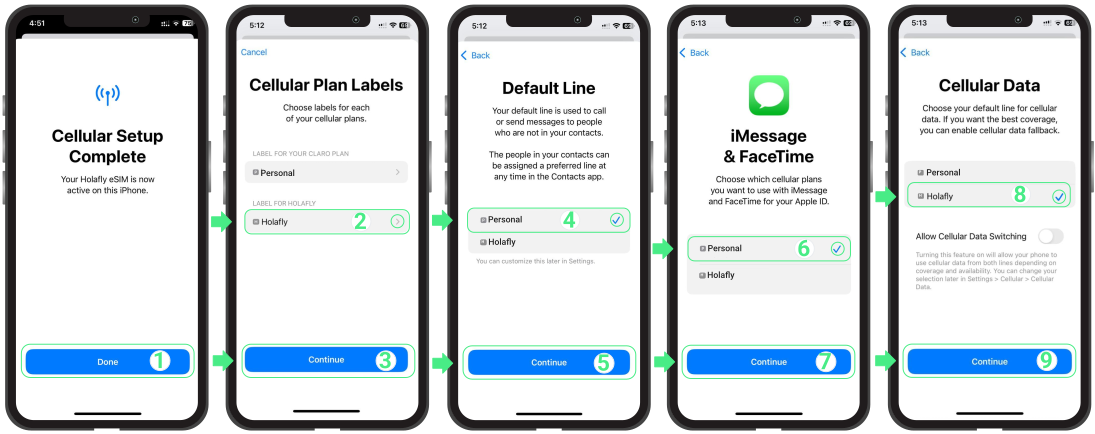
For iPhone with iOS 26:

  • On the Activate eSIM screen, tap Continue → On the screen Where will you use this eSIM?, select Abroad to indicate the eSIM will be used internationally and avoid early activation → Tap Continue → On the screen Which type of plan do you have?, choose Data Only to use mobile data without calls or SMS → Tap Continue → On the screen Turn On Travel eSIM, select Travel eSIM Only to use the eSIM during your trip → Tap Continue → To finish the setup, tap Turn On Low Data Mode.

Configure your eSIM on iPhone (iOS 26)

For iPhone with iOS 18:

  • When the Cellular Setup Complete screen appears, tap Done → Assign a name to your new eSIM line and tap Continue → Choose your Default Line for calls and messages → Select Continue → Select Personal to keep using your main number for iMessage and FaceTime, tap Continue → Set the new eSIM as your Cellular Data line.

How to activate an eSIM on iPhone

Once installed, activate your eSIM by turning the line on and selecting it for mobile data (no internet required). If you’re using a travel eSIM, complete these steps only after you arrive at your destination. Then, enable Data Roaming and turn off your personal SIM to avoid extra charges.
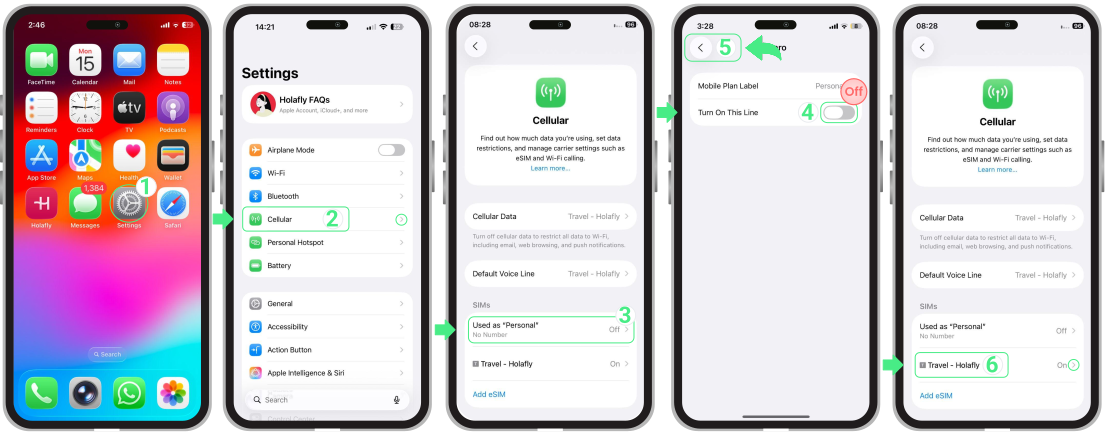
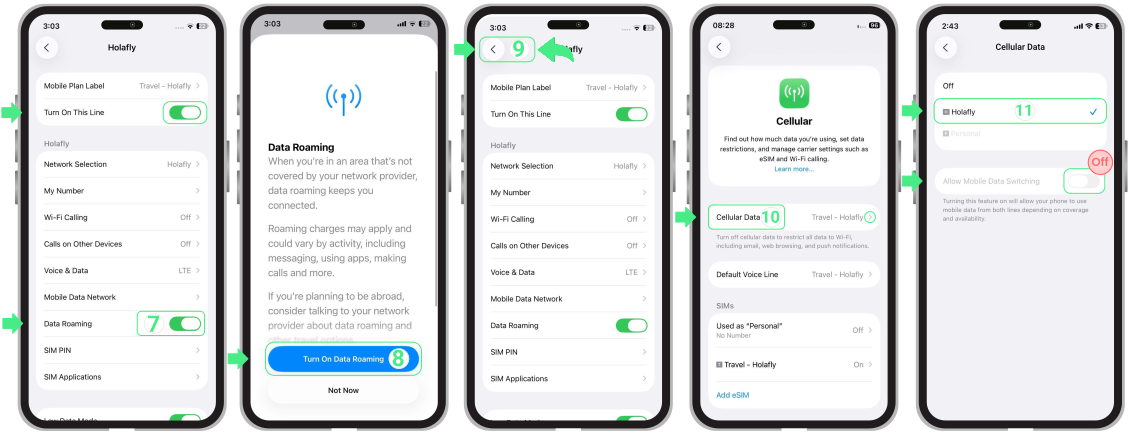
  • Go to Settings → Cellular or Mobile Service → Turn off your personal SIMs or other eSIMs by switching off Turn On This Line → Go back to Cellular or Mobile Service → Select the eSIM you want to activate (your new Travel eSIM, which may appear with a custom name).

How to activate an eSIM on iPhone
  • Make sure the Turn On This Line button is enabled → Turn on Data Roaming → If prompted, tap Turn On Data Roaming to confirm → Return to Cellular or Mobile Service → Tap Cellular Data or Mobile Data and select the Travel eSIM as your data line → Check that Allow Mobile Data Switching is turned off to prevent the iPhone from switching between lines automatically.

How to activate an eSIM on iPhone

Troubleshooting tips

During Installation

If your screen says “eSIM cannot be added” or “This code is no longer valid,” please don’t worry! This almost always means the eSIM was actually installed successfully on the first try, and your phone is just throwing a false alarm.


Before trying anything else, let’s check if it’s already there:


  • On your iPhone: Go to Settings → Cellular. Look at the bottom of your SIM list, your new line will be there, usually named Travel, Secondary, Business, or Holafly.
  • In the App: Check your eSIM status. If it says “eSIM Installed – Ready to use,” you are all set!

Using your mobile data

If you’ve followed the activation steps but still have no internet, open your eSIM settings and manually select a network.


⚠️ Important: Don’t delete your eSIM to fix connection issues.

eSIM 사용법

eSIM과 물리적 SIM을 동시에 사용할 수 있나요?

여행자라면 eSIM과 물리적 SIM을 동시에 사용할 수 있는지 궁금하실 수 있습니다. 답은 네! 둘 다 ~에서 사용할 수 있습니다 eSIM 호환, 잠금 해제됨 다음과 함께 제공되는 기기 듀얼 SIM 지원됩니다. 두 카드 모두 통화를 걸 수 있지만 한 번에 한 개만 데이터를 사용할 수 있습니다. 이 가이드에서는 여행 중에 eSIM과 SIM을 간편하게 전환하는 방법을 안내해 드립니다.

eSIM과 SIM 간 전환 방법

eSIM과 SIM 카드 간 전환은 매우 간편하며 여행 중 모바일 사용 경험을 한층 더 개선해 줍니다. 다만 해외에서 개인 회선으로 문자 메시지를 보내거나 전화를 걸 경우 Holafly가 아닌 통신사에서 추가 요금을 청구할 수 있으니 유의하세요. 예상치 못한 비용이 발생하지 않도록 미리 통신사 측에 확인하시는 것을 꼭 잊지 마세요!


데이터용 Holafly eSIM과 통화용 물리 SIM을 효과적으로 설정하려면 아래 간단한 단계를 따르세요.
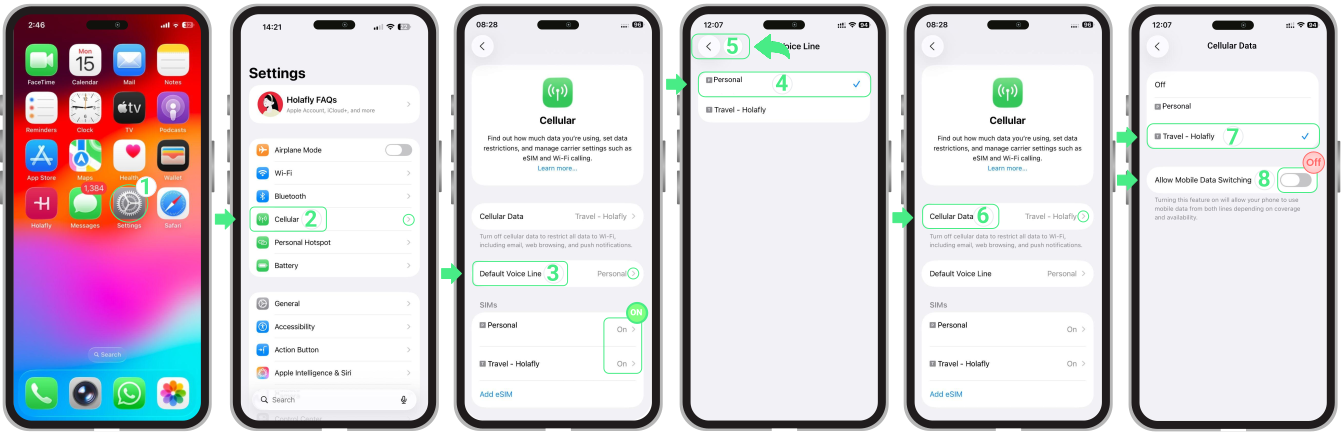
iOS 기기의 경우:

  • 이동하기 설정 → 셀룰러 or 모바일 데이터 → 개인 SIM과 eSIM이 모두 활성화되어 있는지 확인하세요 → 선택 기본 음성 대사 → 개인 라인을 선택하세요 → 로 돌아가기 셀룰러 or 모바일 데이터 → 탭하세요 셀룰러 데이터를 선택한 다음 Holafly eSIM을 선택하세요 → 마지막으로, 반드시 “셀룰러 데이터 전환 허용” 꺼져 있으므로 신호 강도를 기준으로 휴대폰이 데이터 회선 간 자동으로 전환되지 않습니다.

How to Switch Between eSIM and SIM on iPhone

Android 기기의 경우:

  • 이동하기 설정 → 이동하기 연결 → 선택 SIM 관리자 → 개인 SIM과 eSIM이 모두 활성화되어 있는지 확인하세요 → 로 이동하세요 전화 그리고 개인 SIM이 선택되어 있는지 확인하세요 → 선택하세요 모바일 데이터 그리고 당신의 것을 선택하세요 Holafly eSIM → 마지막으로, 꼭 “데이터 전환” 꺼져 있으면 휴대폰이 신호 세기에 따라 데이터 회선 간 자동 전환되지 않습니다.

To Switch Between eSIM and SIM on Android:

데이터 스위치 끄기

eSIM과 물리적 SIM을 동시에 사용하려면 “데이터 스위칭” 또는 “셀룰러 데이터 전환기능이 꺼져 있습니다. 이 옵션은 신호 세기에 따라 SIM 카드 간 자동 전환이 이루어지지 않도록 방지합니다. 또한 해외에서 해당 회선으로 통화를 사용할 경우 추가 요금이 부과되는지 여부는 본인의 통신사에 문의하여 꼭 확인하시기 바랍니다.

기억해 둘 점:

  • Holafly는 SMS나 음성 통화를 지원하지 않지만 WhatsApp, Messenger와 같은 메시지 및 통화 앱 사용에 필요한 데이터를 제공합니다.
  • 일반 전화 통화나 문자 메시지를 사용하려면 기존 SIM을 설정하세요. 해외에서 이 기능을 이용할 경우 통신사에서 요금을 부과할 수 있습니다.
  • 물리적 SIM 카드가 데이터 사용으로 활성화되어 있는 경우 Holafly eSIM의 성능에 영향을 줄 수 있습니다.
  • 당신은 할 수 있습니다 두 개의 eSIM을 동시에 사용하세요 두 개의 활성 eSIM을 지원하는 iPhone 13 또는 이후 모델을 소지하신 경우에만 해당됩니다.

데이터 사용량과 잔액을 어떻게 확인하나요?

여행 중에는 사용 중인 모바일 데이터 사용량을 파악하기 어려운 경우가 많습니다. 데이터 사용량 확인 방법을 알면 휴대폰 설정에서 바로 예상 사용량을 볼 수 있으며, 데이터 잔액을 확인하면 통신사에서 제공하는 정확한 잔여 데이터나 서비스 이용 가능 일자를 확인할 수 있습니다.

실제로 휴대폰은 사용량 추정치를 보여주지만, 실제 잔여량은 통신사나 eSIM 제공업체만 정확히 확인할 수 있습니다. 이 가이드에서는 iPhone과 Android 기기 모두에서 확인하는 방법을 배워, 지금까지 사용한 데이터 양과 앞으로 사용 가능한 잔여 데이터를 언제나 정확히 파악하실 수 있습니다.


휴대폰에서 데이터 사용량을 확인하는 방법

데이터 사용량을 추적하기 전에 휴대폰의 데이터 통계를 수동으로 초기화해야 합니다. 휴대폰은 여행 시작 날짜나 청구 주기와 자동으로 동기화되지 않기 때문에 설정에 표시되는 사용량에는 종종 이전 몇 주 또는 몇 달 간의 데이터가 포함되어 있습니다. 


정확한 측정값을 얻으려면 착륙하자마자 또는 eSIM을 활성화하자마자 통계를 재설정하세요. iPhone에서는 다음에서 찾을 수 있습니다 통계 초기화 셀룰러 메뉴 하단에 있습니다. Android에서는 다음을 찾으세요 재설정 or 청구 주기 이내 데이터 사용량초기화하면 휴대폰은 해당 시점 이후부터 사용된 데이터만 표시됩니다. 이후 아래 단계를 따라 여행 중 사용량을 간편하게 추적하실 수 있습니다.

iPhone에서 데이터 사용량 확인하기

  • 이동하기 설정 → 탭 모바일 데이터 → 아래로 스크롤하여 셀룰러 데이터 → 활성화된 회선에서 현재 기간의 총 데이터 사용량을 확인하실 수 있습니다.

팁: 여행용 eSIM이 켜져 있고 셀룰러 데이터 회선으로 선택되어 있는지 확인하세요. 사용 통계가 섞이는 것을 방지하기 위해 기본 SIM을 꺼두는 것을 권장드립니다. 이렇게 하면 표시되는 사용량 데이터가 오직 여행 요금제만 정확히 반영하게 됩니다.
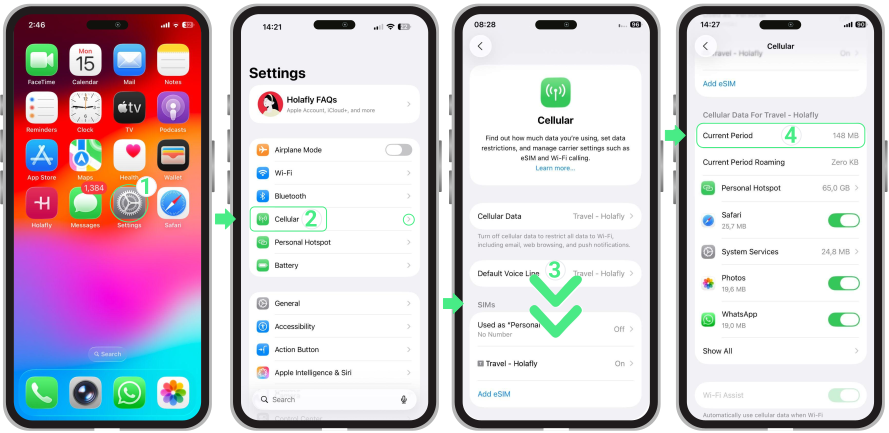
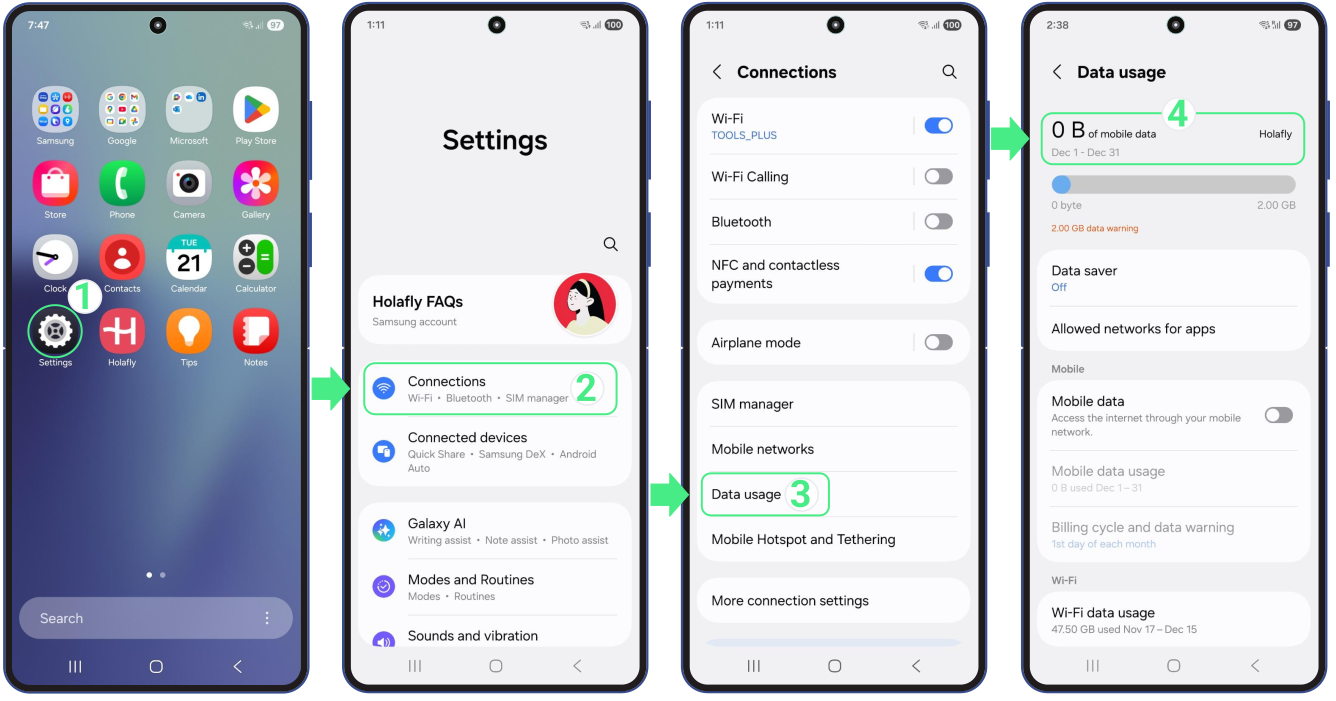
Android에서 데이터 사용량을 확인하는 방법

  • 로 이동하세요 설정 → 연결 → 선택 데이터 사용량 → 데이터 사용량 확인: 현재 기간의 총 데이터 사용량이 표시됩니다.

To check data usage on Android

통신사에서 데이터 잔액을 확인하는 방법

사용하신 데이터 잔량을 확인하시려면 통신사 앱이나 웹사이트가 가장 신뢰할 수 있는 방법입니다. 휴대폰 설정과 달리 해당 서비스는 기기에서 집계한 데이터 사용량 추정치가 아닌 공식 데이터 잔액을 정확히 표시합니다.

여기서 제한형 요금제는 사용 가능한 잔여 GB를 표시하며, 무제한 요금제의 경우 데이터 사용량 대신 남은 서비스 이용 일수를 보여줍니다. 휴대폰의 데이터 사용 예상치가 본인 요금제와 일치하지 않거나 기기 설정에 표시된 현재 기간을 넘어선 명확한 확인이 필요할 때 이 옵션을 사용하세요.

앱 또는 웹사이트에서 데이터 잔액을 확인하려면

제공업체의 앱이나 웹사이트를 통해 데이터 잔액을 확인하실 수 있습니다. roAmigo와 같은 제공업체의 경우 계정에 로그인한 뒤 아래에 안내된 동일한 단계를 따르시면 됩니다.

  • 귀하의 에 로그인하세요 배송사 고객 포털 브라우저 또는 모바일 앱을 통해 → 활성화된 플랜으로 이동하거나 해당 구매 내역 섹션 → 여기에서 eSIM 상태를 확인하실 수 있습니다 (설치 대기 중, 설치 완료 – 사용 준비 완료, 또는 설치 완료 – 사용 중으로 표시될 수 있습니다) → 확인하려는 eSIM을 선택하세요 (현재 사용 중인 eSIM) → 사용 세부 정보를 보려면 탭하세요. 

To check your data balance througt Holafly APP

핫스팟 데이터 사용량 확인 방법

만약 휴대폰을 다음과 같은 용도로 사용하신다면 핫스팟, 핫스팟 데이터 사용량을 확인하면 다른 기기와 공유된 데이터 양을 파악할 수 있습니다. 특히 여행 중 인터넷 데이터 사용량을 조절하고 싶을 때 매우 유용합니다.


iPhone에서:

  • 열기 설정 → 탭 모바일 서비스 → 아래로 스크롤한 후 탭하세요 개인용 핫스팟 다른 기기와 공유된 데이터를 확인하려면

참고: 현재 모바일 데이터 회선으로 설정된 SIM 또는 eSIM에서 사용한 핫스팟 데이터를 보여줍니다.
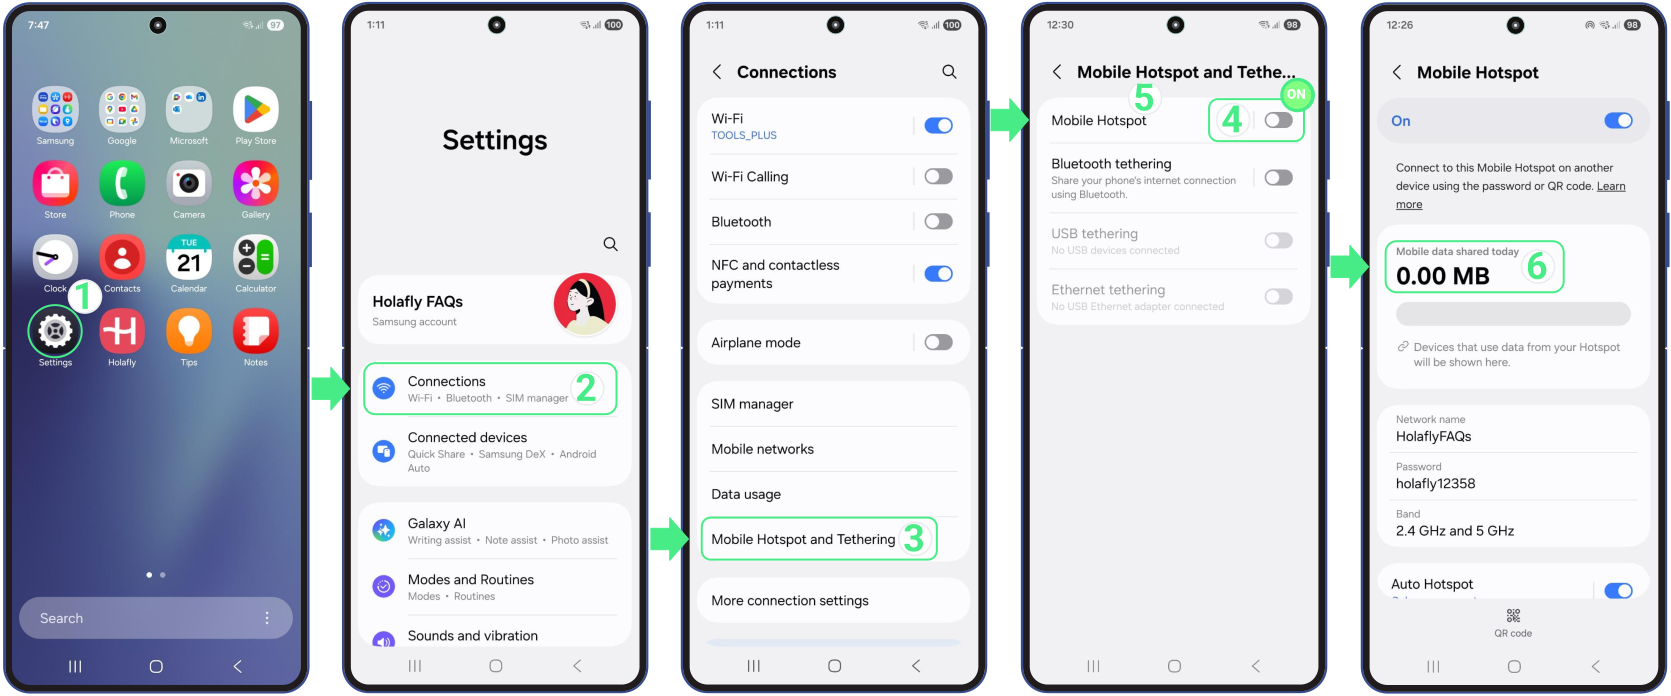
Android에서:

  • 로 이동하세요 설정 → 탭하세요 연결 → 선택 모바일 핫스팟 및 테더링 → 를 선택하세요 모바일 핫스팟 공유한 핫스팟 데이터 사용량을 확인할 수 있는 옵션

여행자를 위한 데이터 절약 팁

데이터 사용량이나 잔액을 확인하셨다면 다음 단계는 데이터를 더 오래 사용하는 것입니다. 이 간단한 습관들은 여행 중 데이터 사용량을 줄이고 예기치 않게 데이터가 모두 소진되는 상황을 피하는 데 큰 도움이 됩니다.

  • 휴대폰에 데이터 사용량 알림을 설정하여 데이터 사용량이 급증하기 전에 미리 확인하세요
  • 배경 끄기 자주 사용하지 않는 앱의 데이터 휴대폰의 데이터 사용량을 줄이기 위해.
  • 모바일 인터넷 데이터 사용량을 제한하려면 특히 업데이트나 스트리밍을 할 때 사용 가능할 때마다 Wi-Fi를 사용하세요.
  • 이동 중에 이 폰에서 과도한 데이터 사용량이 발생하지 않도록 미리 동영상, 지도 또는 음악을 다운로드하세요.
  • 통신사 앱이나 웹사이트에서 데이터 잔액을 확인하는 방식으로 정기적으로 남은 데이터 양을 체크하세요.

Strategies to Save Your Data

eSIM으로 WhatsApp을 사용할 수 있나요?

물론이죠! eSIM으로 WhatsApp을 사용할 수 있습니다 어디에 계시든 언제나 연결을 유지하세요. 여행 중 메시지를 보내거나 전화를 걸고 사진과 동영상을 공유하는 경우, 안정적인 데이터 접속만 있다면 WhatsApp은 여행 중에도 정상 작동합니다. 본 글에서는 eSIM과 함께 WhatsApp을 사용할 때 얻을 수 있는 이점과 기억해두면 유용한 조언들을 알아보실 수 있습니다. 

eSIM으로 WhatsApp을 사용하는 장점

당신은 당신의 기기와 함께 WhatsApp을 사용할 수 있습니다 roAmigo eSIM 여행 중에 높은 로밍 요금 걱정 없이 연결 상태를 유지할 수 있습니다. 주요 혜택은 다음과 같습니다:

  • roAmigo eSIM은 데이터 통신을 통해 작동하므로 추가 요금 없이 WhatsApp으로 국제 전화를 걸고 메시지를 보낼 수 있습니다.
  • 동일한 WhatsApp 번호를 유지하여 어디에 계시든 모든 채팅 기록과 연락처가 변경 없이 그대로 보존되도록 하세요.
  • eSIM을 사용하면 휴대폰에 물리적인 SIM 카드 없이 WhatsApp을 이용할 수 있으며, 여행 중에도 모바일 데이터나 Wi-Fi를 통해 계속 연결 상태를 유지할 수 있습니다.
esim whatsapp

기억해 두셔야 할 점

  • 휴대폰에서 WhatsApp이 모바일 데이터를 사용하도록 설정되어 있는지 확인하세요. 데이터 사용 설정이 제대로 구성되어 있지 않다면 eSIM을 사용 중이더라도 정상 작동하지 않습니다.
  • WhatsApp에서 전화를 걸거나 받으려면 상대방이 해당 앱을 설치하고 인터넷에 연결되어 있어야 합니다.
  • 주 통신사의 로밍 요금이 청구되는 것을 방지하려면 Holafly eSIM을 사용하는 동안 기본 SIM을 반드시 꺼주세요.
  • 중국 등 국가로 여행하실 경우 VPN을 사용 중이시더라도 현지 인터넷 규제로 인해 WhatsApp이 차단될 수 있습니다.

문제 해결 팁

eSIM으로 WhatsApp을 사용할 수 없는 경우, iPhone 또는 Android 기기에서 해당 앱이 모바일 데이터를 사용하도록 설정되었는지 확인하려면 다음 단계를 따르세요:
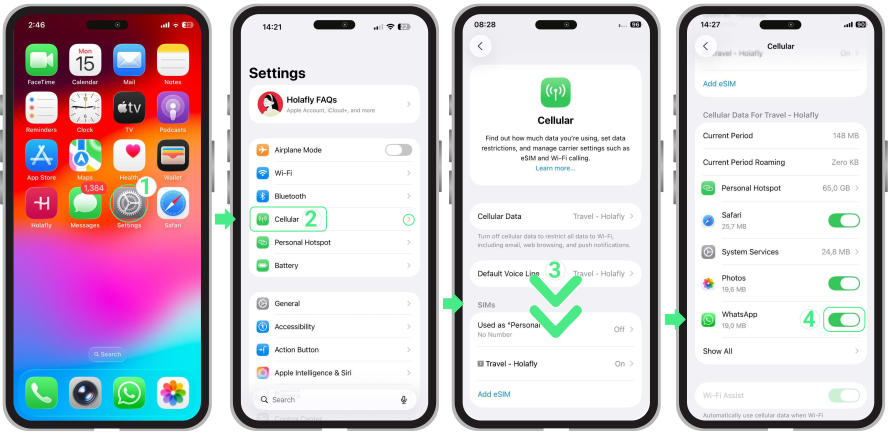
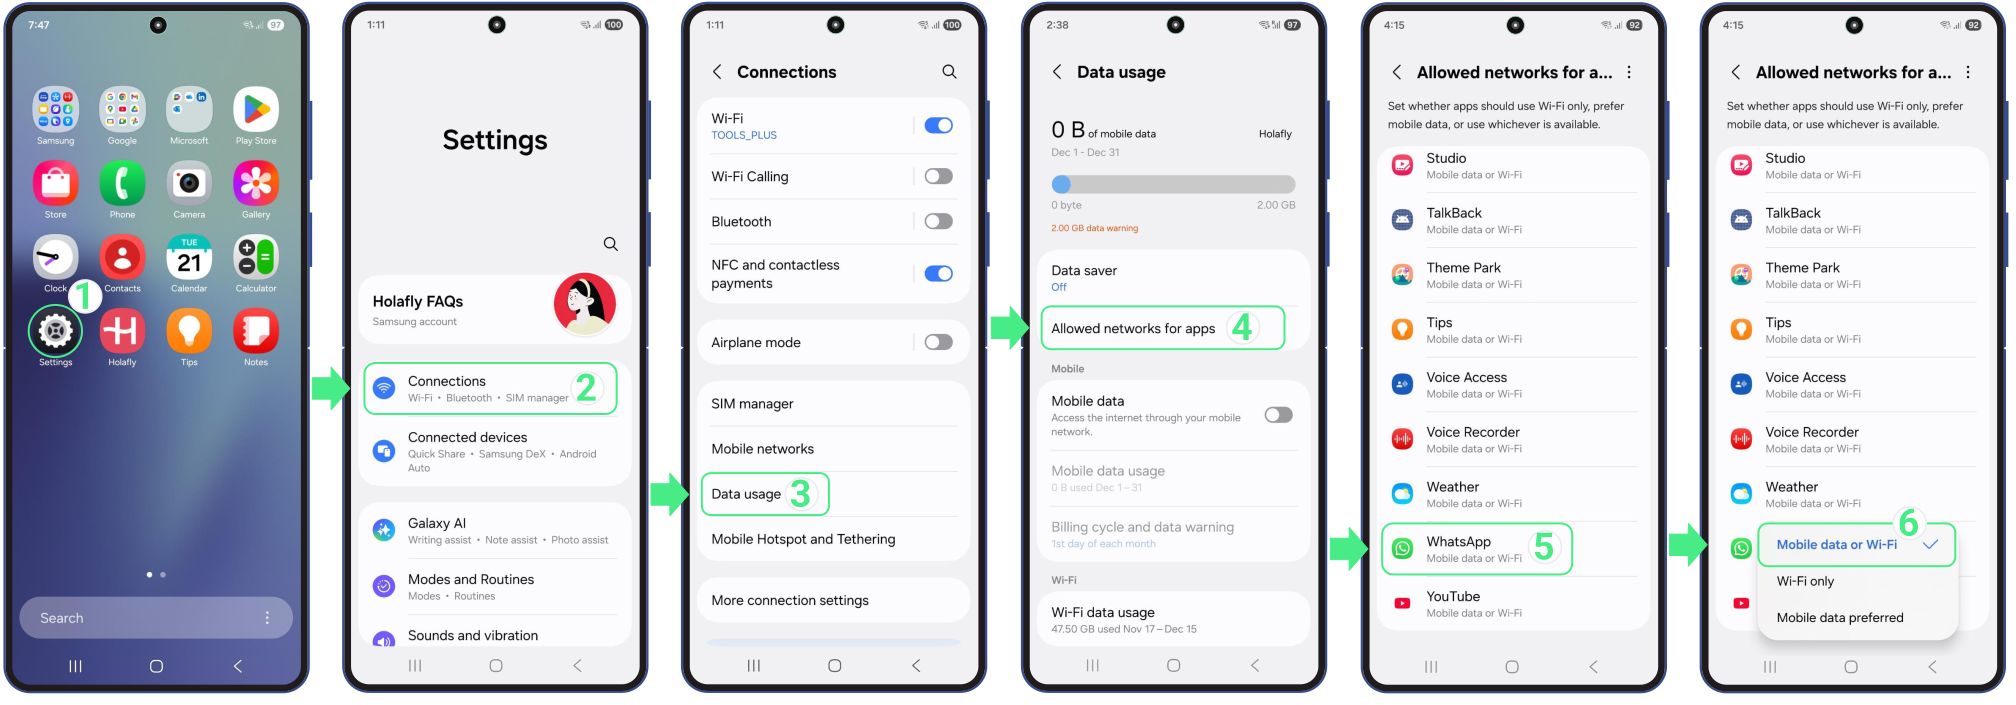
아이폰에서 모바일 데이터로 WhatsApp을 사용하려면:

  • 이동하세요 설정 → 선택 셀룰러 → 아래로 스크롤하여 찾으세요 전체 보기 옵션 → 그런 다음 아래로 스크롤하여 해당 내용을 찾으세요 WhatsApp 앱 → 다음인지 확인하세요 WhatsApp 버튼은 초록색입니다, 이 앱의 모바일 데이터가 정상적으로 작동하는지 확인하기 위해 활성화됨; 그렇지 않다면 활성화하세요.

To use WhatsApp with mobile data on iPhone:

Android에서 모바일 데이터로 WhatsApp을 사용하려면:

  • 이동하기 설정 → 선택 연결 제품 → 탭하세요 데이터 사용량 → 그 다음에 앱에서 허용되는 네트워크 → 찾을 때까지 아래로 스크롤하세요 WhatsApp 앱 → 탭하세요 WhatsApp 앱 → 다음 사항을 확인하세요 모바일 데이터 or 와이파이 옵션이 선택되었습니다.

To use WhatsApp with mobile data on Android:

roAmigo eSIM을 충전할 수 있나요?

아니요. roAmigo는 제품 구조를 업데이트했으며, 기존 충전이나 데이터 재로드는 더 이상 사용할 수 없습니다.

하지만 이에는 큰 장점이 있습니다: roAmigoeSIM은무제한 데이터구매 시 선택한 특정 일수 동안 제공됩니다. 즉, 여행 중 데이터가 다 떨어질 일이 전혀 없고, 남은 데이터 기가바이트를 계속 확인하거나 여행 중 추가 데이터를 구매할 방법을 찾는 번거로움이 사라집니다.

여행이 연장되거나 더 많은 일수가 필요한 경우, 기존 eSIM 충전을 사용하는 대신 목적지에 맞는 새 eSIM 요금제를 구매해야 합니다. 이에는 다음이 필요하다는 점을 유의해 주세요:새 eSIM 프로필을 기기에 설치하는 것이며, 다음 단계를 통해 간편하게 관리할 수 있습니다.

연결이 끊기지 않고 새 요금제로 전환하는 방법

  • 현재 요금제가 만료되기 24시간 전에 새 eSIM을 구매하세요.
  • 기존 eSIM이나 호텔 Wi-Fi를 이용해 인터넷에 연결된 상태에서 새 eSIM 프로필을 설치하세요.
  • 새 회선은비활성화된 상태로현재 요금제가 만료될 때까지 기기 설정에 유지하세요.
  • 기존 요금제가 만료되면 기존 eSIM을 비활성화하고 새 eSIM을 활성화하세요.
  • 만약 기존 eSIM을 삭제하려는 경우기존 eSIM을 삭제하려면, 항상 만료된 프로필을 삭제하는지 다시 확인해야 합니다. 새 eSIM을 실수로 삭제하면 복구할 수 없으니 주의해 주세요.

전문가 팁:수동 충전과 갑자기 연결이 끊어질 위험을 피하기 위해, eSIM 충전 방법을 찾는 많은 여행자는월간 eSIM 요금제.이 요금제는 매달 자동으로 갱신되므로, 요금제 만료, 수동 구매 누락 또는 전환 과정의 설정 오류로 데이터가 다 떨어질 일이 전혀 없습니다.

내 eSIM은 언제 활성화되며, 언제 시작되나요?

귀하의 데이터 요금제는 여행 목적지에서 Holafly eSIM의 로밍 데이터를 활성화하는 순간 시작됩니다. 기억해 주세요: 설치와 활성화는 다릅니다! 그래서, 언제 eSIM을 활성화해야 할까요? eSIM은 여행 전에 설치할 수 있지만, 목적지에 도착한 후 활성화하는 것이 가장 좋습니다. 자세한 내용을 살펴보겠습니다.

기억해 두세요

iPhone 또는 iPad를 사용하는 경우, iOS 16.4 이상 버전에서는 설치 및 활성화가 결합될 수 있으니 유의하세요 설치 및 활성화. 그래서 자동 활성화를 피하려면 데이터 요금제를 활성화할 준비가 될 때까지 설치를 기다리세요.
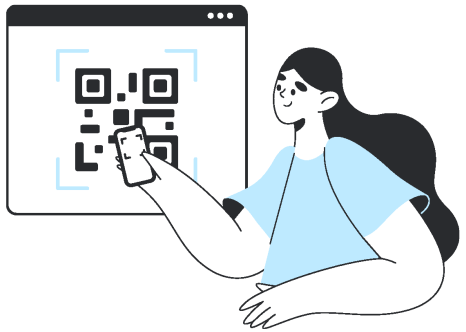
When to activate your eSIM.

문제 해결 팁

내 데이터 요금제가 활성화되었는지 어떻게 알 수 있나요?

모든 eSIM 및 현재 상태에 대한 자세한 정보를 확인하려면 앱을 통해 roAmigo 계정에 로그인할 수 있습니다. 데이터 요금제가 활성화되었는지 확인하려면 다음 단계를 따르세요:

  • roAmigo 웹사이트로 이동하세요 → 탭 구매 내역 → 여기에서 다음을 확인할 수 있습니다: 상태 귀하의 eSIM 상태 (설치 대기 중, 설치 완료 – 사용 가능, 또는 설치 완료 – 사용 중)  → 귀하의 eSIM에 “사용 중”으로 표시되어 있다면 데이터 요금제가 활성화된 상태입니다. 사용 내역 세부 정보를 보려면 탭하세요. 


만약 eSIM이 이미 활성화되었지만 아직 목적지에 도착하지 않았다면 걱정하지 마세요. 모든 것이 정상인지 확인하려면 휴대폰에서 roAmigo eSIM의 데이터 로밍을 끄기만 하면 됩니다.

핫스팟 활성화 및 데이터 공유 방법

많은 Holafly eSIM은 핫스팟 기능을 활성화하여 데이터를 공유할 수 있습니다. 간단히 eSIM을 활성화한 뒤 기기의 핫스팟을 켜기만 하면 됩니다. 이 가이드에서는 iPhone과 Android 기기 모두에서 핫스팟을 켜는 방법과 핫스팟에 연결하는 방법을 안내해 드립니다. 또한 Holafly eSIM이 핫스팟을 지원하는지 확인하는 방법과 효율적인 사용 팁도 알아보실 수 있습니다. 

iPhone에서 핫스팟을 켜는 방법은 무엇인가요?

Holafly eSIM으로 iPhone의 핫스팟 기능을 활성화하려면 다음 간단한 단계를 따르세요:
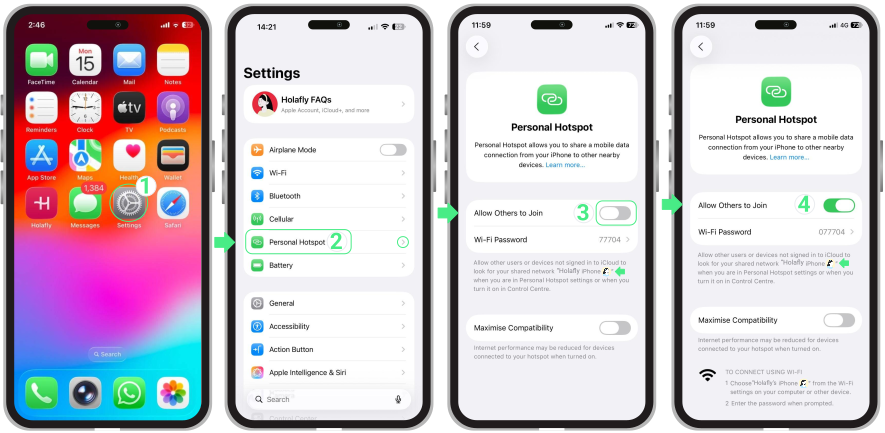

  • 로 이동하세요 설정 → 탭하세요 개인용 핫스팟 → “ 옆에 있는 스위치를 전환하세요다른 사용자가 참여하도록 허용로 켜짐 → 핫스팟이 이제 활성화되었습니다. 개인용 핫스팟 메뉴에 표시된 Wi-Fi 네트워크 이름을 사용하여 다른 기기를 연결할 수 있습니다.

How to Turn ON Hotspot on iPhone?

안드로이드에서 핫스팟을 켜는 방법은 무엇인가요?

Android 기기에서 핫스팟 기능을 활성화하려면 다음 간단한 단계를 따르세요:
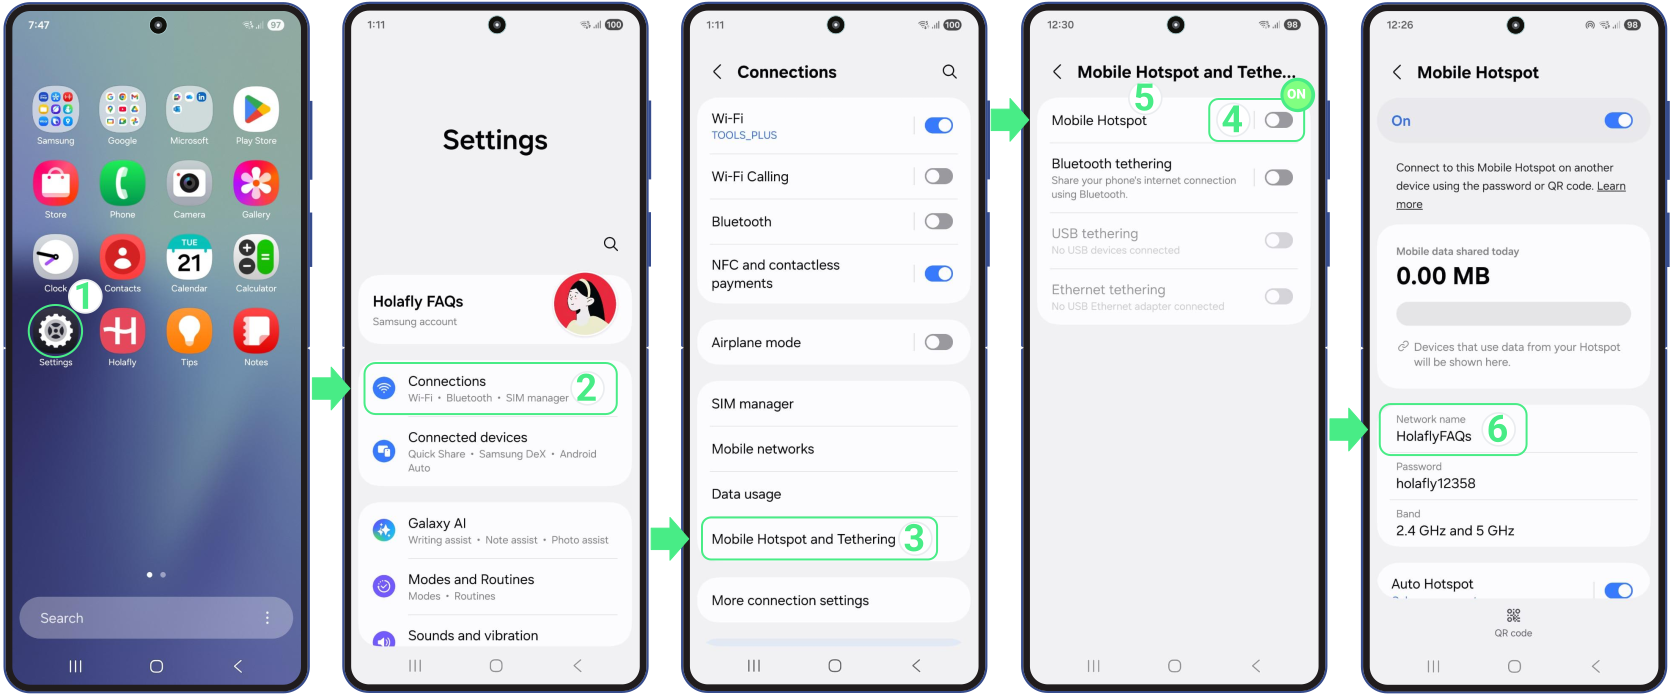

  • 이동하세요 설정 → 탭하세요 연결 → 모바일 핫스팟 및 테더링 → 모바일 핫스팟 → 모바일 핫스팟 스위치를 전환하여 켜짐 → 사용자님의 핫스팟이 이제 활성 그리고 ~할 준비가 되어 기기 연결 → 탭하세요 모바일 핫스팟 를 보려면 와이파이 비밀번호 그리고 네트워크 이름, 데이터 공유를 위해 기기에 할당한

How to Turn ON Hotspot on Android?

문제 해결 팁:

  • 요금제의 기술 사양을 확인하여 방문지에서 핫스팟 사용이 허용되는지 꼭 확인하세요.
  • Holafly eSIM 핫스팟이 작동하지 않을 경우 비행기 모드를 켰다 꺼본 뒤 기기를 재시작하고 다시 연결해 보세요. 추가 도움이 필요하시면 저희 문제 해결 가이드를 확인하세요 iPhone or 안드로이드.

Holafly 요금제에 핫스팟이 포함되어 있는지 확인하려면:

  • 로 이동하세요 Holafly.com → 표시된 검색창에 목적지를 입력하세요 어디로 여행 가세요? → 그런 다음, 을 탭하세요 검색 플랜 버튼 → eSIM 대상 페이지에 접속하신 후, 해당 항목이 보일 때까지 아래로 스크롤하세요 (귀하의 여행지)에서 Holafly eSIM을 사용하는 장점 → 혜택 카드가 보일 때까지 조금 더 스크롤하세요 → 카드를 왼쪽으로 스와이프하여 다음과 같은 문구가 적힌 카드를 찾을 때까지 진행하세요 가족 및 친구와 데이터를 공유하세요 → 해당 곳에서 하루에 공유할 수 있는 데이터 용량(MB 단위)을 확인하실 수 있습니다.

To check if your Holafly plan includes hotspot:

휴대폰을 핫스팟으로 사용하면 전체 데이터 사용량에 추가되며, 때로는 그 영향이 상당히 클 수 있다는 점을 기억하세요. 특히 여러 기기가 연결된 경우 이 추가 사용량이 항상 명확하게 드러나지는 않습니다. 이 점을 고려하여 계산에 반영하려면 데이터 사용량 예측기 그리고 핫스팟을 사용하는 데 소요되는 시간도 포함하세요.

내 eSIM을 듀얼 SIM으로 사용할 수 있나요?

네, eSIM을 다음과 같이 사용할 수 있습니다: 듀얼 SIM 기능을 지원하는 경우 가능합니다. 듀얼 SIM 기능을 사용하면 물리적 SIM과 eSIM을 동시에 활성화할 수 있습니다. 모든 듀얼 SIM 기기가 eSIM과 함께 듀얼 SIM을 지원하는 것은 아니므로 기기에서 eSIM과 듀얼 SIM을 지원하는지 확인하는 것이 중요합니다. eSIM 호환입니다. 전화의 기술 사양을 확인하고 통신사와의 호환성을 확인하세요. 이 글에서는 eSIM을 듀얼 SIM으로 사용하는 장점과 설정 팁에 대해 자세히 알아볼 수 있습니다. 계속 읽어서 알아야 할 모든 것을 알아보세요! 

eSIM과 듀얼 SIM 사용의 장점:

이 기능은 특히 자주 여행하는 사람들에게 유연성과 편의성을 제공합니다:
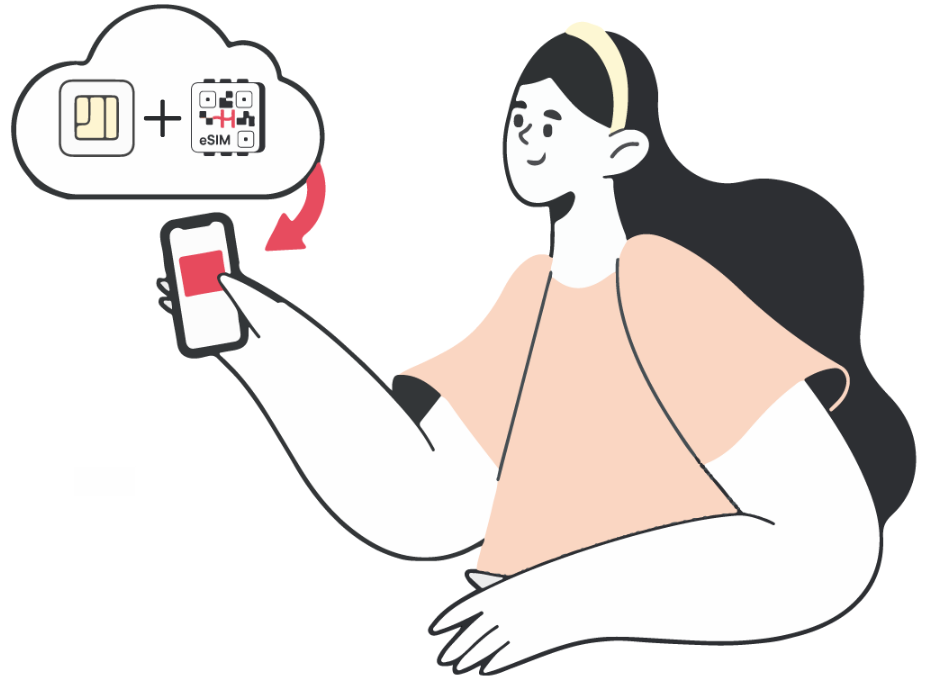

  • eSIM으로 국제 요금제를 사용하는 동안 지역 번호를 활성 상태로 유지하세요. 
  • 여러 대의 휴대폰 없이 하나의 기기에서 두 개의 번호를 관리할 수 있습니다.
  • 통신사를 쉽게 전환할 수 있어 더 나은 요금을 이용하거나 로밍 요금을 피하기에 이상적입니다.

기억해야 할 점

  • 휴대폰이 eSIM 기술을 사용한 듀얼 SIM을 지원하는지 확인하세요.
  • 각 SIM을 특정 작업에 수동으로 할당하세요, 예를 들어 다음과 같이: 하나는 통화용, 다른 하나는 데이터용으로.
  • 일부 네트워크는 모든 지역에서 두 SIM을 동시에 사용하는 것을 지원하지 않을 수 있습니다.
  • 한 번에 하나의 SIM만 모바일 데이터를 사용할 수 있습니다.
  • 각 SIM의 요금제와 충전은 별도로 관리해야 합니다.
  • 해외에서 주 SIM을 활성 상태로 두면 귀하의 본국 통신사에서 로밍 요금이 발생할 수 있습니다. 그들은 또한 귀하의 개인 회선(Holafly가 아닌)으로 통화나 문자에 대해 추가 요금을 부과할 수 있습니다.  예상치 못한 요금을 피하기 위해 사전에 확인하는 것이 좋습니다.
  • 두 개의 통신사를 사용하려면 다음이 필요합니다: 잠금 해제된기기.


문제 해결 팁

통신사의 데이터 로밍 요금을 피하려면 다음과 같이 하세요: SIM에 라벨을 붙이세요, 하나는 통화용, 다른 하나는 데이터용으로 사용하세요. 통화는 물리적 SIM에 두고 모바일 데이터는 Holafly 같은 eSIM으로 유지하세요. 또한 모바일 데이터 전환을 비활성화하여 Holafly의 데이터만 사용하세요.

두 개의 eSIM을 동시에 사용할 수 있나요?

예, 기기가 듀얼 eSIM을 지원한다면 iPhone 13 및 이후 모델과 같이 두 개의 eSIM을 동시에 쉽게 사용할 수 있습니다. 반대로, eSIM을 지원하는 Android 기기는 여러 개의 eSIM 프로필을 저장할 수 있지만, 동시에 활성화할 수 있는 것은 하나뿐입니다. 모델별로 사양이 다를 수 있으니 유의하세요.

여러 개의 eSIM을 활성화하는 이점

듀얼 eSIM 기능을 사용하는 이점을 알아보세요:


  • 듀얼 SIM iPhone에서 eSIM 프로필을 쉽게 전환하고 어디에서든 연결 상태를 유지하세요!
  • 개인 eSIM으로 통화 및 문자 메시지를 보내고, Holafly eSIM으로는 무제한 데이터를 이용할 수 있어 두 가지를 모두 활용하세요!
  • 번거로움 없는 의사소통을 위해 개인 생활과 업무 생활을 분리하세요!
  • 여러 개의 eSIM으로 걱정 없이 여행하세요.

어떤 기기가 eSIM을 지원하는지 확인하세요—지금 목록을 확인하세요!


유의해야 할 사항

  • 설정하기 전에 기기가 지원할 수 있는 eSIM의 개수 를 확인하세요.
  • 해외에 있는 동안 개인 회선으로 통화나 문자 메시지(SMS)를 보내면 통신사(Holafly가 아님)에서 추가 요금을 부과할 수 있다는 점을 기억하세요. 놀라움을 피하기 위해 미리 통신사에 확인하는 것이 좋습니다!
  • 두 개의 eSIM을 활성화하려면 '셀룰러 데이터 전환 허용'을 끄세요—하나는 통화용, 하나는 데이터용으로 사용하세요.
  • 한 번에 모바일 데이터를 처리할 수 있는 eSIM은 하나뿐입니다.
  • 기기는 잠금 해제되어야 여러 통신사의 eSIM을 동시에 사용할 수 있습니다.

문제 해결 팁

iPhone 듀얼 eSIM 기능 설정 방법:

  • 다음으로 이동하세요 설정 → 탭하세요 셀룰러 또는 모바일 데이터 → 개인 eSIM과 Holafly eSIM이 모두 활성화되어 있는지 확인하세요 →선택하세요 기본 음성 회선 → 선택하세요 개인 회선 → 다시 이동하세요 셀룰러 또는 모바일 데이터 → 탭하세요 셀룰러 데이터 와 Holafly eSIM을 선택하세요 → 마지막으로, “모바일 데이터 전환 허용” 꺼져 있어야 기기가 신호 강도에 따라 데이터 회선을 자동으로 전환하지 않습니다.

참고: 해외에서 이 서비스(통화)를 사용할 때 부과될 수 있는 추가 요금에 대해 개인 통신사에 연락하여 확인하세요.
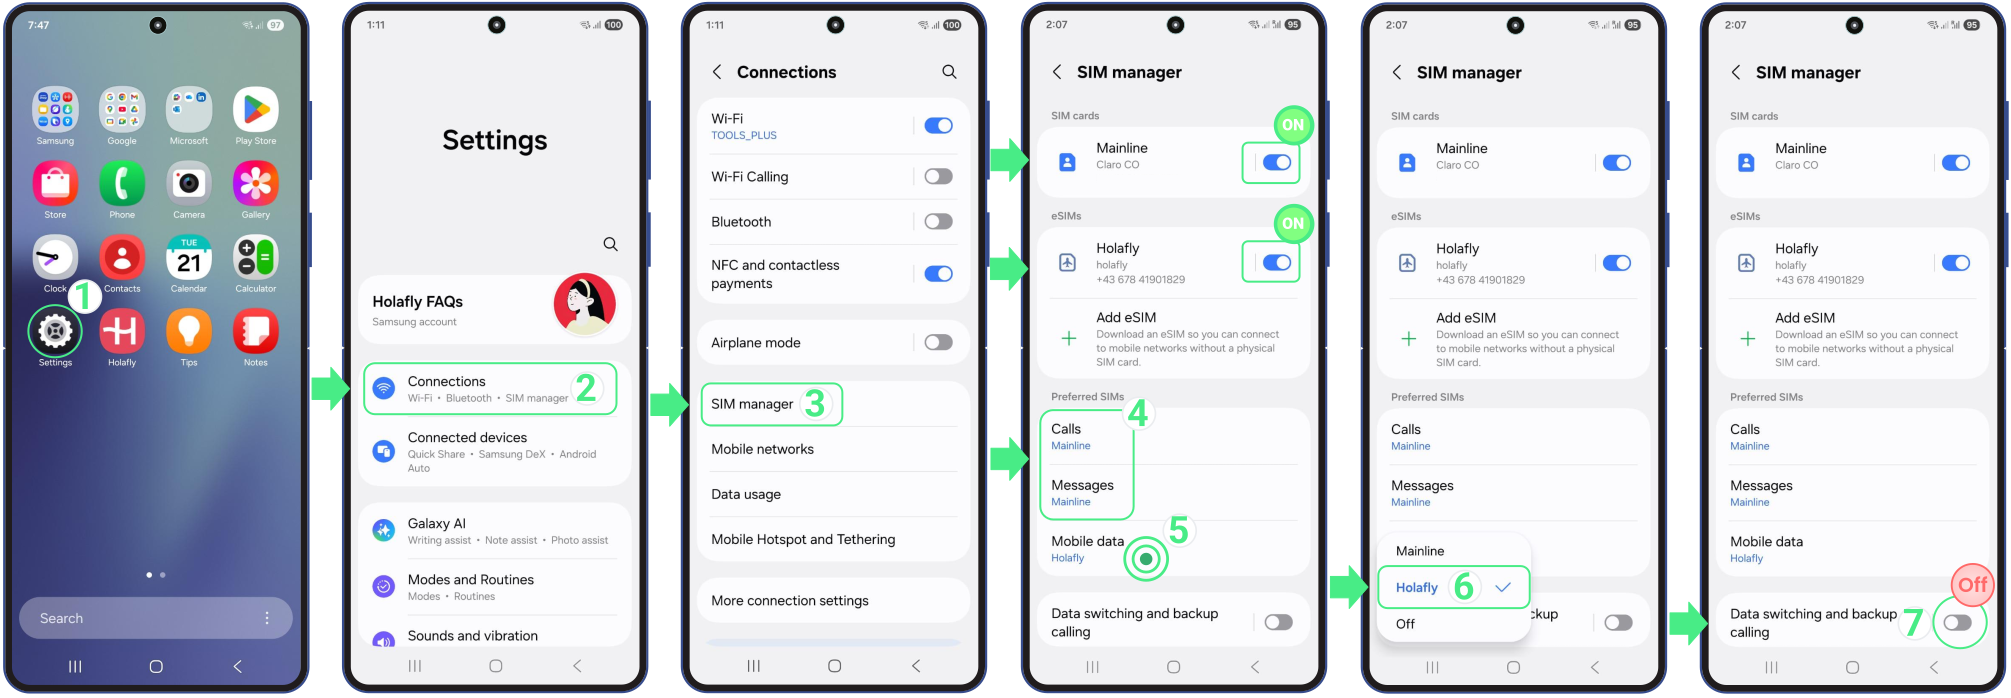

Troubleshooting Tips

Android 듀얼 SIM 기능 설정 방법:

Android 기기는 두 개의 eSIM을 동시에 사용할 수 없지만, 물리적 SIM과 하나의 eSIM을 함께 사용할 수 있습니다. Holafly eSIM으로 데이터를 이용하고 개인 SIM으로 통화와 문자 메시지를 받으려면 다음 단계를 따르세요.


  • 다음으로 이동하세요 설정 → 탭 연결 → 선택하세요 SIM 관리자 → 개인 SIM과 eSIM이 모두 활성화되어 있는지 확인하세요 → 선택하세요 통화 를 선택하고 개인 SIM이 선택되었는지 확인하세요 → 그 다음 탭하세요 모바일 데이터 와 당신의 Holafly eSIM → 마지막으로, “데이터 전환 및 백업 통화” 꺼져 있어야 기기가 신호 강도에 따라 데이터 회선을 자동으로 전환하지 않습니다.

참고: 해외에서 이 서비스(통화)를 사용할 때 부과될 수 있는 추가 요금에 대해 개인 통신사에 연락하여 확인하세요.


To Set Up Your Android Dual SIM Function:

아직도 의문이 있다면, Android에서 SIM과 eSIM을 동시에 사용하는 방법을 보여주는 동영상이 있습니다!

eSIM을 삭제하는 방법은 무엇인가요?

eSIM 삭제 방법이 궁금하다면 몇 단계만으로 휴대폰 설정에서 직접 할 수 있습니다. 이 기기에서 모바일 플랜이 제거되므로 삭제하기 전에 더 이상 필요하지 않은지 확인하세요. 아래에서 iPhone과 Android의 정확한 단계를 확인할 수 있습니다.

iPhone에서 eSIM 삭제하는 방법?

iPhone에서 eSIM을 삭제하려면, 다음 단계를 따르세요:

  • 로 이동합니다 설정 → 탭합니다 셀룰러 또는 모바일 서비스 → 원하는 eSIM 삭제하려는 것 → 아래로 스크롤하여 탭합니다 eSIM 삭제 →  프롬프트가 표시되면 두 번 확인하세요.

 Android에서 eSIM 제거하는 방법?

Android 기기에서 eSIM을 제거하려면 다음 단계를 따르세요:
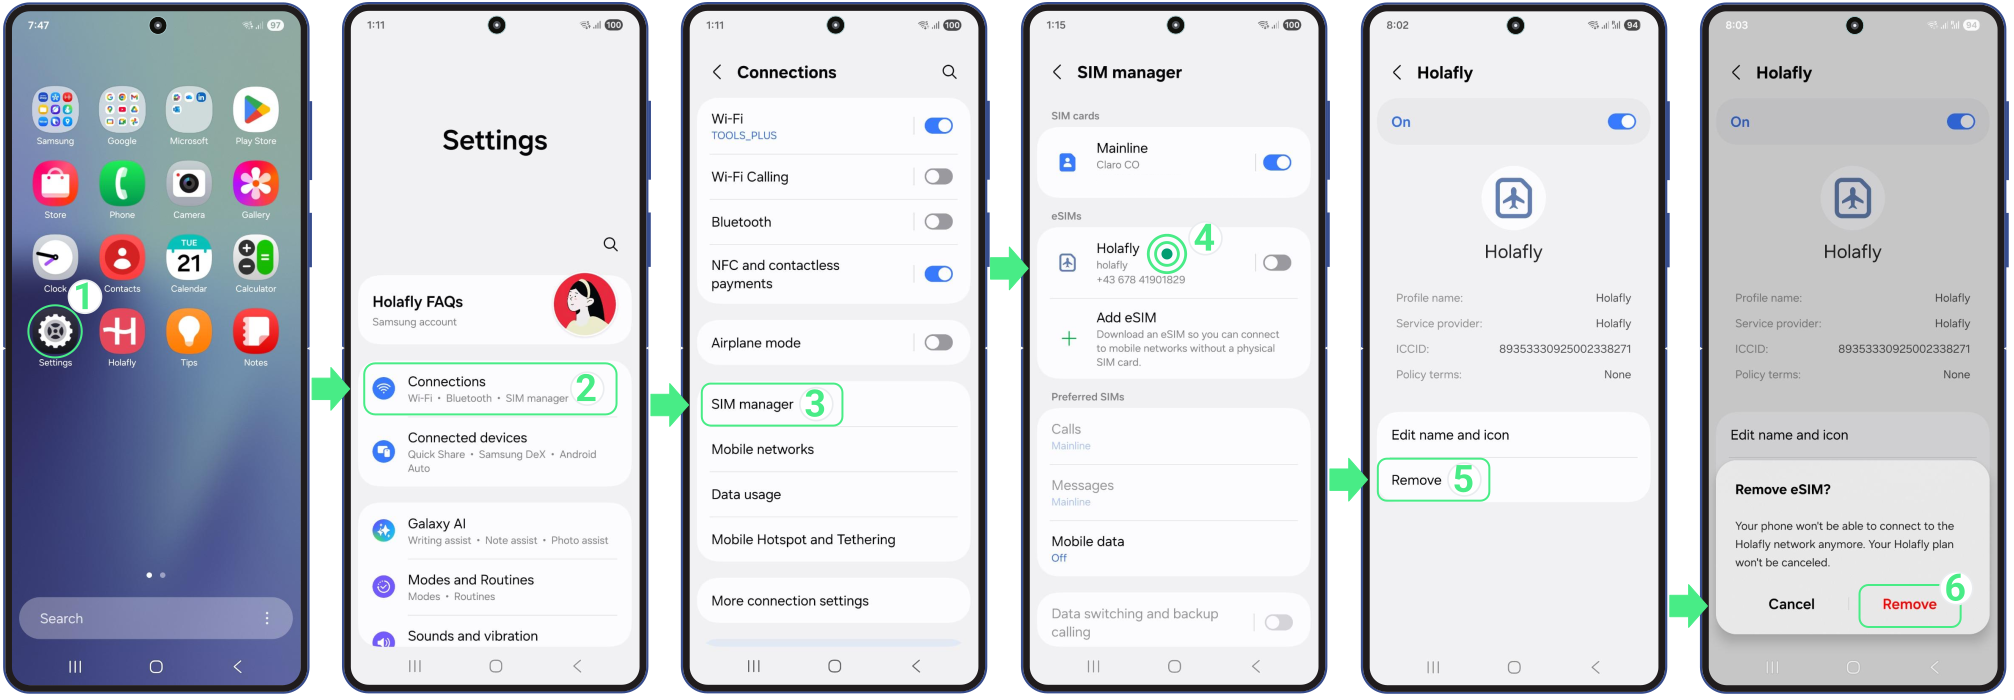

  • 로 이동합니다 설정 → 탭합니다 연결 → 선택합니다 SIM 관리자 → 다음을 탭합니다 eSIM 제거하려는 것 → 탭합니다 제거 → 다음을 탭하여 확인합니다 제거 다시.

문제 해결 팁

iPhone에서 eSIM을 삭제해도 eSIM 목록에 계속 표시될 수 있습니다. 아래는 이 경우 해결 방법입니다:
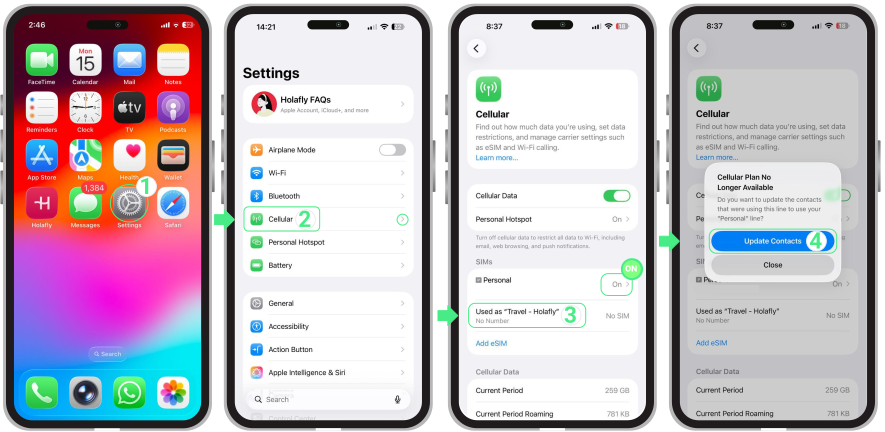
  • 로 이동합니다 설정 → 탭합니다 셀룰러 → 개인 회선이 켜져 있는지 확인합니다 켜짐 → 삭제된 eSIM 항목을 탭합니다 → 탭합니다 연락처 업데이트 →이렇게 하면 회선과 연결된 연락처 정보가 새로고침되고 목록에서 남은 eSIM이 완전히 제거됩니다.

Troubleshooting tips

만약 연락처 업데이트 옵션이 나타나지 않는 경우:

  • 휴대폰에서 다른 SIM 또는 eSIM 회선(백업 회선)을 켜고 다시 시도하세요.
  • 항목을 다시 탭한 다음 연락처 업데이트를 선택하세요.

핫스팟 활성화 및 데이터 공유 방법

많은 roAmigo eSIM은 핫스팟 기능을 활성화해 데이터를 공유할 수 있게 해줍니다. eSIM을 활성화하고 기기에서 핫스팟을 켜기만 하면 됩니다. 이 가이드는 아이폰과 안드로이드 모두에서 핫스팟을 켜는 방법과 핫스팟에 연결하는 방법을 보여줄 것입니다. 또한 Holafly eSIM이 핫스팟을 지원하는지 확인하는 방법과 효과적인 사용 팁도 배울 수 있습니다.

아이폰에서 핫스팟 켜는 방법?

이 간단한 단계를 따라 로Amigo eSIM으로 아이폰의 핫스팟 기능을 활성화하세요:

  • 다음으로 이동하세요 설정 → 다음을 탭하세요 개인용 핫스팟 → 다음의 스위치를 토글하세요 “다른 사람이 가입할 수 있도록 허용”를 켬 → 이제 핫스팟이 활성화되었습니다. 개인용 핫스팟 메뉴에 표시된 Wi-Fi 네트워크 이름을 사용해 다른 기기에 연결할 수 있습니다.

안드로이드에서 핫스팟 켜는 방법?

안드로이드 기기에서 핫스팟 기능을 활성화하려면 다음 간단한 단계를 따르세요:

  • 이동하세요 설정 → 탭하세요 연결 → 모바일 핫스팟 및 테더링 → 모바일 핫스팟 → 모바일 핫스팟 스위치를 다음으로 토글하세요 켬 → 이제 핫스팟이 활성화되었으며 연결할 준비가 되었고 기기를 연결할 수 있습니다 → 탭하세요 모바일 핫스팟 를 탭하면  Wi-Fi 비밀번호 및  네트워크 이름, 데이터 공유를 위해 기기에 할당한 이름입니다.
How to Turn ON Hotspot on Android?

문제 해결 팁:

  • 플랜의 기술 사양을 확인하여 목적지에서 핫스팟 사용이 허용되는지 확인하세요.
  • 만약 Holafly eSIM 핫스팟이 작동하지 않는다면 비행기 모드를 켜고 끈 다음 기기를 재시작하고 다시 연결해 보세요. 더 자세한 도움이 필요하면 다음의 문제 해결 가이드를 확인하세요 아이폰 또는 안드로이드.

Holafly 플랜에 핫스팟이 포함되어 있는지 확인하려면:

  • 다음으로 이동하세요 Holafly.com → “어디로 여행하시나요?” 라고 표시된 검색창에 목적지를 입력하세요 “어디로 여행하시나요?” → 그다음, 다음을 탭하세요 플랜 검색 버튼을 클릭하세요 →eSIM 목적지 페이지에 들어가면 다음을 볼 때까지 아래로 스크롤하세요 “귀하의 목적지에서 Holafly eSIM을 사용하는 장점” →장점 카드를 볼 때까지 조금 더 아래로 스크롤하세요 →카드를 왼쪽으로 스와이프하여 다음을 적힌 카드를 찾으세요 “가족 및 친구와 데이터를 공유하세요” →거기에서 하루에 공유할 수 있는 데이터 양(MB)을 확인할 수 있습니다.

To check if your Holafly plan includes hotspot:

휴대폰을 핫스팟으로 사용하면 데이터 총 소모량이 증가한다는 것을 기억하세요, 때로는 상당히 많이 증가하기도 합니다. 이 추가 사용량은 특히 여러 기기가 연결된 경우 항상 명확하지는 않습니다. 이를 고려하려면 다음을 사용하세요 데이터 사용량 추정기 그리고 핫스팟을 사용할 시간을 포함하세요.

eSIM으로 통화할 수 있나요?

eSIM으로 전화를 할 수 있나요?

여행을 준비할 때 여행자들이 가장 많이 하는 질문 중 하나는: eSIM으로 전화를 할 수 있나요? 간단한 답은 네, 하지만 더 스마트한 방식으로 가능합니다.


우리의 eSIM은 데이터만 제공되므로, SMS나 아날로그 전화를 받을 임시 지역 전화번호를 받을 수 없다는 뜻입니다. 대신, 무제한 데이터를 사용하여 WhatsApp, FaceTime, Messenger 같은 인기 있는 데이터 통화 앱을 통해 선명한 음성 및 영상 통화를 할 수 있습니다. 비싼 로밍 분당 요금을 지불하지 않고 연결을 유지하는 현대적인 방법입니다. 여기 알아야 할 모든 정보가 있습니다.

데이터 전용 eSIM으로 전화는 어떻게 작동하나요?

생각보다 간단합니다. 전화와 문자 서비스가 포함된 기존 eSIM 요금제는 표준 음성 네트워크에 의존하지만, 데이터 전용 eSIM은 다르게 작동합니다: 모든 통화가 인터넷을 통해 이루어집니다.


아날로그 분당 요금이나 전화번호를 사용하는 대신, 인터넷 기반 앱을 통해 전화를 겁니다. 이 방식으로 비싼 로밍 요금을 피하고 친구와 가족과 원활하게 소통을 계속할 수 있습니다.

데이터 전용 eSIM을 사용할 때 전화를 거는 방법

여행 시 eSIM으로 전화를 거는 두 가지 간단한 방법이 있습니다. 앱에 전적으로 의존하거나, eSIM을 데이터로 사용하는 동안 기존 SIM을 음성용으로 활성화해 둘 수 있습니다. 두 방법 모두 작동합니다. 어떤 방법이 당신의 여행에 가장 적합한지 알아보려면 계속 읽어보세요.

여행 중 통화 앱 사용

이것이 데이터 전용 eSIM으로 여행자들이 전화를 거는 주요 방법입니다. 다음과 같은 앱들은 WhatsApp, Facebook Messenger, Telegram, 그리고 FaceTime 모바일 데이터만을 사용하여 음성 및 영상 통화를 걸 수 있게 해줍니다. 로밍 요금 없이 통화할 수 있으며 전 세계에서 작동하고, 이미 이 플랫폼들을 매일 데이터 통화로 사용하고 있다면 완벽한 선택입니다.

음성 통화에 실제 SIM 사용

많은 사람들이 개인 SIM을 전화와 SMS여행용 eSIM을 데이터로 사용하는 동안 활성화해 둡니다. 이것은 쉬운 dual SIM 설정으로, iPhone이나 Android에서 eSIM으로 전화 거는 방법을 궁금해하는 여행자들에게 인기가 있으며, 기존 번호를 계속 사용할 수 있는 편리한 방법입니다.


중요:단, 주요 SIM이 모바일 데이터로 설정되어 있지 않아도 통신사에서 음성이나 SMS 로밍 요금을 부과할 수 있음을 기억하세요. 우발적인 데이터 요금을 피하려면 개인 회선의 데이터 로밍을 비활성화해 두고 여행 중에는 eSIM이 모든 데이터 사용을 처리하도록 하세요.
앱 기반 통화가 제한될 수 있는 지역

일부 목적지에서는 지역 규정으로 인해 WhatsApp, FaceTime, Telegram, Messenger 같은 VoIP 서비스가 부분적으로 제한될 수 있습니다. 이는 eSIM 데이터가 정상적으로 작동하더라도 음성 또는 영상 통화에 영향을 미칠 수 있습니다. 이러한 제한은 다음 지역에서 흔합니다:


  • China
  • UAE/Dubai
  • Oman
  • Qatar
  • Turkey (간헐적)

일부 여행자들은 통화 기능을 복원하기 위해 VPN을 사용하지만, 합법적인 지역에서만 사용해야 합니다. VPN을 사용하기 전에 항상 지역 규정을 확인하세요.


문제 해결 팁: 

문제가 발생하면 다음과 같은 간단한 해결 방법을 시도해 보세요:

  • 통화 앱이 모바일 데이터를 사용할 권한이 있는지 확인하세요. 데이터 통화에 필수적입니다.
  • 듀얼 SIM을 사용하는 경우, eSIM 음성 및 데이터 설정에서 실제 SIM이 기본 음성 회선으로 설정되어 있는지 확인하세요.
  • 핸드폰에서 데이터 세이버/로우 데이터 모드를 끄세요. 이 설정은 통화 앱의 백그라운드 데이터를 제한하여 eSIM 통화에 방해가 될 수 있습니다.
  • 핸드폰을 재시작하여 두 회선을 새로고침하세요.
  • 다른 앱을 테스트하여 문제가 특정 서비스나 eSIM 통화 및 데이터 연결에 있는지 확인하세요.

당신의 eSIM을 삭제하지 않고 끄는 방법

eSIM을 삭제하지 않고 끄는 방법 

언제든지 휴대폰 설정에서 eSIM을 끌 수 있습니다. 이렇게 하면 해당 라인이 일시적으로 비활성화되어 모바일 데이터를 사용할 수 없게 되지만, eSIM은 기기에 안전하게 저장되므로 필요할 때 언제든지 다시 켤 수 있습니다. 이는 자국 통신사의 로밍 요금을 피하려거나 데이터 플랜을 전환하거나 여행 중 배터리를 절약하려는 경우에 유용할 수 있습니다.  


eSIM을 끄는 것은 플랜의 유효 기간이나 구독을 중지시키지 않는다는 점을 기억하세요. 플랜이 이미 활성화된 경우 eSIM이 꺼진 상태에서도 유효 기간이 계속됩니다. 아래에는 iPhone과 Android에 대한 단계별 지침과 eSIM을 최대한 활용할 수 있는 몇 가지 팁이 있습니다.

iPhone과 Android에서 eSIM 끄는 방법

iPhone인지 Android인지에 따라 절차가 약간 다릅니다. 아래에서 자신의 기기를 선택하고 단계를 따르세요.
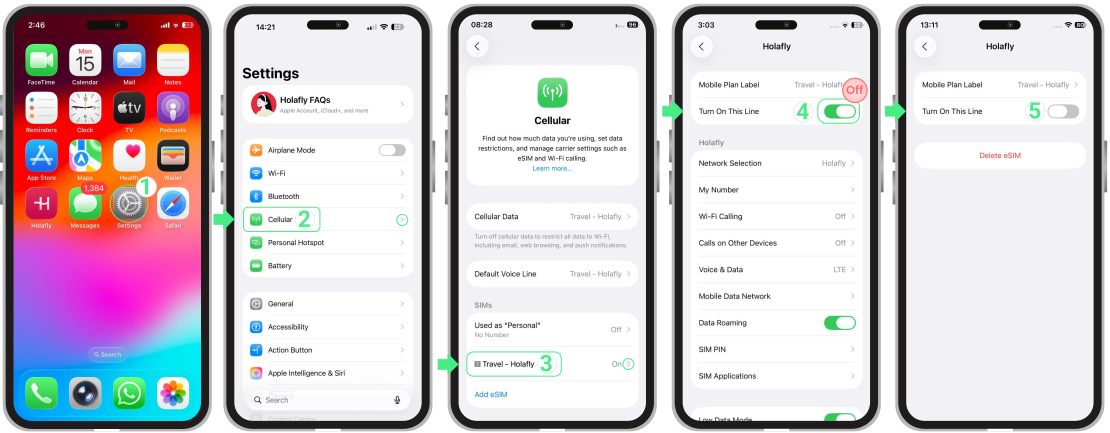
iPhone에서 eSIM 끄는 방법

  • 다음으로 이동하세요 설정 → 터치하세요 셀룰러 또는 모바일 데이터 → 끄고 싶은 eSIM을 선택하세요 → 다음 옵션을 끄십시오 이 라인 켜기 옵션입니다. eSIM은 삭제되지 않은 상태로 비활성화됩니다.

How to turn off eSIM on iPhone

Android에서 eSIM 끄는 방법

  • 다음으로 이동하세요 설정 → 터치하세요 연결 → 선택 SIM 관리자 → 끄고 싶은 eSIM의 스위치를 끄십시오. 이렇게 하면 eSIM이 기기에서 제거되지 않은 상태로 안전하게 비활성화됩니다.

How to turn off eSIM on Android

eSIM을 끄면 어떻게 되나요?

eSIM을 끄거나 비활성화하면 기기에서 라인이 유지되는 동안 데이터 사용이 일시적으로 비활성화됩니다. 즉, eSIM을 분실하지 않아도 되고 다시 설치할 필요가 없으며 플랜이나 구독이 여전히 활성화되어 있는 한 언제든지 다시 켤 수 있습니다.


eSIM을 비활성화해도 플랜의 유효 기간이나 결제 주기는 중지되지 않습니다.일일 여행 플랜이든 월간 구독이든 eSIM이 켜져 있는지 꺼져 있는지와 관계없이 활성화 순간부터 시간이 계속 카운트다운됩니다.

기억할 점

  • eSIM을 비활성화하는 것은 삭제하는 것과 같지 않습니다. 라인은 휴대폰에 유지되므로 새 QR 코드 없이 다시 사용할 수 있습니다.
  • 해외에 있는 경우 자국 통신사의 추가 요금을 피하기 위해 주 SIM을 끄세요. 집에 돌아오면 주 SIM을 다시 켜고 여행용 eSIM을 끄세요.
  • eSIM을 끄고 다시 켠 후 연결이 설정되는 데 최대 2분이 걸릴 수 있습니다. 이 과정에서 반복적으로 켜고 끄는 것은 피하세요.
  • 주 SIM을 다시 활성화할 때 기기 설정에서 수동으로 모바일 데이터, 통화 및 SMS의 기본으로 설정해야 할 수 있습니다.
  • 배터리를 절약하려면 통신이 약하거나 범위가 없는 지역(예: 비행 중)에서 eSIM을 끄세요.
  • 일부 통신사는 긴급 백업 데이터또는 플랜 만료 후에도 반복되는 혜택을 제공하기 때문에 eSIM을 삭제하는 대신 끄는 상태로 두는 것이 종종 더 좋습니다. 이렇게 하면 향후 사용할 수 있는 혜택을 분실하지 않을 수 있습니다.

구매 및 환불

환불 정책 및 절차

계획 변경이 있으신가요? 전혀 문제 없습니다! 안심하고 roAmigo eSIM을 구매하세요. 환불을 요청할 수 있는 기간은 최대 30일입니다. 

[ 환불 3가지 유형 ] 

1. 서비스 해지에 따른 환불 

계획이 변경되어 roAmigo eSIM이 더 이상 필요하지 않은 경우 전액 환불해 드립니다. 

전액 환불을 위해서는 다음 요건을 만족해야 합니다: 

  • 귀하의 eSIM이 roAmigo 웹사이트에서 구매된 것
  • eSIM의 활성화가 아직 완료되지 않은 것
  • eSIM이 이미 활성화되었거나 사용된 경우, 저희는 더 나은 해결책을 제시하기 위해 귀하의 개별 사례를 분석하겠습니다 
  • 구매 후 30일이 지나지 않은 것-

2. 기기 호환 불가 또는 잠금에 따른 환불 

구매한 eSIM이 귀하의 기기와 호환되지 않는 것으로 확인된 경우 전액 환불해 드립니다. 

귀하가 다음 사항을 충족할 경우 환불이 적용됩니다: 

  • QR 코드를 스캔하지 않은 것 
  • 해당 요금제의 데이터를 사용하지 않은 것 
  • eSIM 구매 후 6개월이 지나지 않은 것 
  • 호환 불가 또는 잠금을 확인할 수 있는 스크린샷과 필요한 정보를 제공한 것 

3. 연결 문제에 따른 환불 

roAmigo에 문제가 있거나 목적지 국가의 네트워크 인프라에 문제가 발생하여 불안정해진 경우 귀하의 eSIM이 작동하지 않을 경우, 부분 환불을 제공해 드릴 수 있습니다. 

환불을 요청하기 전에: 

  • 연결 문제를 보고하려면 저희 고객지원팀 roamigo@roamigoesim.com 또는 채팅을 통해 문의해 주세요. 
  • 여행 후에 문의하시는 경우 환불을 보장할 수 없습니다.
  • 그 외의 모든 경우에는 사용하신 데이터에 따라 부분 환불 또는 전액 환불(USD 3.50의 관리비가 부과됨)이 발행될 수 있습니다. 

[ 환불 절차 ] 

모든 것을 저희에게 맡기세요! 저희 고객지원팀 roamigo@roamigoesim.com으로 연락하시고 관련된 모든 세부 정보를 제공해 주세요. 귀하의 금액은 3~5 영업일 내에 동일한 은행 계좌로 환불됩니다. 

다음 목적지는 어디인가요?

eSIM은 언제 어디서든

빠르고 끊김 없는 인터넷 연결을 제공합니다!

eSIM 구매

도움이 필요하신가요?

걱정하지 마세요.

저희 지원팀이 도와드리겠습니다.

문의하기